 LunaPic is a free, browser-based photo editor that allows users to edit images without installing any software. Since it works fully online, it is easy, fast, and convenient to use. Because of this, many people prefer LunaPic for simple and everyday photo editing tasks. One helpful feature is background removal, which lets users highlight the main subject of an image. For instance, removing unwanted backgrounds is useful for product photos, profile pictures, social media posts, and creative designs. As a result, images look cleaner and more professional. In addition, LunaPic offers multiple ways to edit photos. You can remove the background in LunaPic using an automatic tool for quick results. Meanwhile, a manual option gives better control for detailed edits. That said, this article will guide you on how to remove background in LunaPic using different methods.
Use the Automatic LunaPic Background Removal
LunaPic recently added a new AI-powered automatic background removal tool to improve the editing experience. With this update, users can remove background from image with LunaPic in just a few clicks. As a result, the process becomes faster and easier for beginners. In addition, this tool clearly separates the main subject from the background with minimal steps. Because the system works automatically, there is no need for advanced editing skills. However, this method can be less precise with intricate backgrounds or subjects that blend into their surroundings. This means you can effortlessly remove simple backgrounds. Here are the steps you can follow to automatically remove backgrounds in LunaPic.
Step 1 Choose Image File
To start the process, access the LunaPic website. After that, click the "Upload" option in the interface's toolbar. Then, click the "Choose File" option and pick the photo you want to remove the background from. Finally, to upload the picture of your choice to the LunaPic editor, select "Open."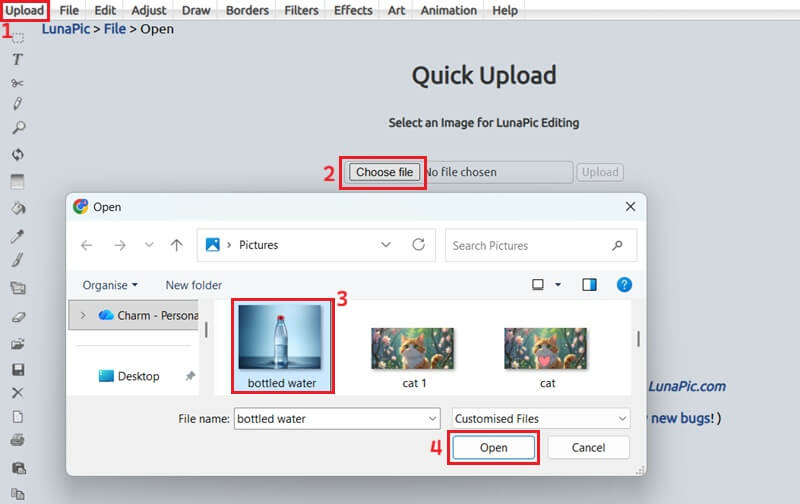
Step 2 Remove Background
Once your picture is uploaded to the LunaPic editor, click on the "Edit" option. Then, you will see the drop-down list, locate and select the "Auto Background Removal" option. Upon selecting this feature, LunaPic will automatically remove the background from your image.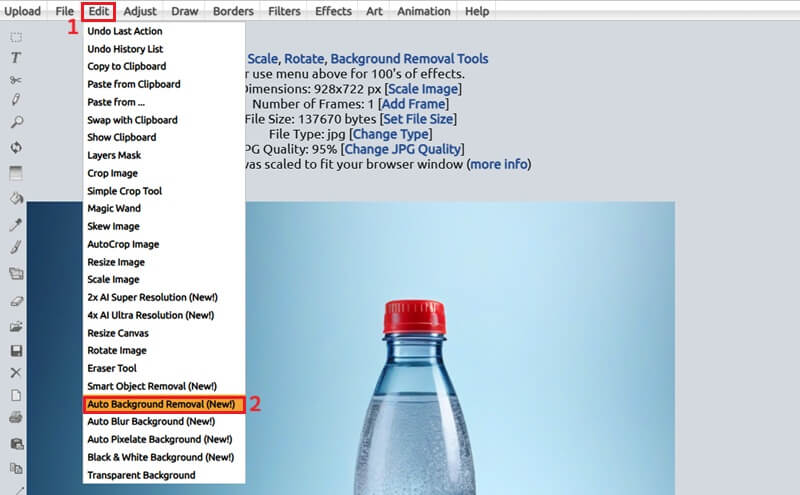
Step 3 Save and Access Image File
After the automatic process completes, you can download the edited image by clicking the "Save" button below the image. Then click the download icon in your browser's toolbar to access your image. From here, click the "Show in folder" option to locate your file.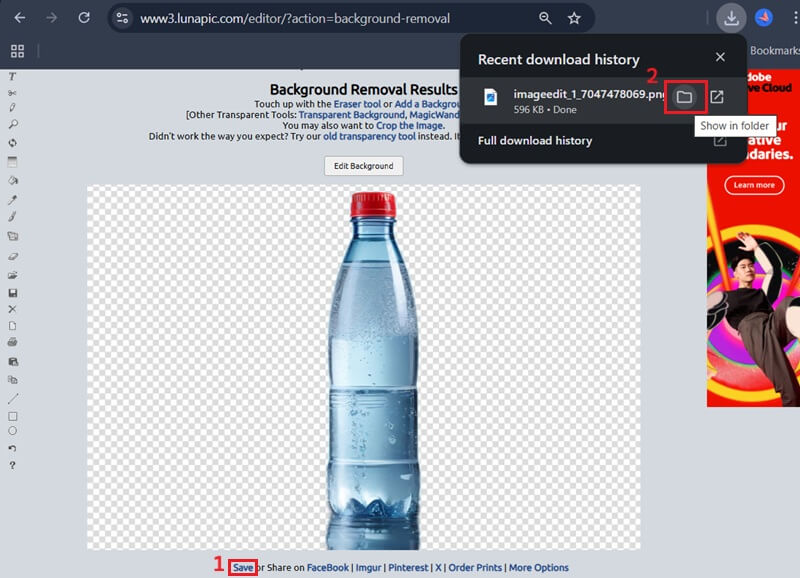
Remove Background Manually Using the Magic Wand Tool
While the automatic tool offers convenience, the Magic Wand tool of LunaPic provides more precise control for intricate selections. This is specifically useful for images with complex backgrounds or when the subject does not share similar colors with the background. Moreover, this manual approach allows greater accuracy, enabling users to isolate the main subject with greater detail. This tool also lets you remove a sticker from a photo or other object in your photos. Below is an in-depth guide on utilizing the Magic Wand tool for manual background removal in LunaPic.
Step 1 Access Magic Wand
To begin, upload your desired image to LunaPic. Once uploaded, navigate to the "Edit" menu. From the dropdown options, select the "Magic Wand" tool to activate it for selection purposes.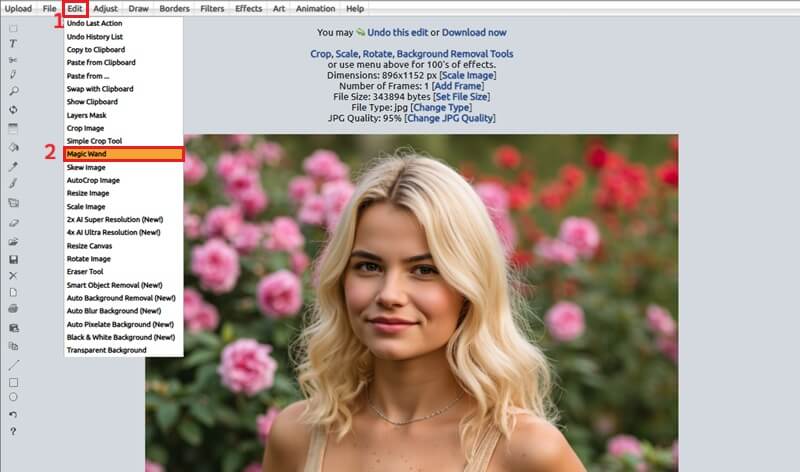
Step 2 Utilize the Magic Wand
With the Magic Wand tool enabled, click on the background area you wish to remove. Then, the tool will automatically select contiguous regions of similar color and click the "Cutout" option. You have to repeatedly select the Magic Wand and delete segments until the entire unwanted background is eliminated.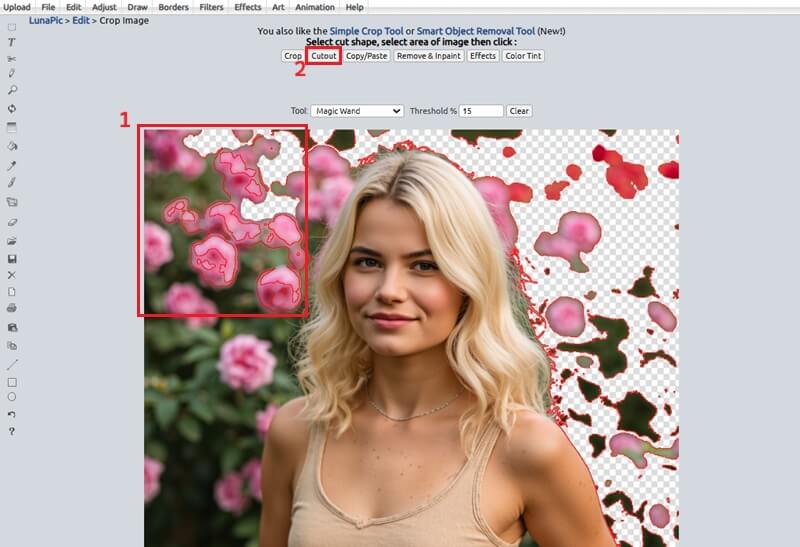
Step 3 Refine Edges and Save Image
After removing the primary background segments, zoom in on the image and carefully examine the subject's edges for any remaining background elements. Once you're satisfied with your image, click "Save" to keep it in your default download location.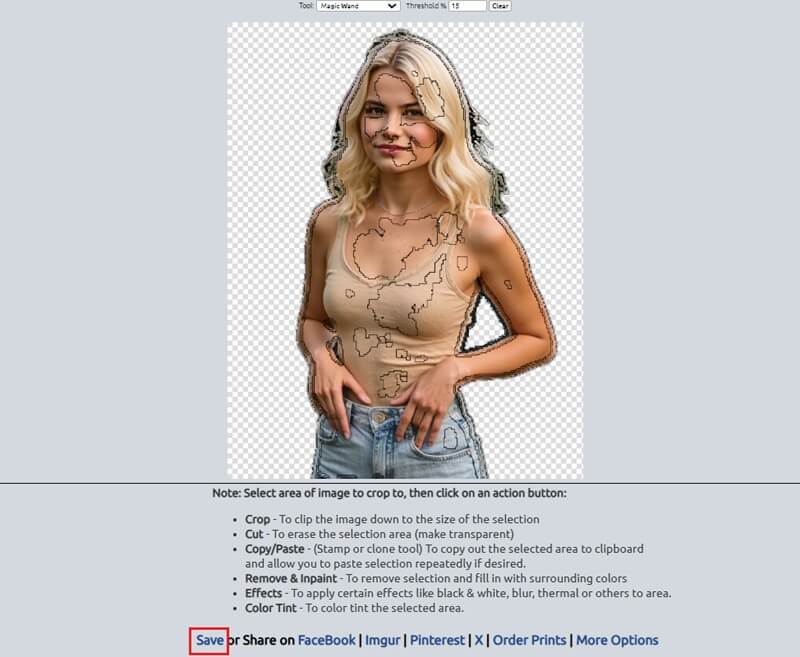
Utilize the Eraser Tool to Remove Background
The Eraser tool in the LunaPic editor provides a direct, controlled way to remove unwanted areas from an image. Because of this, it is very useful for careful background editing. In particular, this tool works well for images with fine details, such as hair or small objects. Moreover, users can slowly erase parts to keep clean edges. It also helps when you need to remove a date from a photo without affecting the main subject. As a result, you can create a LunaPic background transparent image that looks neat, accurate, and ready for different uses. Here is how you can use the Eraser tool to exactly remove the background from an image.
Step 1 Activate Eraser Tool
First, upload your image to LunaPic and open it in the editor. Next, click the "Edit" tab from the top menu. From there, select the "Eraser Tool" to prepare for manual background editing.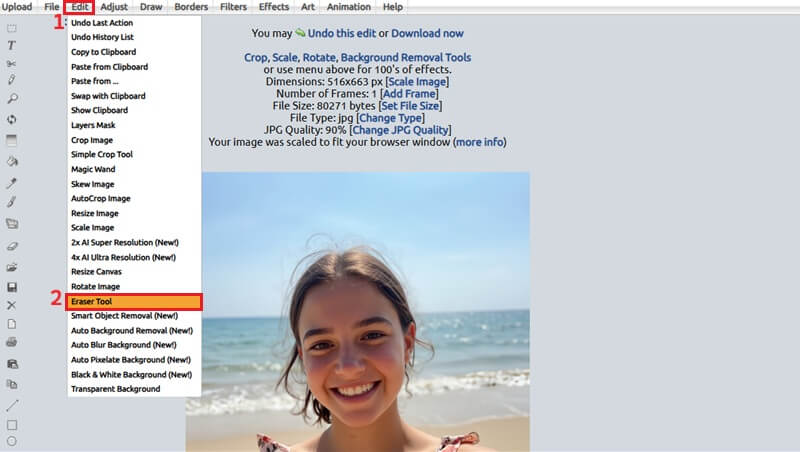
Step 2 Manually Erase the Background
When the Eraser tool is active, choose the size of your brush according to the area you need to remove. You must first remove the outer parts of the background. Then, adjust your brush size to meticulously remove the remaining segments around the subject. Once you're satisfied with your edits, save them to your local drive.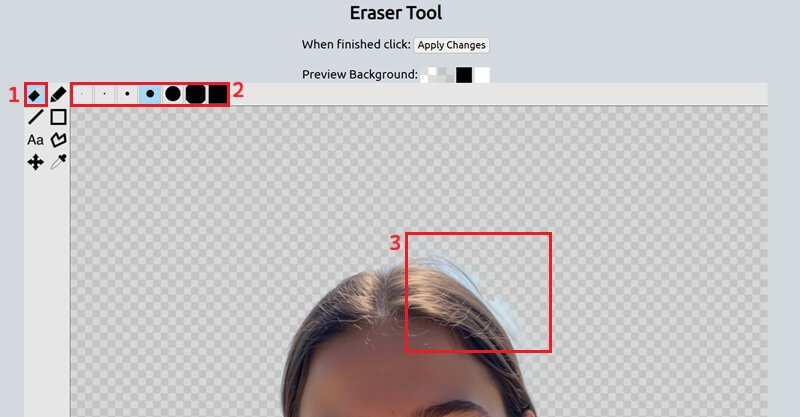
Remove Background in LunaPic Using the Simple Crop Tool
If you need a simple background removal or just want to quickly remove the background from images, the Simple Crop Tool can be a highly efficient option. It works by letting you select a specific shape around the area you want to keep. This tool also lets you choose the background-removal shape, including square, rectangle, circle, and oblique options. Once the shape is placed, everything outside it is cropped out. Because of this, the tool is best for images with simple backgrounds or clear subjects. See the steps below to remove the background in LunaPic using the Crop feature.
Step 1 Launch Simple Crop Tool
Begin by uploading your image to the LunaPic editor. To do this, click "Upload" and select "Choose File." When your image is loaded, hit the "Edit" tab and select the "Simple Crop Tool."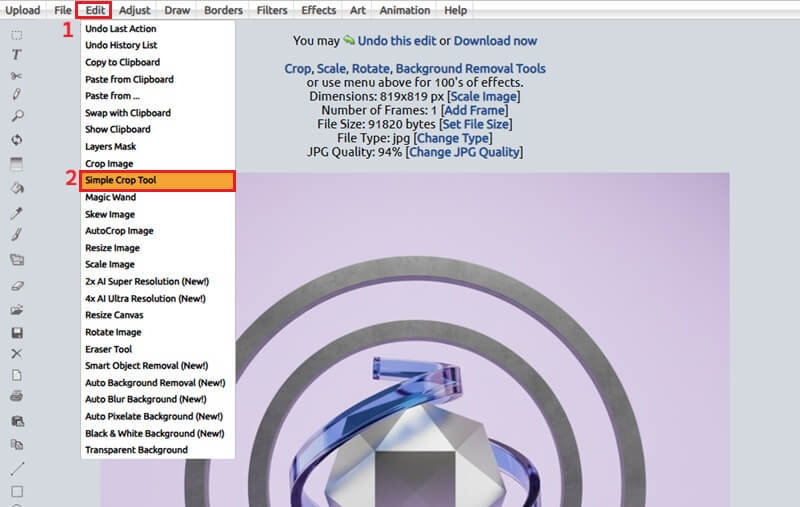
Step 2 Crop Background
Once the tool is activated, it will automatically crop your image to a square shape. You can then select the shape you want from the available options. Then, you can move the cropping area to enclose your desired subject. After that, download the edited image by selecting the "Save"option.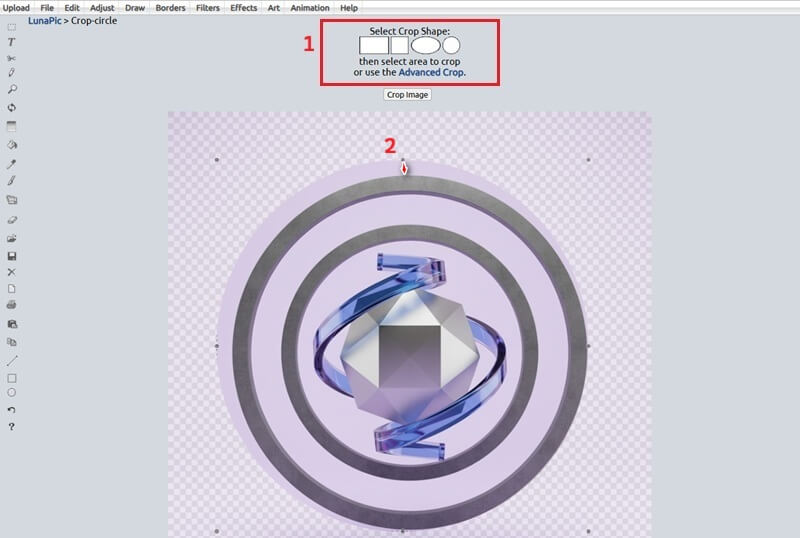
Best Alternative for LunaPic Background Remover
Although the LunaPic background remover is helpful, it has a limit on handling large file sizes. It does not clearly state the official maximum file size limit; users have reported issues when processing images exceeding 5 MB. That said, the AceThinker AI Background Remover offers a streamlined and highly efficient approach to background removal. It supports high-quality images up to 10MB, ensuring superior results for professional applications without compromising image fidelity. It also uses advanced AI to distinguish the main subject from the background. This makes the process easier by automatically handling most of the detailed selections. Besides, it lets you save your images in PNG, JPEG, and WEBP formats, ensuring compatibility across platforms and applications. Below is a simple guide on how you can use this online AI background remover tool.
How-to Guide:
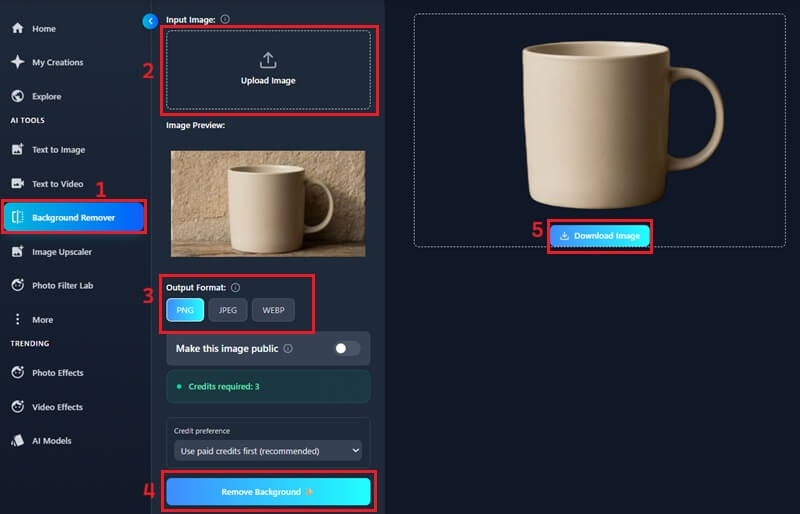
- Start by accessing the AceThinker AI Background Remover website. On the tool's interface, click "AI Background Remover." You will then be prompted to upload the photograph you wish to remove the background from.
- Next, click the upload box to access your device’s file explorer. Then, browse your files and select the image you intend to process. Subsequently, click open to upload your chosen image directly to the AI background removal interface.
- When your photo is uploaded, select your preferred format; we suggest PNG. Then, click the "Remove Background" option. After the processing is complete, download your newly edited image, which will now have a transparent background.
Frequently Asked Questions
Can LunaPic Online Photo Editor remove backgrounds?
Yes, LunaPic can effectively remove backgrounds and provides several useful tools. For example, the Magic Wand allows automated selections, while the Eraser tool offers precise manual control. Additionally, the Simple Crop tool helps quickly isolate subjects for a straightforward edit.

Is LunaPic available for mobile devices?
Yes, the LunaPic is compatible with both Android and iPhone devices. You can access the LunaPic Photo Editor in your web browser, making it convenient to edit images on the go. It also has a mobile version that includes many of the features found in its desktop counterpart.
Is LunaPic free to use?
Yes, LunaPic is completely free to use. You don't need to pay or even create an account to access its wide range of features. Furthermore, all the tools, including background removal, cropping, filters, and basic photo editing options, are available at no cost.
Conclusion
In summary, LunaPic is a free and easy-to-use tool for removing backgrounds from images. It offers multiple methods, including automatic AI removal, the Magic Wand, Eraser, and Simple Crop tools, allowing users to choose the approach that works best for their photos. With these options, even beginners can achieve cleaner and more professional-looking images. In addition, experimenting with different tools and techniques can speed up and enhance the precision of background removal. This guide shows various ways to remove background in LunaPic, helping you find the method that best suits your editing needs.
| Method | Pros | Cons / Limitations |
|---|---|---|
| Automatic AI Background Removal | Fast and easy, no advanced skills needed. | Less precise with complex edges |
| Magic Wand Tool | Greater control, more accurate for detailed areas. | Can be time-consuming for complex images |
| Eraser Tool | Highly precise, ideal for small details like hair or objects. | Requires careful attention and manual effort. |
| Simple Crop Tool | Quick and simple for straightforward edits. | Only works well for plain backgrounds |
