
 Instagram Stories have become one of the most popular ways to share real-time moments because they are quick, fun, and easy to view. People love posting short clips or photos to show what they are doing right now, and this makes Stories feel more personal and lively. As a result, users look for simple tools to add temperature to Instagram Story to provide more context to their followers. Adding the current temperature helps viewers understand the mood of the moment—whether it’s a hot beach day or a cold morning walk —boosting engagement. In this article, we will guide you through the built-in Instagram options and creative alternatives for displaying temperature in your Instagram Stories.
How to Add Instagram Temperature Sticker
Instagram Stories features a native temperature sticker that lets you effortlessly display the local temperature directly on your shared content. This feature not only enhances visual storytelling but also provides your viewers with contextual information. Moreover, it allows you to engage with your viewers, seeing that you're dealing with the same environmental conditions. Below is the simple instruction on how to add weather to Instagram story.
Step 1 Launch the Story Feature
On your mobile phone, open the Instagram application. Make sure you are logged in to your Instagram account. If not, you can enter your credentials to access your profile. After that, you will see the Instagram interface, and tap the "+" icon found at the bottom center of your screen. This action will prompt a menu to appear, from which you should select "Story" to initiate the process.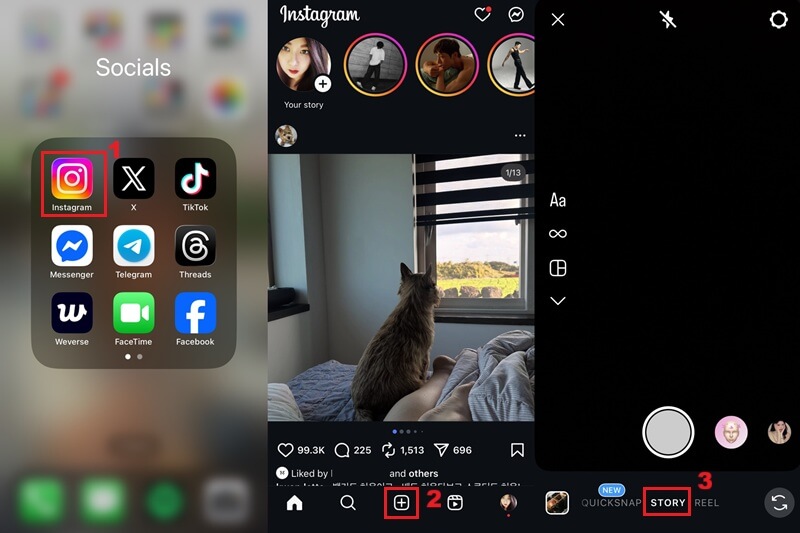
Step 2 Add Instagram Temperature Sticker
Once you click the "Story" option, you can either take a photo or select an existing one from your device's gallery to serve as the background for your Instagram Story. Then, tap the "Sticker" option that looks like a square smiley face. Afterward, click the search option and type "temperature" to reveal the temperature sticker. Choose any of the stickers available and tap it.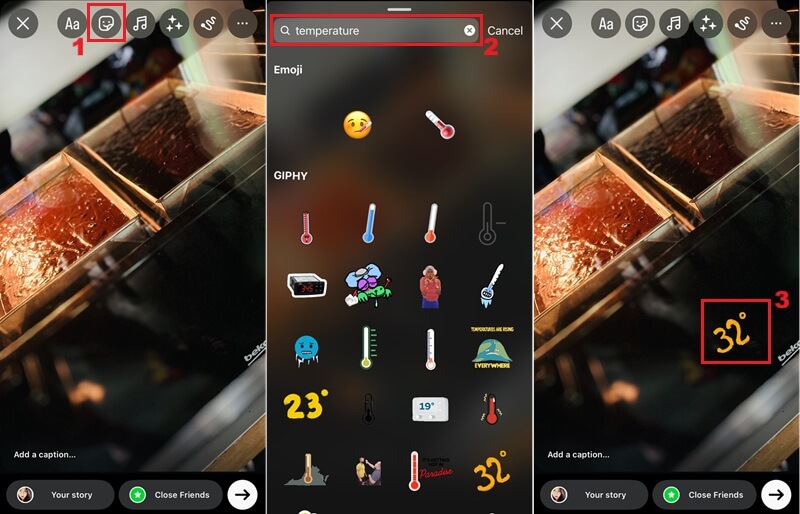
Step 3 Post the Instagram Story
When you are satisfied with the placement and appearance of the temperature sticker on your photo, you can further enhance it by adding stickers, GIFs, text, or drawings to make your Instagram Story more appealing. Then tap the arrow icon in the lower-right corner of your screen. Finally, tap the "Share" option to post your Instagram story with temperature.
How to Make the Temperature Sticker Appear on Instagram Story
Occasionally, users find that the temperature sticker does not appear among the available options. This is similar to situations where an Instagram post gets stuck on sending. These issues often arise due to multiple factors, including the app's location permissions, an outdated app version, or other problems. To address these issues, you must meet the requirements for temperature-sticker functionality. That said, here are some criteria and solutions to help your Instagram temperature sticker appear.
1. Turn on Location Services for Instagram
Instagram requires access to your device's precise location to display the local temperature in your stories accurately. Without this permission, the app cannot retrieve the necessary weather data for your specific area. In that line, make sure your phone's location is enabled so Instagram can read your GPS data. This helps the app show the weather on Instagram Story correctly. More than that, users in the US see Fahrenheit, while most other regions see Celsius on the weather sticker. Here is how to enable location services for Instagram.
Step 1 Access Instagram from Settings
On your mobile devices, go to your "Settings." Then, navigate to the "Apps" or "Applications Manager" section. Subsequently, scroll through the list of installed applications and select "Instagram" to access its specific settings.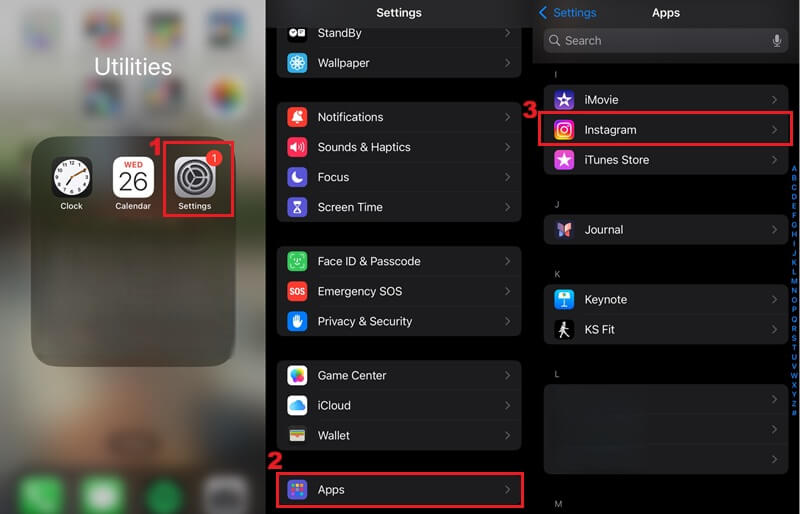
Step 2 Enable Permissions for Location Services
Within the Instagram app settings, locate the "Location" options. After that, tap the "Location" option to access the available settings. You can choose between "Always" and "While Using the App" to ensure Instagram can access your location and provide accurate, real-time temperature data for your Instagram Stories.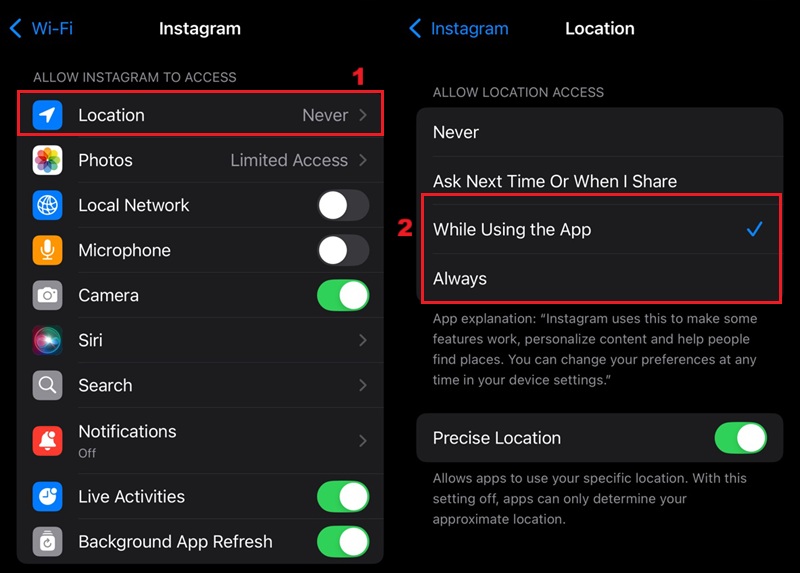
2. Update Your Instagram App
Another requirement is to ensure your Instagram app is up to date. This ensures all features, including the Instagram Story temperature overlay, work properly. Sometimes, older app versions cause certain stickers to disappear or fail to load. Therefore, updating your app can quickly fix the issue and help the app to show weather on Instagram Story without any trouble. Below is the process for updating your Instagram App.
Step 1 Access Your Phone's Store
For this example, we will use an iPhone to update Instagram. On your iPhone screen, drag your finger down to access the "Search" option. Then, type the "App Store" in the search bar. Once the App Store appears, tap it.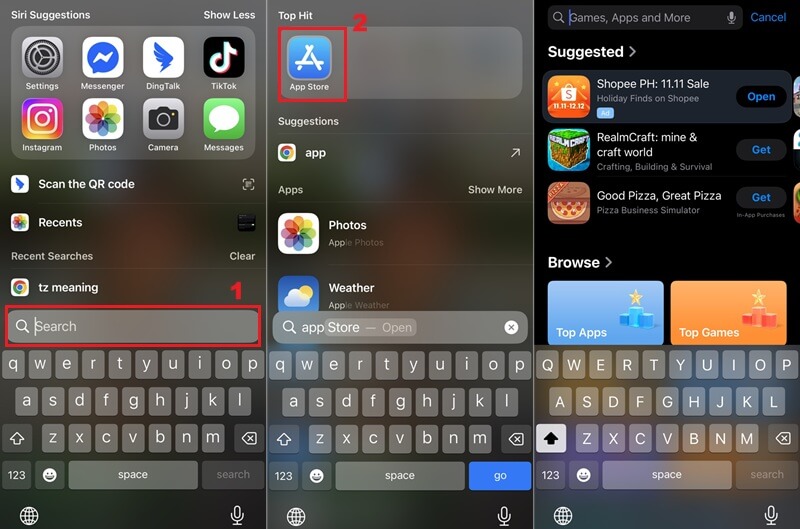
Step 2 Update Instagram
Once you have access to your "App Store," tap on the search option. Then, type "Instagram" and press the "Search" icon. If you see an "Update" button beside the Instagram app, tap it to install the latest version. Let the update complete, and then reopen your Instagram app again.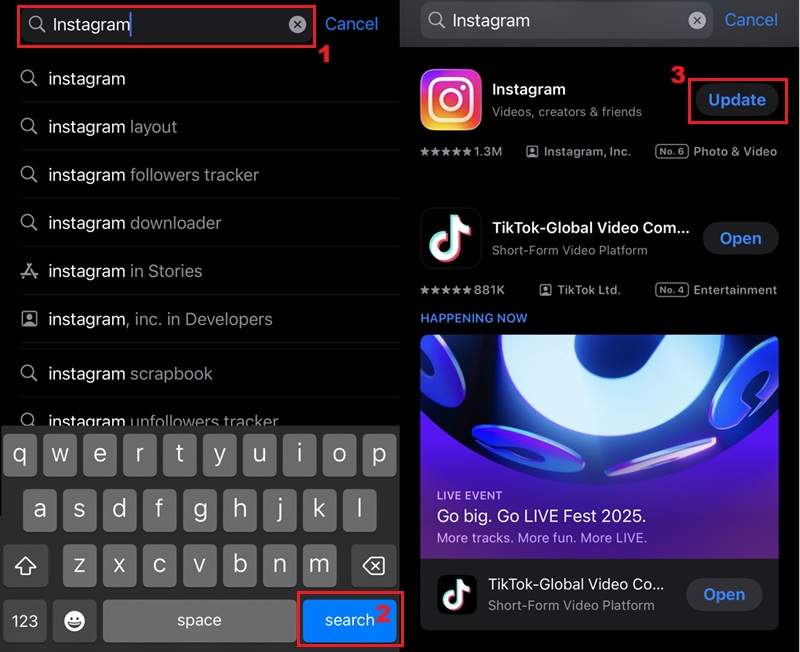
Alternative Way to Show Temperature on Instagram Stories
While Instagram's native temperature sticker is the easiest option, users can still add temperature to Instagram Story using other simple methods. For example, third-party apps let you create custom designs that match your style. Additionally, you can use manual text overlays to include temperature details and combine them with other weather information.
1. Use Manual Text Overlays
This method involves manually entering the current temperature as text in your Instagram Story. With this method, you gain complete control over the font, color, and size of the temperature display for your Instagram story. Besides, it allows for the integration of additional weather-related context, such as humidity levels or wind speed, which is not possible with the standard sticker. Here's how you can add temperature using manual text overlays.
Step 1 Open Instagram Story
Initiate the Instagram application and access the Instagram Story board by tapping the "Your Story" icon. Alternatively, you can swipe right from your main feed to open the Story camera.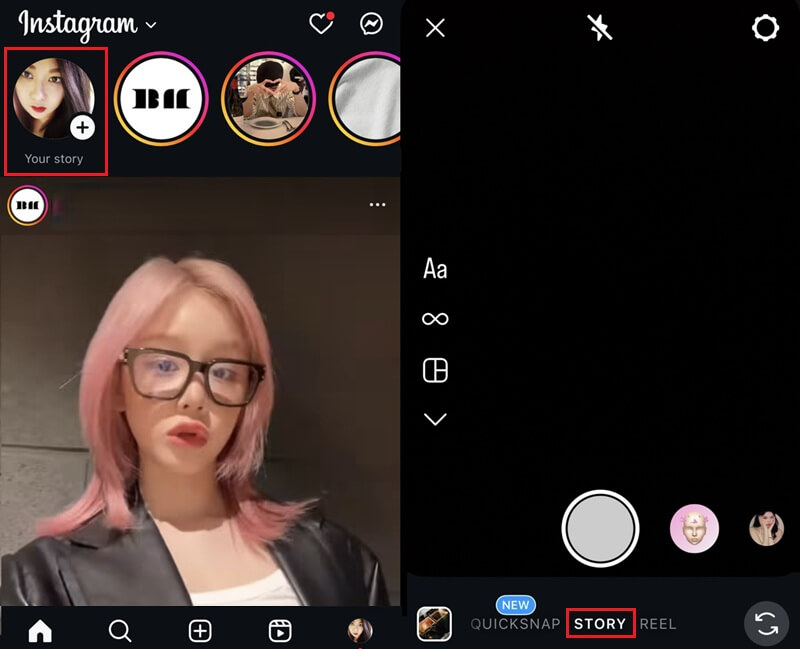
Step 2 Overlay Temperature Text
After capturing or selecting your desired media, tap the "Aa" icon at the upper right part of your screen to activate the text tool. After that, enter the current temperature, including the unit (e.g., °C or °F) for clarity. Then, you can also add multiple weather symbols or temperature graphics. Once done, you can now share your Instagram Story.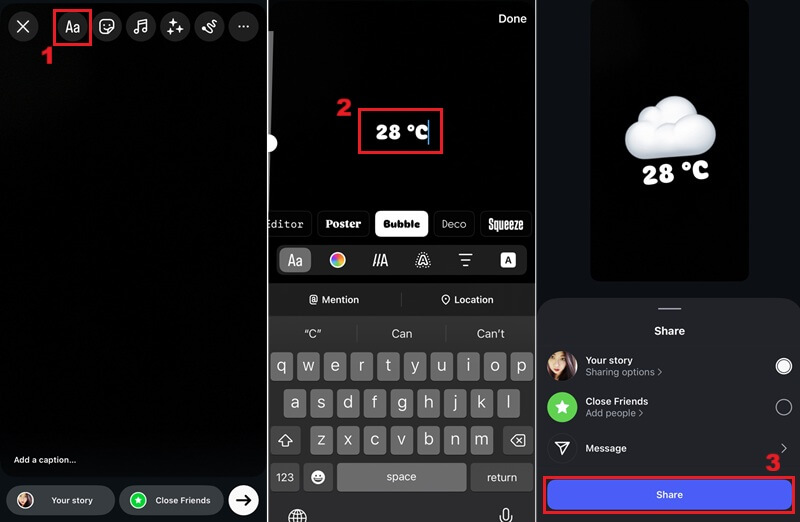
2. Utilize Third-Party Tools
To make your Instagram Story more distinctive, consider utilizing various third-party applications. For instance, you can use an app like Canva to integrate sophisticated weather widgets or custom-designed temperature graphics directly into your story content. Canva offers a variety of templates and graphic elements. It also enables you to insert text, where you can customize fonts, colors, and animations. Furthermore, it supports a broad range of image sizes for multiple social media platforms, including Instagram stories. This feature enables you to import your own photos and combine them with professional design elements to create a visually appealing temperature overlay. Here's a step-by-step guide to using Canva to add temperature to your Instagram Story.
Step 1 Create a New Design in Canva
To start, access the Canva app or web interface. Then, navigate to the "Social Media" section. From there, select the Instagram option and choose the "Instagram Story" format. This will ensure your photo fits the optimal Instagram story dimensions.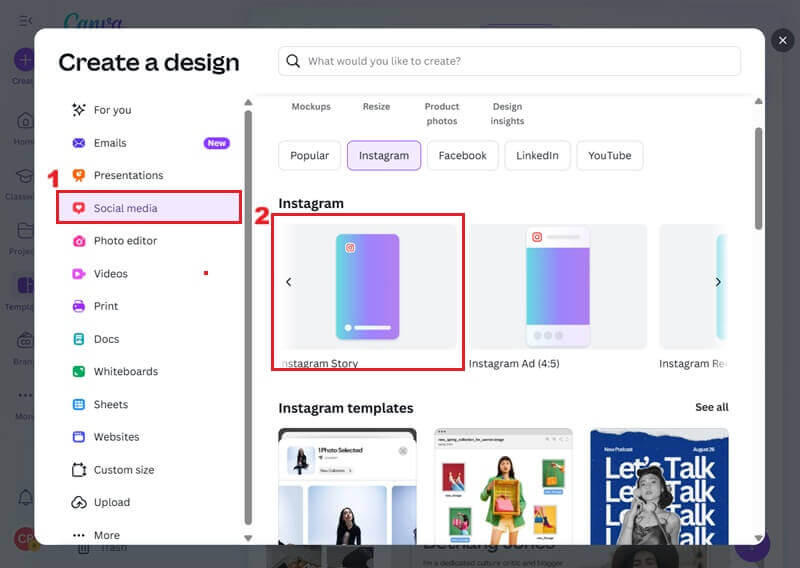
Step 2 Insert Temperature Graphics into Photo
Next, import the image you intend to use on your Instagram story. Then, click the "Elements" and search for "temperature" or "weather" to access multiple graphic designs. After that, you can also add text by clicking the "Text" option and including the exact temperature. Once you are satisfied with the design, save the image to your device.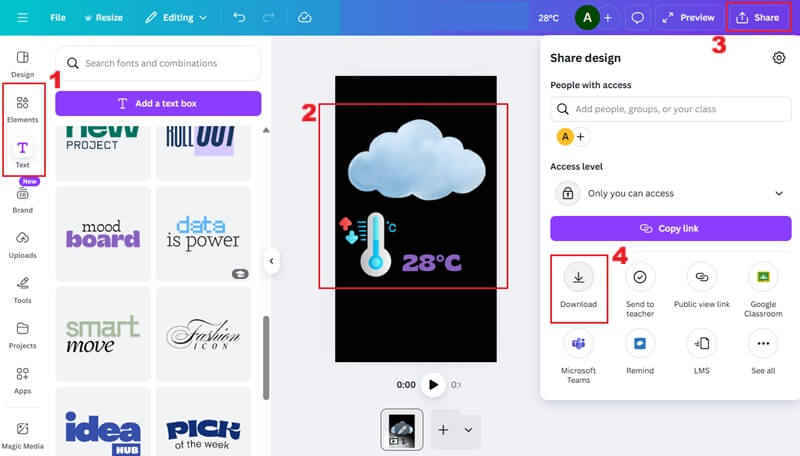
Step 3 Share the Image on Your Instagram Story
Finally, open your Instagram and press "Your Story". Then, select the image you edited on Canva. After reviewing it, tap the "arrow" in the bottom-right corner of the screen to share your Instagram Story.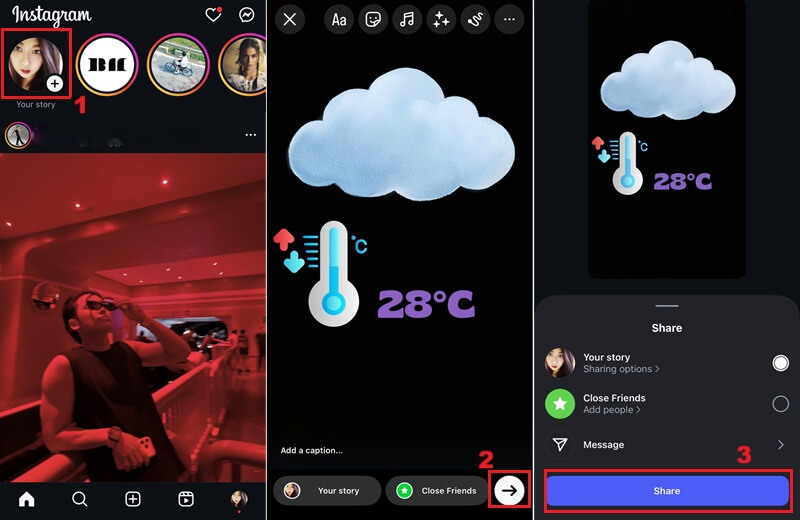
Creative Ways to Utilize the Temperature Sticker
The Instagram temperature sticker is more than just a small detail. You can use them to add context, set the mood, or highlight what's happening around you. It also helps your viewers better understand the moment. Below are some ideas you can try to include temperature:
- For travel stories: You can highlight the climate difference between places you visit. This gives your audience a quick idea of how warm or cold each location is.
- For workouts: Showing the outdoor temperature alongside your fitness routine can make your progress feel more tangible. It also lets viewers know how challenging the weather is during your run or exercise.
- For daily lifestyle content: You can pair the sticker with the time, fun emojis, or captions. This makes your Instagram Story feel more personal and relatable to your audience or followers.
- Combine with music, hashtags, or GIFs: Add music stickers, relevant hashtags, or weather-themed GIFs to match your Instagram Story's vibe. This simple mix makes your post more expressive and visually appealing.

Extra Tips: Make Stunning Instagram Stories Online
Before integrating the Instagram temperature stickers, you can make your images more stunning. For instance, AceThinker AI Image Generator & Editor provides a sweeping suite of tools to enhance your Instagram Stories. It's an online tool that employs advanced technology to make your images more vibrant and engaging. Besides, it offers diverse editing functions, including an image upscaler, text-to-image, and various filters. You can also change Instagram Story backgrounds with a few clicks. In this section, we will explore two features to enhance your images before utilizing the Instagram Story temperature sticker.
Photo Effects
This feature lets you apply many different filters to your photos. It offers over 300 simple artistic filters that can turn plain pictures into eye-catching images. You can choose from soft, bright, or bold styles to match the mood you want. With just a tap, your Instagram photos can look more creative and polished. To apply Photo Effects using our online AI tool, you can see the simple procedure below.
Step 1 Select Filter
The initial step to apply a filter to your Instagram photos is to access our AceThinker AI Image Generator & Editor. From the main interface, navigate to the "Photo Effects" panel. Then you will see multiple options or filters available; click the one you want to apply to your image.
Step 2 Apply Effects
After selecting your desired filter, proceed to upload the image you intend to modify from your local device. Once uploaded, click the "Apply Effect" option and wait until the tool processes the changes for your image. Lastly, click the "Download" icon to save your Instagram photo on your device.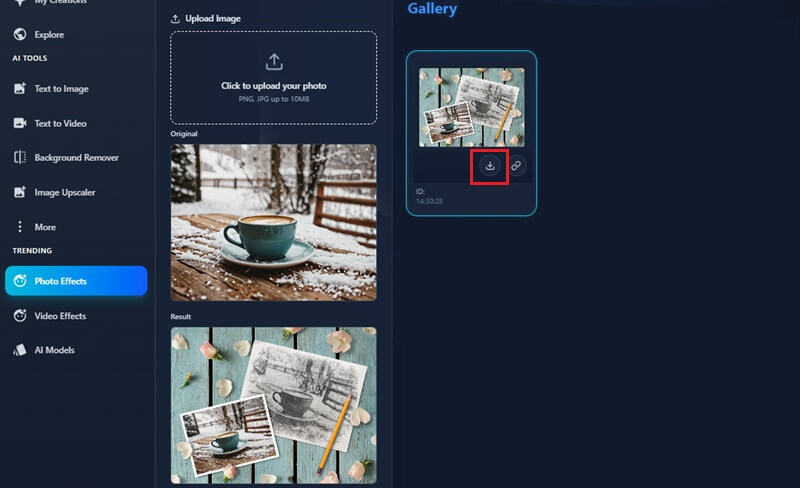
Image Upscaler
Another powerful feature within our AceThinker AI Image Generator & Editor is the Image Upscaler. This feature enables you to enhance the resolution and clarity of your images. For instance, if your image is pixelated or low-resolution, the Image Upscaler can transform it into a high-definition picture. This helps ensure your Instagram stories maintain professional quality. To utilize this online tool, you can follow the steps below.
Step 1 Add Your Image
On the interface of the AceThinker AI Image Generator & Editor, locate and click the "Image Upscaler" option. Then, pick the image file you wish to enhance from your local storage. Afterward, click "Open" to upload it to the online tool.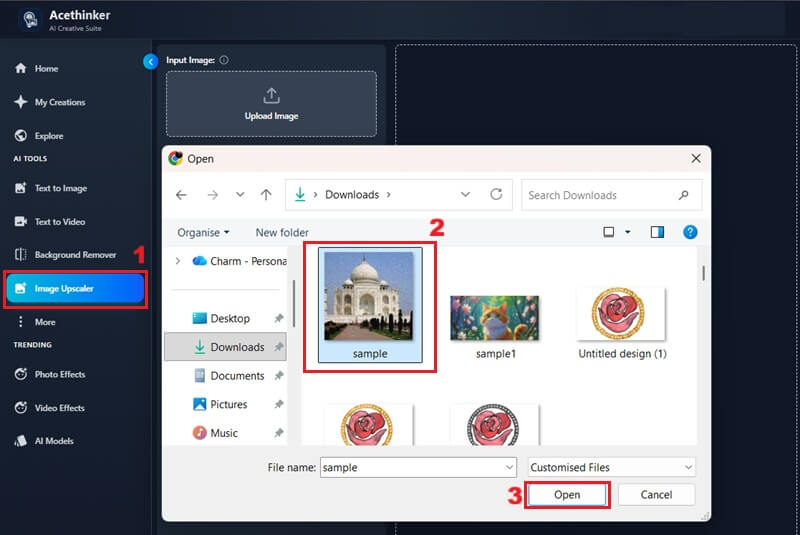
Step 2 Upscale the Instagram Photo
Once the image is uploaded, select your desired upscaling factor from 2x to 4x. You can also choose the image output format. Finally, click the "Upscale Image" button to sharpen and enhance your Instagram photo.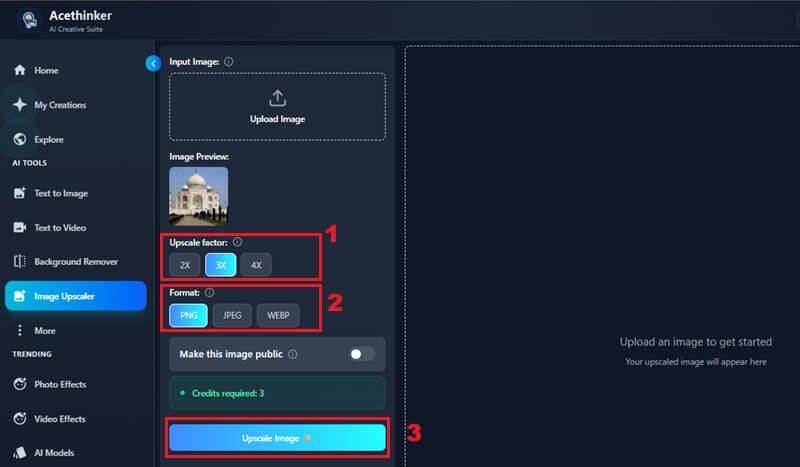
Step 3 Download the Upscaled Image
After the upscaling process is complete, click the "Download Image" option under your upscaled image. This will save the image to your local storage. Then, you can use this image for your Instagram stories and incorporate the temperature stickers.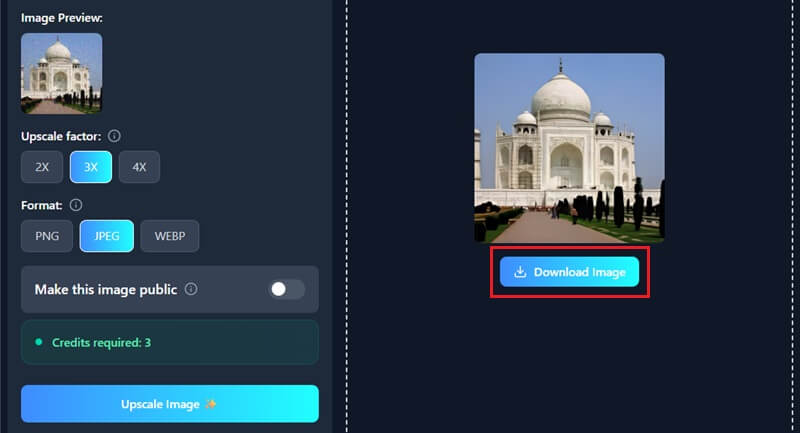
Frequently Asked Questions
Why is the weather or temperature not showing on Instagram?
This issue of Instagram issues commonly arises from several factors, including disabled location services in the Instagram app and outdated app versions. Occasionally, there are some temporary glitches within the Instagram platform itself. To resolve these issues, you can enable location services for the Instagram app, update it, and restart it.

Can I add temperature to my Instagram stories?
Yes, Instagram has a built-in temperature sticker that you can add to your Stories. It lets you show the current temperature in your area. This feature also helps your Story make more sense by providing viewers with quick weather information about the area around you.
Can I find out who looked at my Instagram Stories?
Yes, you can see who viewed your Stories within 24 hours of posting. Just open your Story and swipe up to view the list of viewers. After 24 hours, the view list will no longer be available.
"To see who viewed your stories, you can click Your Story."
- How to tell who's seen your Instagram story
Conclusion
Adding temperature to an Instagram Story is simple and helps make your posts more meaningful. First, you can use Instagram’s built-in temperature sticker, or instead, try other methods like text overlays or third-party design tools. These options let you share the mood of your day and give your viewers or followers a clearer picture of what's happening around you. By adding small details like weather, your stories become more personal, fun, and engaging. Try adding your city's temperature to your next Instagram Story and share your vibe with your followers!
| Method | Difficulty Level | Accuracy of Temperature | Best For |
|---|---|---|---|
| Using Instagram's Temperature Sticker | Easy | Exact and automatic | Quick updates and casual stories |
| Use Manual Text Overlays | Moderate | Depends on user input | Custom styles or creative layouts |
| Using a Third-Party App | Moderate | Accuracy varies by what users enter | Full customization and stylized stories |