 We live in a visual world where a picture is worth a thousand words; adding some extra touch to your photo can transform a simple photograph into something extraordinary. It could be sharing on social networks, work-related content, or just storing memories, but refined images make a better impact. However, not all the photos are perfect and absolutely okay. Editing software such as Photoshop can be applied by professionals and anyone who desires to enhance image quality with both simplicity and control. Photoshop has both intelligent AI-based enhancements and comprehensive manual controls, so you can correct the lighting, refine the details, de-clog the distractions, or change the entire mood of the picture. This guide will look at some of the best techniques to enhance photo in Photoshop, whether it be increasing the resolution and exposure settings or applying creative filters and effects to achieve a better result, even for a beginner.
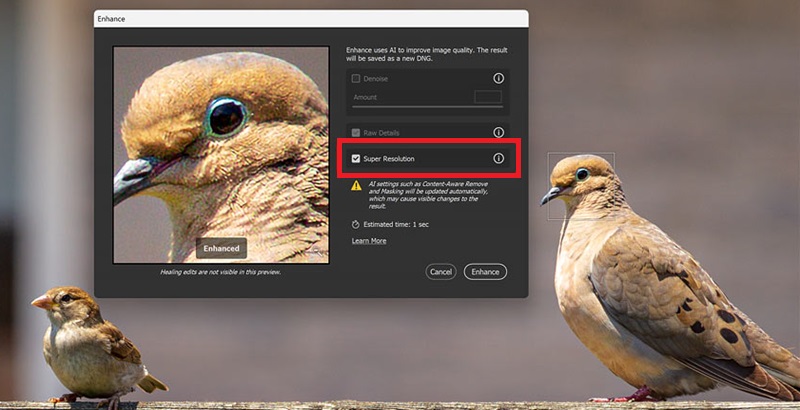
How to Increase Image Resolution with Super Resolution
Super Resolution is one of the most impressive technologies enabled by Adobe Sensei AI. This powerful machine learning engine runs much of Photoshop's smartest behavior. Adobe Sensei AI is designed to intelligently upscale images by analyzing patterns, textures, and details in a photograph to enhance them with incredible clarity. Super Resolution is unlike simple upscaling, frequently leading to blurry or pixelated outputs. By utilizing deep learning, Super Resolution can increase your image's horizontal and vertical size by a factor of 2 while maintaining (and frequently enhancing) Detail and sharpness. It proves invaluable when you need to upscale older photos and get images ready to be printed in a large format or crop in tight without sacrificing quality. Other tools accelerate workflows, including automatic subject selection, neural filters, and sky replacement, all driven by Adobe Sensei. This is one of its best qualities, functioning in the background and performing intricate calculations with only two clicks. Super Resolution offers photographers and designers the opportunity to have the best of both worlds: high-resolution output without losing image integrity
- Begin by launching your RAW or high-quality JPEG image in Adobe Photo Enhancer. Next, select Filter in the top menu and select Camera Raw Filter. This will open your picture in the Camera Raw interface where the Super Resolution is found. When you work with a RAW file directly, it is opened in Camera Raw by default.
- Within Camera Raw, right-click (or Control-click on Mac) on the thumbnail image in the filmstrip view. Select the Enhance option in the context menu that appears. An Enhance Preview pop-up window will open, and you can preview the enhanced image's result.
- Ensure the box labeled Super Resolution is checked in the Enhance Preview dialog. Below, a brief description states that this will increase the resolution of your image 2x with machine learning. The preview will be refreshed to reflect the changes. To view the original and enhanced versions side by side, click the magnifying glass icon.
- To process the image, click the Enhance button. Adobe shall create a new DNG (Digital Negative) File with the Photoshop increase resolution. This file will be shown next to your original on the filmstrip. You can then open it in Photoshop to continue working on it or save/export it in the format of your choice.
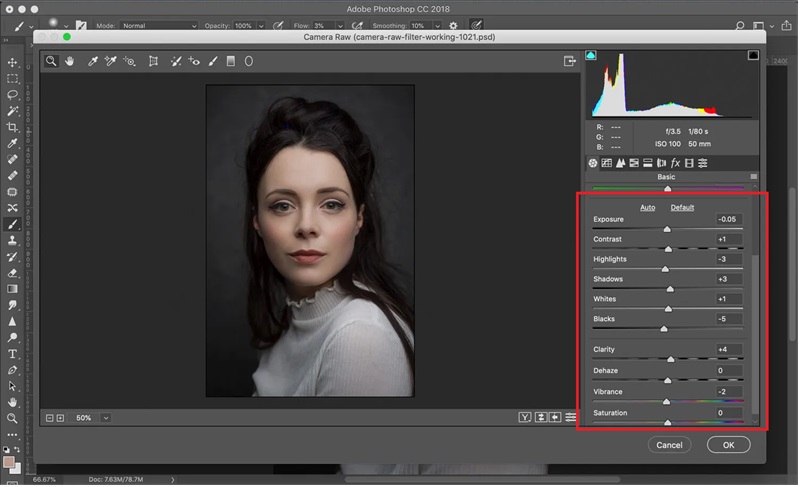
Proper Way to Adjust Exposure and Color Balance
The mood and realism of a photo are determined by the exposure and color balance, which are basic features. A beautiful subject will not look beautiful when it is too dark, washed out, or full of unnatural colors. Photoshop with Adobe Sensei AI and enhanced manual tools puts you in control there. Regardless of whether you are retrieving Detail out of overexposed skies or removing a color cast introduced by indoor lighting, using the Camera Raw filter and adjustment layers in Photoshop can make the process increasingly familiar and non-destructive. Highlights, shadows, midtones, and white balance can be modified separately -this is precision work without quality loss. Camera Raw is best used in making non-destructive edits, particularly in RAW files. In contrast, adjustment layers in Photoshop can be used in layered work. The greatest thing? Live preview of your changes lets you see exactly what you are doing and adjust everything using slider-based controls, having even advanced edits approachable to a beginner and quick to execute in the hands of an expert.
- Begin by launching your image in Photoshop. Provided you are working with a RAW file, this will automatically open in the Camera Raw interface. To open the enhancement tools on JPEG or other formats, choose Camera Raw Filter in the Filter menu. You could also create a new adjustment layer via the Layer menu by selecting options such as Exposure or Levels and then start making specific modifications.
- Inside Camera Raw, you will find the Basic panel on the right-hand side. Adjust the Exposure slider to regulate the brightness of your image in general. To bring back details in the blown-out highlights or excessive dark areas, slightly move the Highlights and Shadows sliders. This will balance the lights within your image without affecting its flatness.
- Increase resolution of image Photoshop by using the Contrast slider to decrease or increase the distance between the light and dark portions of the image. The tonal endpoints can also be determined using the Whites and Blacks sliders—nudging the Whites just increases the brightest areas, and the Blacks slider affects the deep shadows. These are finely adjusted changes that may provide richness without losing Detail.
- When your image feels unnaturally colored, you can use the Temperature slider to add warmth and more yellow tones or make it colder by adding blue. The Tint slider is handy when balancing magenta and green shifts, particularly in mixed lighting. To balance the colors, another quick fix is to choose the White Balance tool (eyedropper icon) and then click on a neutral gray patch in your photograph to have the colors balance automatically.
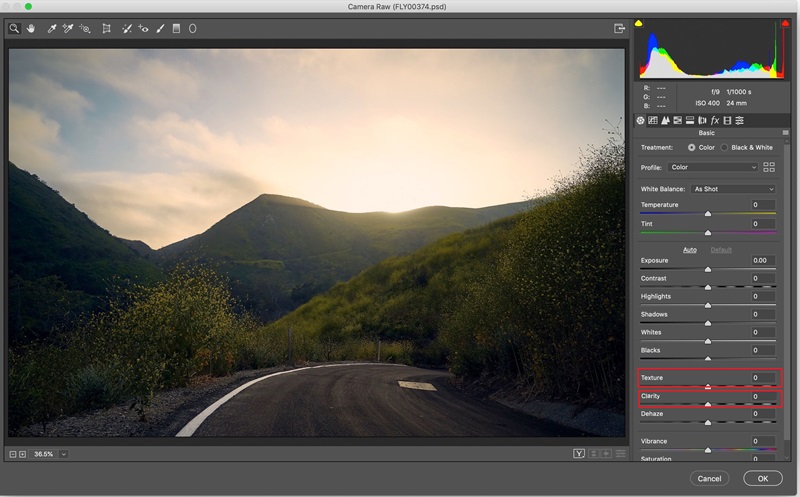
Enhancing Clarity and Texture
When an image appears flat or lacks depth, clarity and texture modifications can make a difference. Both of these tools, which are found in Adobe Camera Raw, aim to enhance tiny details and provide images with visual punch without pushing the picture toward the over-processed look. The Clarity slider targets mid-tone contrast and adds additional structure and depth to the image, which is ideal for landscapes, portraits, and product photographs. Texture, however, adds or mutters finer details such as cloth, skin, or leaf without altering the overall contrast. Texture adjustments are more natural and controlled than sharpness adjustments, which can make images appear harsh. Both are subtle but powerful tools when you need to add some extra detail without the added noise or halos you sometimes get with other tools. Applied properly, they allow for the creation of an ideal balance between realism and refinement.
- Start by launching your image in Photoshop. For non-RAW files, go to the Filter menu and choose Camera Raw Filter. When you open a photograph in RAW format, it will be opened in Camera Raw, and you will have access to advanced editing options such as Clarity and Texture sliders.
- Within the Camera Raw workspace, go to the panel on the right-hand side and find the Basic section. Here, you will see both the Clarity and Texture sliders. These tools lie second only underneath Exposure and Contrast, so you can easily tweak them during your overall image improvements.
- Drag the Clarity slider to the right to add mid-tone contrast and punch to the image. This technique is particularly helpful in enhancing structure in a surface such as stone, wood, or even clouds. Be careful not to overdo it—excessive clarity will create halos or an unnatural appearance of skin in portraits.
- Use the Texture slider to sharpen small details or smooth them out without making the image look excessively sharp. Drag to the right to slightly sharpen up close details such as hair, cloth, or trees. Use it to the left to smooth skin or eliminate distracting grain. It is perfect for portraits when you desire Detail but not roughness.
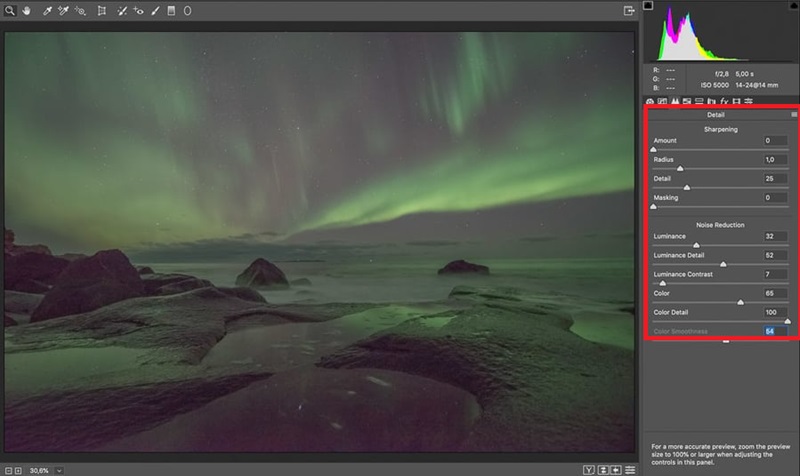
Reducing Noise and Improving Image Cleanliness
Photos in low light situations or with a high ISO value may have digital noise, which appears as grainy textures, creeping in and taking away the subject's attention. Photoshop AI photo enhancer has useful tools to help remove this noise and keep useful details that will make your photos appear clearer and more professional. Adobe Camera Raw has a Noise Reduction feature that automatically reduces grain and speckles but leaves sharp details (edges or textures) unaffected. This noise reduction/ detail preservation balance is critical, particularly with portraits and night shots. Then there are manual cleanup tools: Spot Healing Brush or Clone Stamp, which you can use to take care of persistent artifacts or dust spots that the automated filters may not find. This should help clarify the images, and you will have nice-looking photos that are not blurred.
- Begin by loading your photo into Photoshop and loading the Camera Raw filter, either by opening a RAW file or by choosing Filter and then Camera Raw Filter with other formats. The tools to reduce noise can be found in the Detail panel, which is on the right-hand side of the interface.
- In the Detail panel, sliders marked Luminance, Color, and Detail are located in the Noise Reduction section. Luminance affects the suppression of grainy noise, Color affects chromatic noise (colored speckles), and Detail affects the balance between the amount of fine texture that is retained during noise reduction.
- First, reduce grain in the shadows or darker parts of an image by simply dragging the Luminance slider bar slightly. Then, adjust the Color slider to the left to decrease colored noise, which can make the image have red, green, or blue dots all over. It is important to remember that these adjustments should be moderate because too much noise removal will make the photo look too soft or even plastic.
- Once you have reduced the noise, change to Photoshop's Spot Healing Brush or Clone Stamp tool to remove spots. Use them to remove dust, sensor spots, or any other unwanted blemish that the noise filter failed to remove. Zoom up tightly to clean up accurately and work on a new layer to leave your edits flexible.
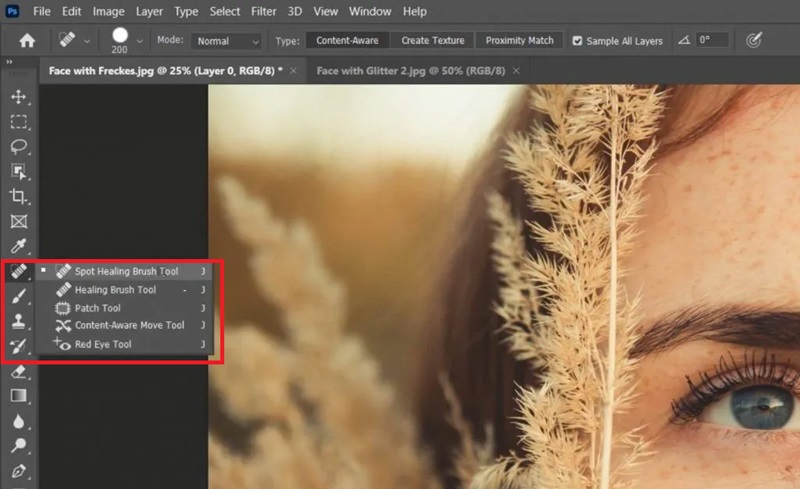
Removing Unwanted Objects and Blemishes
Distracting elements in photographs or unwanted items can take away the audience's attention and diminish your photo's effectiveness. Photoshop offers the mighty tools to clean up your shots by smoothly cleaning up these distractions, leaving the natural appearance of your photo. To remove small imperfections such as dust, spots, or skin blemishes, the Spot Healing Brush and Patch Tool is ideal for erasing these quickly. On bigger objects or busy backgrounds, the Content-Aware Fill tool comes in smart, as it evaluates the pixels around the area and fills it with the same texture and Color, virtually making the removal unnoticeable. Learning how to use these tools will enable you to improve the composition of your photo without apparent manipulation, giving your images a refined professional touch.
- First, open your image and make a copy of the background layer. Editing on a copy layer leaves your original layer untouched and enables you to edit non-destructively. You can do this by right-clicking on the background layer and choosing Duplicate Layer or by pressing Ctrl+J (Cmd+J on Mac).
- On the toolbar, choose the Spot Healing Brush tool. Set the brush size slightly bigger than the imperfection or unwanted area. Simply click or paint over the blemish lightly, and Photoshop will automatically interpolate the surrounding pixels to erase the blemish naturally.
- On larger objects, choose the Patch Tool. Use the lasso tool to outline the element that you wish to remove, and then move the selection to a part of the image that is similar texturally and lighting-wise. Photoshop will interpolate the pixels so that the addition of the new content replaces the selected area, and the edit appears smooth.
- To eliminate a more complex object, make a selection with the Lasso or Marquee tool. Then go to Edit and select Content-Aware Fill. Photoshop will examine the surrounding pixels and automatically fill the selection. Readjust the sampling area, as necessary, to enhance blending and verify to complete fill.
Creative Enhancements and Effects
In addition to general corrections, it is possible to apply creative effects to your photo to make it unusual and provide a certain style or atmosphere. Various tools in Photoshop can hint the viewer in one direction or alter the very mood of the picture. For example, a vignette will softly darken the edges of your photo and naturally guide the eyes to the center and subject. Using filters and adjustment layers, such as warming tones or color grading, you can also predetermine the mood, whether the image will be warm and homely or cool and cinematic. Layer masks assist you in applying these effects locally. Thus, only specific parts of the image are beautified, not the whole image. This method offers maximum creativity, and the final outcome remains natural and easy on the eyes.
- Begin by putting a new layer over your picture. Using the Elliptical Marquee Tool, create an oval around the primary subject. Next, heavily feather the selection (about 150-200 pixels) to blur the edges. Select Invert and fill the new layer with black or dark Color. Reduce the opacity of this layer until the vignette appears natural and subtle and gradually draws the viewer to the center.
- Visit the Adjustments panel and play with layers like Color Balance, Photo Filter, or Gradient Map to alter the overall image tone. To make it warm, apply warming filters that are orange or yellow. To give your footage a cinematic or moody appearance, color grade with teal and orange or cool blue. These layers are not destructive, meaning you can adjust the effect anytime.
- Click the mask icon to add a layer mask to your adjustment or filter layers. To conceal the effect in areas that are not desired, such as skin tones in portraits or certain background elements, use a soft brush with black paint on the mask. The effect will be revealed again by painting with white. In this technique, you can specify the location and amount of effect of the creative enhancements over your image.
- Creative additions are most effective when they are not too noticeable and are sensibly used. Experiment with the opacity, blending modes, and several adjustment layers to achieve equilibrium. Do not hesitate to look at before-and-after views to see that your effects are making the photo better rather than dominating it.

Alternative AI Photo Editor to Enhance Image
When finding an AI-based photo enhancer that is easy to use but powerful enough, AceThinker PicWish is a true alternative to Photoshop. PicWish was developed based on convenient thought, requiring only a few seconds to automatically enhance images using artificial intelligence. It is especially adept at resizing upwards, eliminating backgrounds, and tidying up photos by reducing noise and sharpening up. Among its many impressive features is the AI Super Resolution, which clarifies obscure details and magnifies images without compromising quality, making it ideal for those who need fast and quality output without editing the image in complicated ways. PicWish is easy to use, and therefore, novices can use it. At the same time, it has powerful features that experts would like. It is a convenient option to consider when one seeks to have their photos enhanced effectively with the minimum of steps and technical knowledge.
Try it for Free
- First, click the download button and install the PicWish app on your computer. After downloading the file, open it and run through the installation process. Once the installation is complete, open the app and take your time to get used to the clog-free and friendly interface and get to know the other enhancement tools available.
- First, click the download button and install the PicWish app on your computer. After downloading the file, open it and run through the installation process. Once the installation is complete, open the app and take your time to get used to the clog-free and friendly interface and get to know the other enhancement tools available.
- To begin the editing process, open the app and choose the feature "Remove Objects." In the new window, load the pictures that require improvement or that you want to remove some tattoos on. When you are dealing with multiple photos, you can either upload one at a time by clicking on the option that says "Upload file" or upload a complete folder by clicking on the option that says "Upload Folder."
- After uploading your pictures, the AI will automatically analyze them on PicWish. Select an unwanted or tattooed part, and press AI Removal. The tool will remove your tattoos or other distractions quickly and accurately, and you can set the output resolution or size to retain the best quality after the editing process.
- Once the AI completes the removal process, press the button "Save All" to save the refined images on your computer. To find your saved files easily, use the option "Open in Folder." To see the results, double-click on any photo to open it and examine the tattoo-free, clean results right away.

Conclusion
To improve resolution of image Photoshop, you need to consider the following elegant workflow with major spots: enhancement of the resolution, exposure, and color correction, clarification and enhancement of textures, decrease of noises, and, finally, careful retouching of the unnecessary objects. AI-based options, such as the Super Resolution in Photoshop, produce high-quality images quickly. In contrast, the exposure and colors may be refined to your tastes using manual settings in Camera Raw and layers in Photoshop. Important details are enhanced with clarity and dehaze sliders, whereas noise is eliminated without affecting the sharpness of images. Removal tools are perfect for getting rid of spots or other attention-diverting details. Always work non-destructively, using duplicate layers and masks to keep the original image intact.
