 VLC Media Player is among today's most reliable and widely used multimedia players. It supports various formats and works across different platforms, making it a top choice for many users. However, like any software, it's not without issues. One common and frustrating problem is the "VLC no sound" error during playback. Even when the video plays smoothly, the absence of audio can disrupt the experience. Thankfully, most VLC sound issues are easy to diagnose and fix. Whether it's a muted setting, audio output misconfiguration, or a codec problem, resolving it ensures a seamless viewing experience. In this guide, we'll discuss the possible reasons behind the VLC no audio problem and walk you through simple, useful solutions to restore your audio quickly.
Why Does VLC Play Video without Audio?
If you're experiencing video playback but no sound, there could be several causes. Below are the most common reasons why you may find the audio not working in VLC Media Player:
- Muted Audio in VLC: VLC might be muted internally without you realizing it. Users often accidentally click the mute icon or reduce the volume slider to zero.
- Corrupted Media File: A damaged video file can lead to missing or broken audio streams. This often results in no audio in the VLC Media Player during playback.
- Outdated Audio Drivers: If your system's audio drivers are outdated or corrupted, they can interfere with VLC's sound output. This can cause VLC audio problem even when the video plays fine.
- Conflicting Codecs or Plugins: Third-party codecs or plugins can conflict with VLC's built-in audio decoders. These conflicts can disrupt audio playback or mute the sound entirely.
- Damaged VLC Installation: A corrupted or incomplete VLC installation can lead to malfunctioning features, including sound issues. This often results in the sound not working in VLC Media Player.
How to Fix VLC Media Player Audio Not Working
| Solution | Effectiveness | Time Required | Notes |
|---|---|---|---|
| Unmute VLC Media Player | Medium–High | Less than 1 min | First thing to check before deeper troubleshooting |
| Enable VLC's Audio | High | 1–2 mins | Often disabled unintentionally |
| Turn On the Sound Device | Medium | 2–4 mins | Useful if switching between headphones and speakers often |
| Turn Audio Track Off & On | Medium | Less than 1 min | Helpful for videos with multiple or corrupted audio tracks |
| Update Your VLC Media Player | High | 2–3 mins | Ensures compatibility and fixes known bugs |
| Use an Alternative Media Player | High | 3–5 mins | Ideal for immediate playback needs; consider permanent switch if VLC often fails |
| Convert the Media File | High | 3–5 mins | Best for files that won’t play in any media player due to encoding or codec issues |
1. Unmute VLC Media Player
Sometimes, the most evident solutions are the easiest to overlook, especially for VLC's mute function. It's not uncommon for users to accidentally mute VLC or lower its volume slider without realizing it, especially when switching between multiple media players or audio devices. Moreover, this simple action can lead to frustration when there's no audio in VLC Media Player, even though the video appears to be working perfectly. Before diving into complex fixes, it's important to remember that a muted or low volume setting within VLC is one of the most frequent causes of sound issues. Recognizing this can save time and unnecessary troubleshooting. Here is the user guide for fixing the issue:
User Guide:
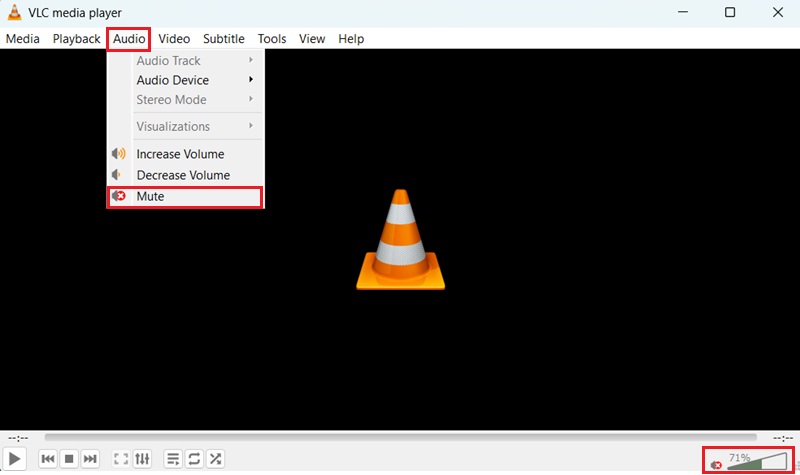
- Open your VLC Media Player. Then, look at the bottom right corner of the VLC window to find the volume control icon. See if the speaker icon is gray, which shows that the audio is muted.
- If the media player is muted, click the volume icon to unmute it. If you're unsure whether the volume is still muted, click the "Audio" option on the toolbar. Then, click the "Muted" option to restore the VLC audio.
- Then, adjust the volume slider to an appropriate level to ensure sound can be heard. Make sure VLC Media Player is not set to zero volume. Once done, try playing a video or audio file to check if the sound has returned.
2. Enable VLC's Audio
VLC Media Player includes a feature that allows users to turn off audio output entirely, which can be useful when troubleshooting specific playback issues. However, if this setting is enabled unintentionally, it may lead users to believe that audio is not working in VLC Player. This option can silently mute all media, making it appear as though there's a larger technical problem when, in fact, it’s a simple configuration setting. Double-checking this option is a smart step when diagnosing audio playback issues.
Step 1 Access VLC's Preferences
To initiate the process, start your VLC Media Player. Then, in the VLC media player interface, click the "Tools" option. Then, from the drop-down menu, select the "Preferences" settings.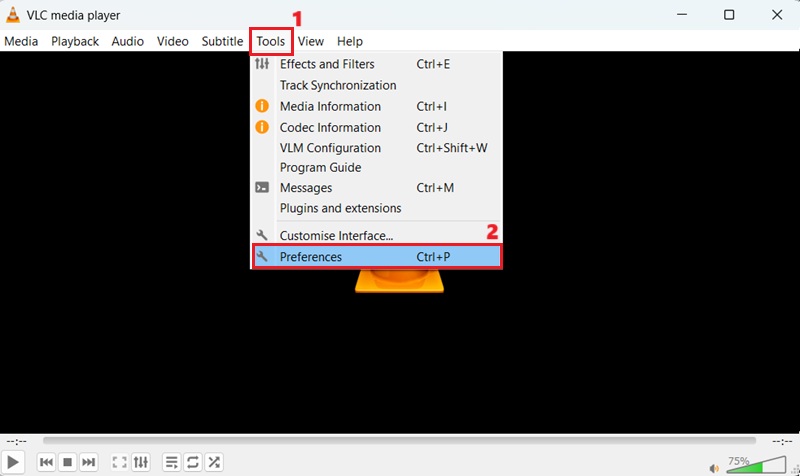
Step 2 Enable Audio
After opening the preferences, navigate to the "Audio" settings. From here, ensure that the "Enable audio" box is checked. Then, smash the "Save" button on the lower right part of the window to keep the changes. Now, play an audio file to see if the volume works.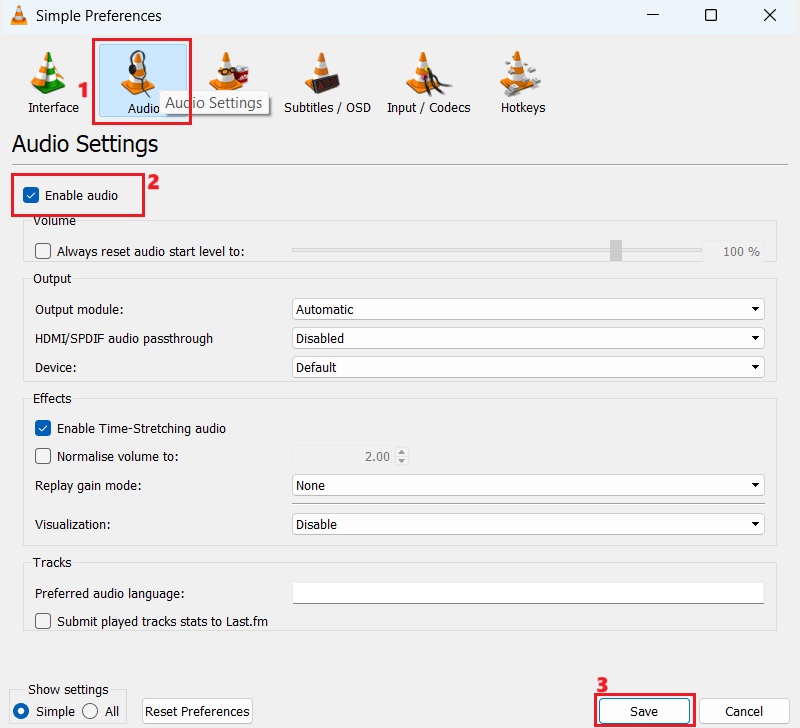
3. Turn On the Sound Device
Sometimes, the audio problem in VLC Media Player isn't caused by the player itself but by your computer's audio settings. In many cases, the wrong output device is selected, especially if you frequently switch between headphones, external speakers, or other audio devices. As a result, VLC may try to send sound through a device that isn't currently connected. To fix this, check your system's sound settings and ensure the correct device is selected. You can also review your VLC default player settings to verify that the proper audio output module is being used. After making changes, restarting VLC can help apply the new settings and restore audio output.
User Guide:
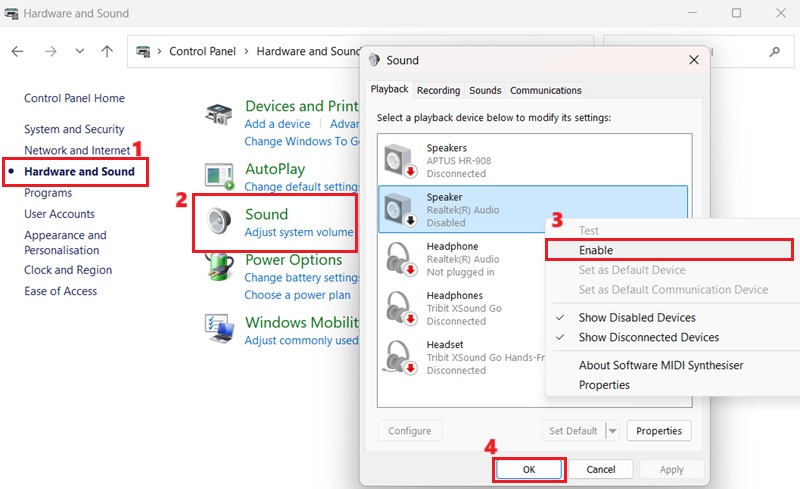
- To begin, access the "Control Panel" by searching for it in the Windows search bar. Then, in the Control Panel, click on "Hardware and Sound." After that, select "Sound" to open your computer's sound settings.
- In the Sound settings window, go to the "Playback" tab, which lists all the audio output devices connected to your computer. Then, right-click on the device you want to use for audio output (e.g., your default speakers or headphones). If the device is disabled, select "Enable" from the context menu.
- To make it the default device, right-click on the same device again and select "Set as Default Device." Then, hit "OK" to save the modifications and close the Sound settings window. After that, try restarting VLC to make sure the settings are applied correctly and to play your media.
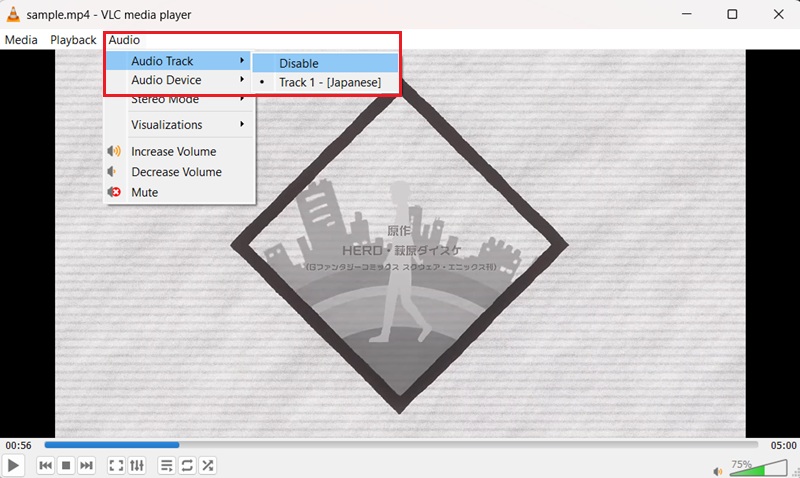
4. Turn Audio Track Off and Then Back On
When playing video files in VLC, you might run into a situation where the video plays without any sound or the audio seems distorted. To solve this, you can fix VLC audio issues by turning the audio track off and back on. By doing this, VLC is forced to reset the audio stream, which can often correct temporary glitches or misconfigurations of the audio output. To do this, you can access the "Audio" on the menu bar while playing a video in VLC, turn off the current audio track, and then re-enable it.
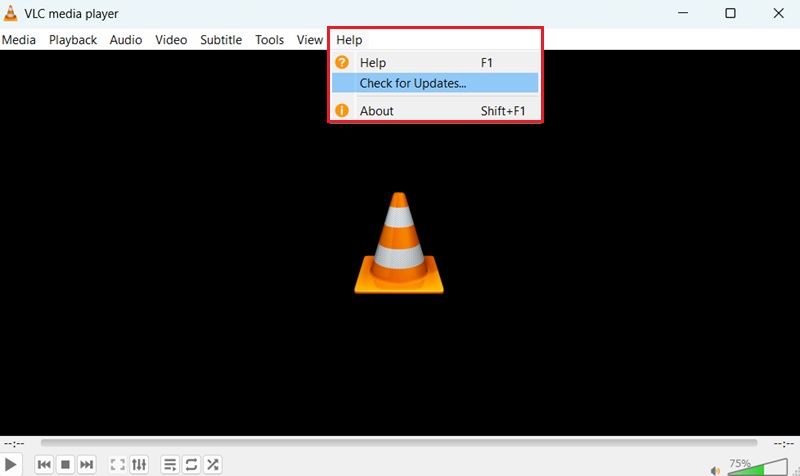
5. Update Your VLC Media Player
To guarantee an optimal performance and compatibility, keeping your VLC Media Player updated to the newest version is crucial. Updates bring performance improvements, bug fixes, and support for new codecs and file formats. This method can also fix the VLC Media Player video not playing and the no sound issue. Since bugs and unsupported codecs can sometimes cause the media player to malfunction. Moreover, keeping VLC up to date ensures you have the latest audio and video decoding capabilities, which can fix compatibility issues. You can update your VLC Media Player by going to the "Help" menu and picking "Check for Updates".
"Updates come with performance improvements."
Updating VLC can address bugs, ensure compatibility with the latest codecs, and improve overall performance.
6. Use an Alternative Media Player
Suppose you still have no audio from the VLC player after trying everything. In that case, you can switch to another media player to enjoy your videos and audios. One of the best VLC alternatives is AceThinker Player. It supports video and audio playback and various video and audio formats. These formats include MP4, MKV, AVI, MP3, FLAC, AAC, and more. Furthermore, it also allows you to play Blu-ray discs and ISO files, giving you more options to enjoy your files. It also enables you to customize the playback settings, including the audio volume and output device. Besides, AceThinker also enables you to play high-quality audio and videos, making your viewing and listening experience even more enjoyable.Here's how you can play media files using AceThinker Player:
Try it for Free
Step 1 Download and Install the Player
To get started, click any of the download buttons above. Once the file is downloaded, locate it in your system. Then, run the installer and go through the on-screen instructions to complete the installation process. After that, the AceThinker Player will launch on your computer.
Step 2 Add Media File
When the AceThinker Player is launched on your computer, open the media file you want to play. You can directly drag-and-drop the file onto the player's interface or use the "Open File" option from the menu. Then, browse for the media file you want to watch or listen to.
Step 3 Play the Media File
Once the media file is loaded into the player, playback will start automatically. While the media file is playing, you can play and pause the video, adjust the volume, and use other playback options. You can also take a screenshot or change the playback speed of the file you're watching or listening to.
7. Convert the Media File
The no sound from VLC player problem may occur because the audio codec of the video file you are trying to play is not compatible with the VLC Media Player. To convert your media file into another format, you will need a video converter like AceThinker VidElement. This video converter can convert your video files into more than 1000 file formats, such as MP4, AVI, MOV, MKV, and more. You can also convert it into audio formats like MP3, AAC, FLAC, WMA, WAV, and more. Additionally, this video converter is fast with its acceleration technology, which can convert your files 5x faster than standard video converters. Apart from that, you can retain the media file's original quality or enhance it up to 8K video resolution.Here's how to convert a media file using AceThinker VidElement:
Try it for Free
Step 1 Download and Install the Software
First, click one of the download buttons to get the video converter from the installer. Once downloaded, run the file and heed the on-screen prompts to install the VidElement video converter on your device.
Step 2 Import Media File
Once the installation process is complete, the video converter will launch. Then, on the video converter's interface, hit "Add Files." Afterward, a small window will emerge on your screen, allowing you to browse for the media file you want to convert.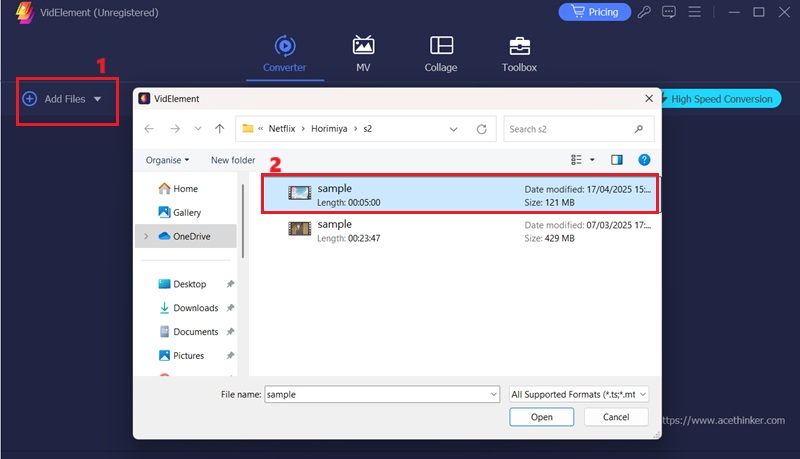
Step 3 Convert the Media File
Once the media file is added to the video converter, select the output format. You can do this by clicking the "Output Format" button at the lowermost left corner of the video converter. Then, pick your desired video format from the list. Finally, hit the "Convert All" button to convert your video to the selected format.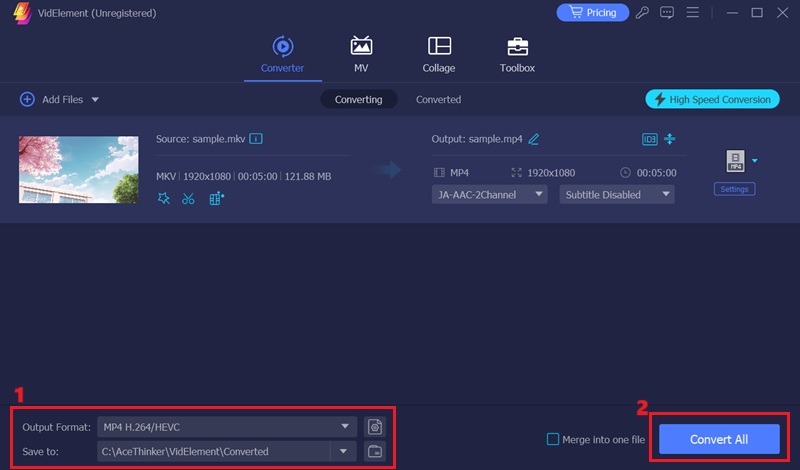
Step 4 Play the Converted File
Once you convert the media file will be available on the "Converted" panel. You can locate it by clicking the folder logo beside the media file. After that, open it using the VLC media player and see if the VLC no sound problem is solved.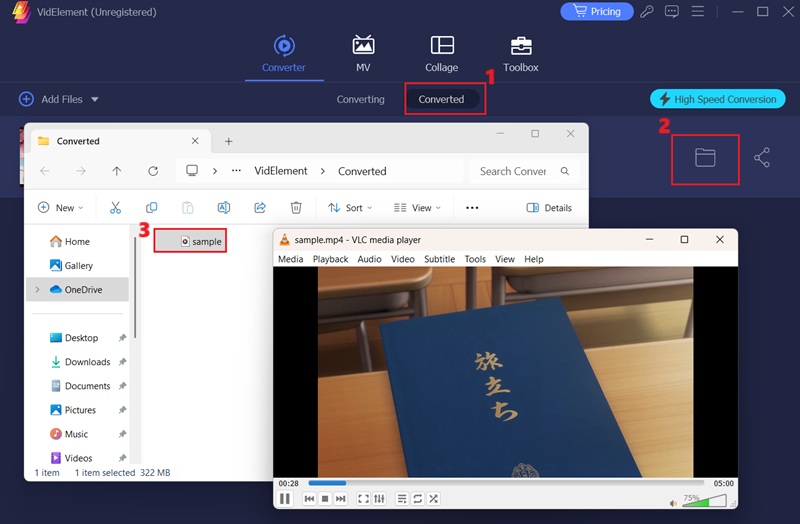
Frequently Asked Questions
Why does VLC have no audio?
VLC has no audio due to muted volume, incorrect audio settings, or a corrupted media file. Sometimes, the issue is caused by outdated sound drivers or selecting the wrong audio output device. Checking these common causes can restore sound quickly.

Why is there no audio in VLC Media Player, but the video plays fine?
This usually indicates an issue with the audio track or output settings. The file may lack a valid audio stream, or VLC might be sending sound to an inactive device. Reviewing VLC’s audio output module can help resolve this issue.
Can outdated drivers cause VLC audio issues?
Yes, outdated or corrupted audio drivers can interfere with VLC’s sound playback. They may prevent proper communication between the system and your output devices. Updating drivers is a reliable way to solve unexpected audio problems.
Conclusion
In conclusion, fixing VLC no sound issues is often simpler than it seems. By reviewing each possible cause, muted settings, incorrect audio devices, outdated drivers, or codec conflicts, you can systematically resolve the problem. If one method doesn’t work, don’t hesitate to try another, as different systems may respond to different fixes. Additionally, keeping your VLC Media Player and system drivers up to date is essential for smooth performance. With the right approach and a bit of patience, you can restore audio quickly and enjoy a seamless media playback experience once again.