How to Use AceThinker VidElement
The best video converter you can ever use on your device is AceThinker VidElement. With this video converting software, you can convert videos, including 4K, to formats like M4V, MKV, MOV, and MP4. Another exciting feature of this software is its speed in converting video; it's remarkably swift. Besides using this app to convert videos, you will be amazed at the editing features it offers. You can use this edit feature to add watermarks, external audio tracks, trim, rotate, and crop videos.The latest version of the app also offers numerous new features you can try. To know how you can use this tool's fantastic features, make sure you read this post thoroughly.
Getting Started
Step 1Download and Install VidElement
To start, use the download buttons provided on the AceThinker VidElement’s main website to get its installer package. Then, proceed to the installation process and launch the tool afterward.
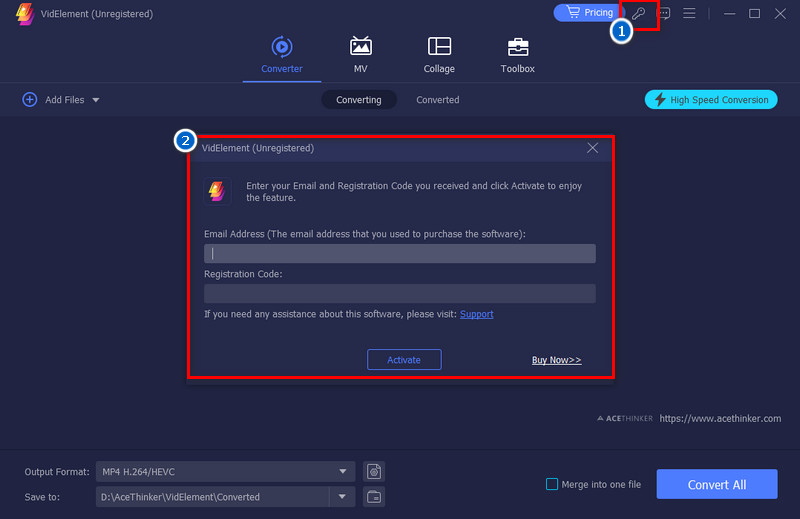
Step 2Enter Registration Code
Next, activate the pro version of the tool by clicking the “key” icon at the top. Then, enter the email address you used to purchase the registration code. Next, enter the provided keycode and click Activate.
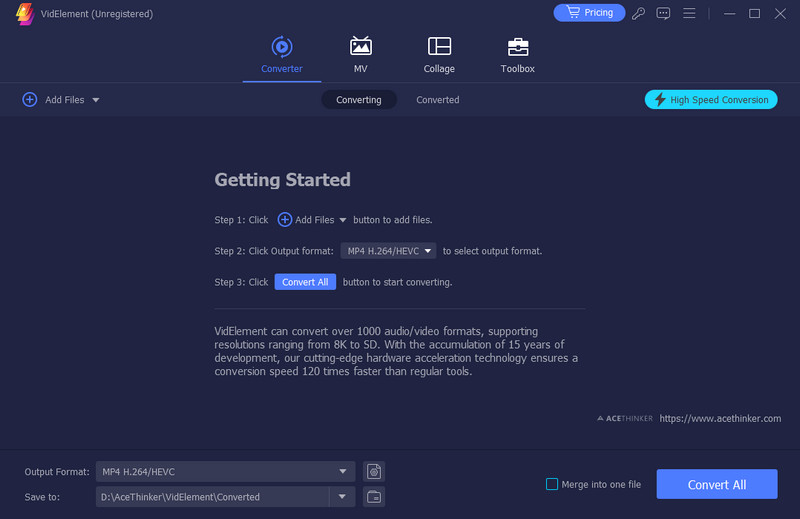
Convert Audio/Video to Different Formats
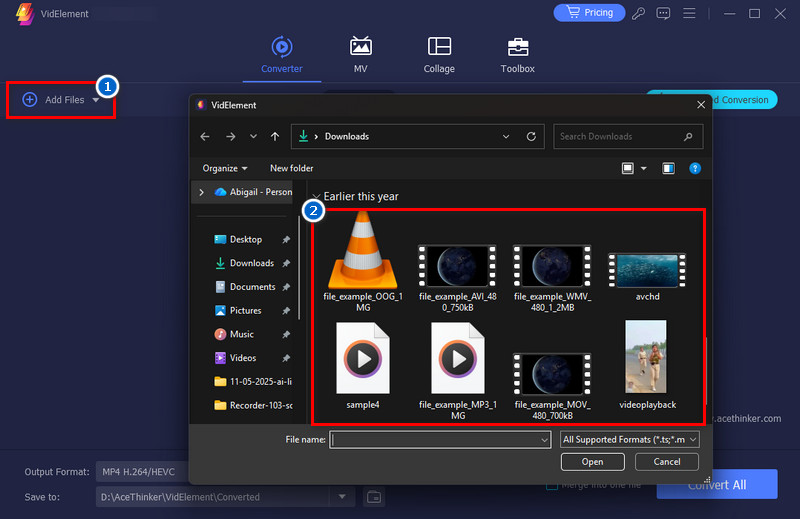
Step 1Upload a File
Use the “Add Files” button in the upper left corner to upload a file. Then, choose a video and audio file you want to convert in the pop-up folder. Alternatively, you can directly frag the file and drop it onto the tool’s interface.
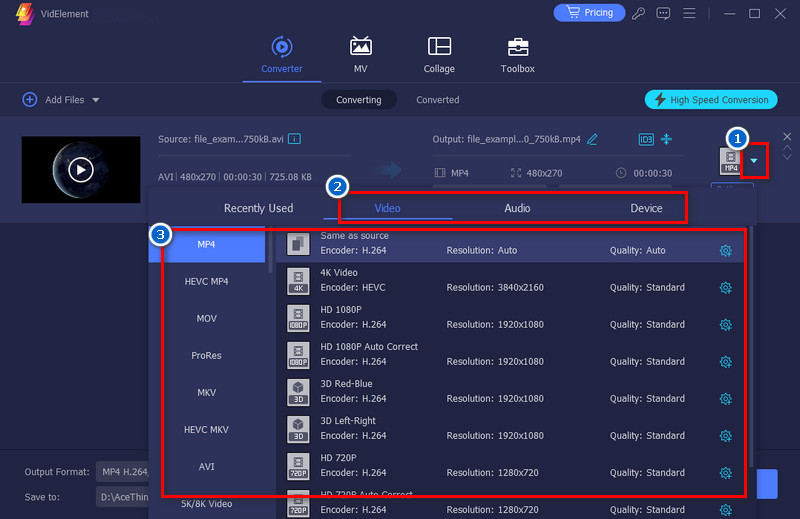
Step 2Choose Output Format
Next, click the dropdown icon beside the MP4 option. Here, you can see various formats for video, audio, and for specific devices. The tool also offers multiple options for each format, including various resolutions and qualities, as well as different bitrates for audio formats. Additionally, you can customize and select your preferred quality, encoder, frame rate, bitrate, and channel. Simply click the “Settings” icon beside the chosen output format.
Step 3Convert the File
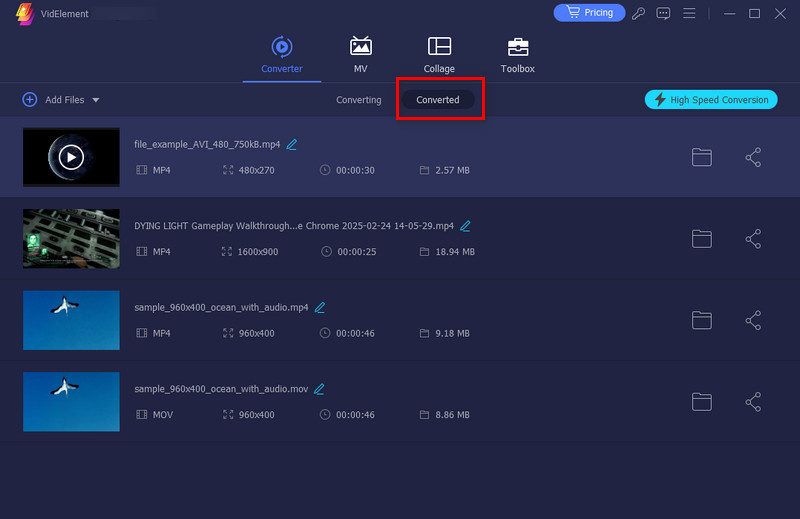
After that, click the “Convert All” button below, and the conversion process will initiate. Once the conversion is done, the output folder will appear on your screen, showing the converted file. Also, you can go to the “Converted” section to see the converted file.
Edit Video and Audio
Aside from converting files, you can also edit the file using AceThinker VidElement. See the functions below:
Merge and Combine Video
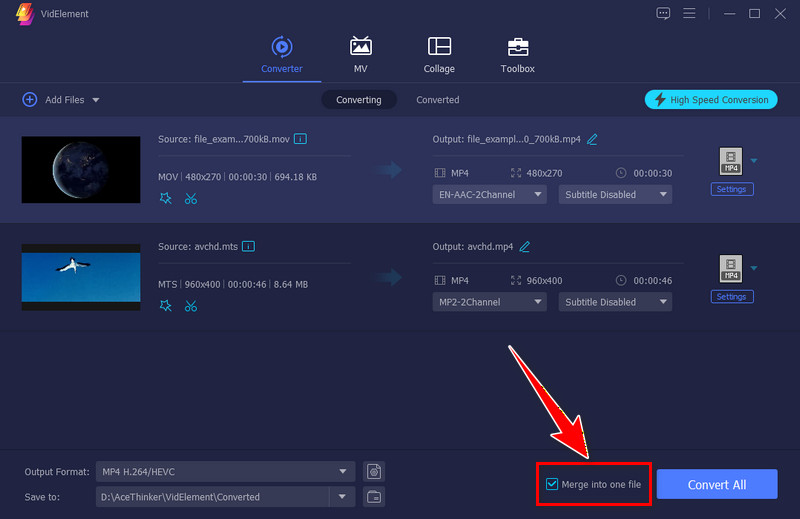
Suppose you want to merge and combine multiple videos into a single file. In that case, you can see the option "Merge into one file" beside the convert button. Enable this feature before converting, and you will get a single file after conversion.
Trim and Split Video
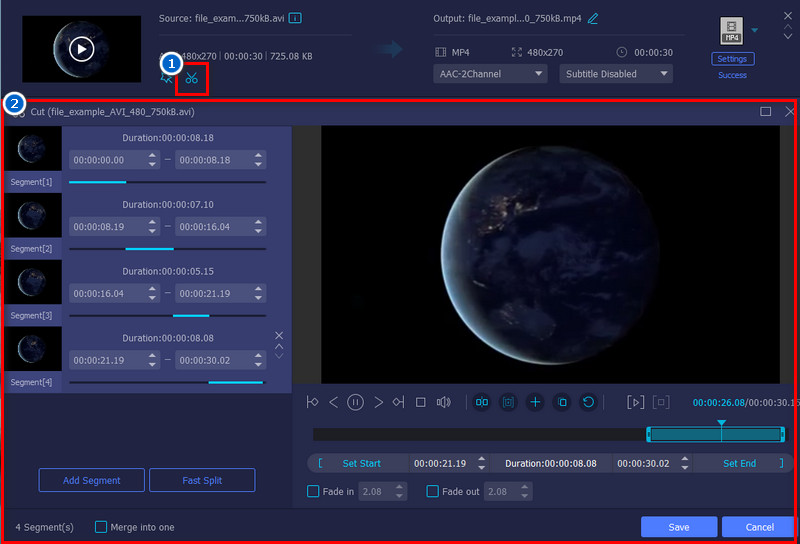
Click the "scissors" icon to access the editing window. Then, set a start and an ending duration time you want. You can trim and split the video as many times as you wish. Additionally, you will see the cut version in the left-hand corner.
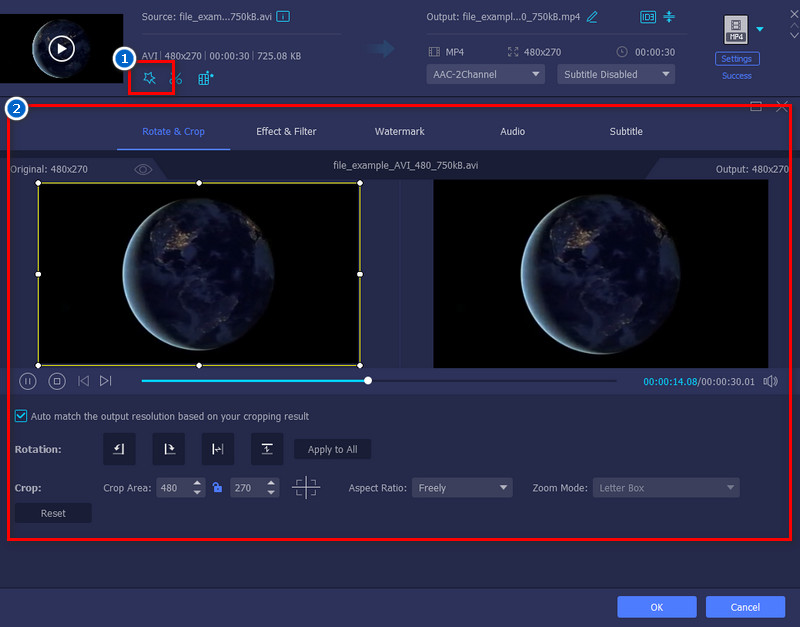
Rotate and Crop Video
To rotate and crop the video, go to the editing panel. From the "Rotate & Crop" section, select the desired orientation for rotating the video. Then, on the lower part of it, set the crop area or use the preset size preferred by the tool, such as 16:9, 4:3, 5:4, 21:9, 16:10, 1:1, and 9:16.
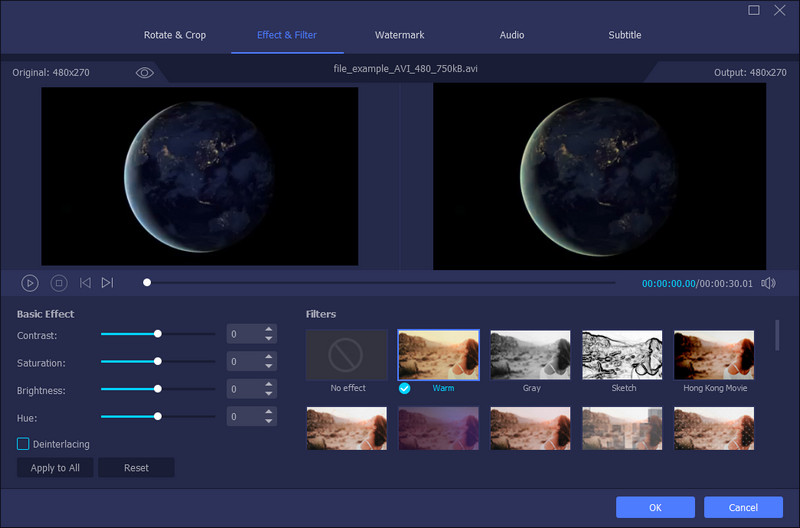
Effect and Filter
AceThinker VidElement also provides various effects and filters. Within the editing window, go to the "Effect & Filter" section. Here, you can adjust the contrast, saturation, brightness, and hue of the video. Aside from that, it also has various filters you can apply to your video.
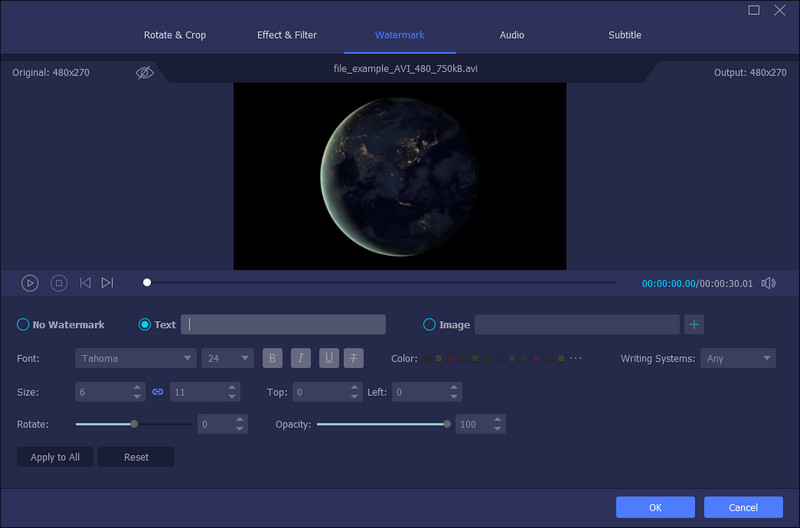
Add Watermark
Add your trademark to your videos. This tool allows you to add your brand name or logo. You can adjust the watermark's position, size, and transparency to fit perfectly on your video. Additionally, for text watermarking, you can select the desired font style and color.
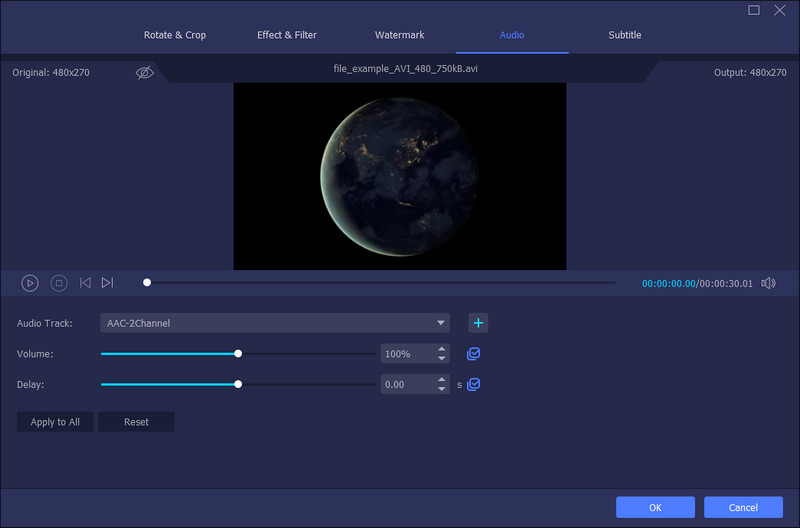
Edit Audio
In the editing window, you can also edit the audio of the video. It allows you to adjust the volume and delay of the audio. Additionally, you can add a new audio track if you want.
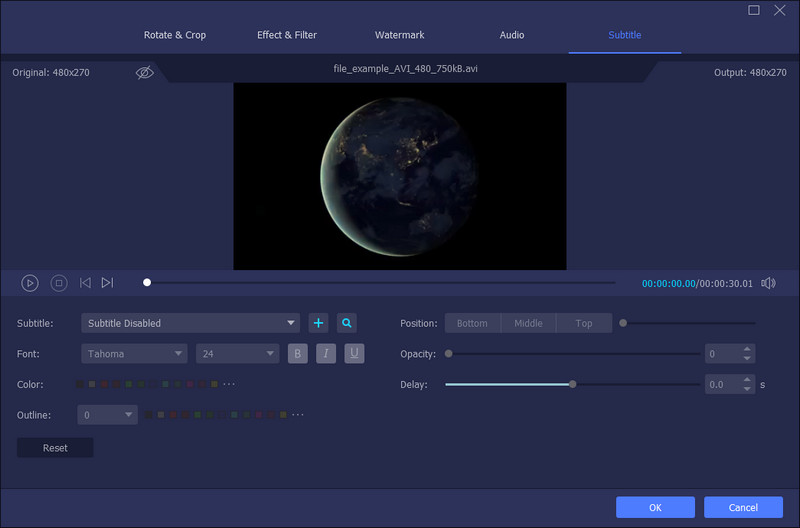
Adjust Subtitle
If your video has subtitles or you want to add subtitles to the video, AceThinker VidElement allows this. You can adjust the position, opacity, and delay of the text. Also, you can change the style, size, and color of the subtitles. Furthermore, if you don't have subtitles, you can use the search feature, which will direct you to a website where you can download subtitles.
Create Movies (MV)
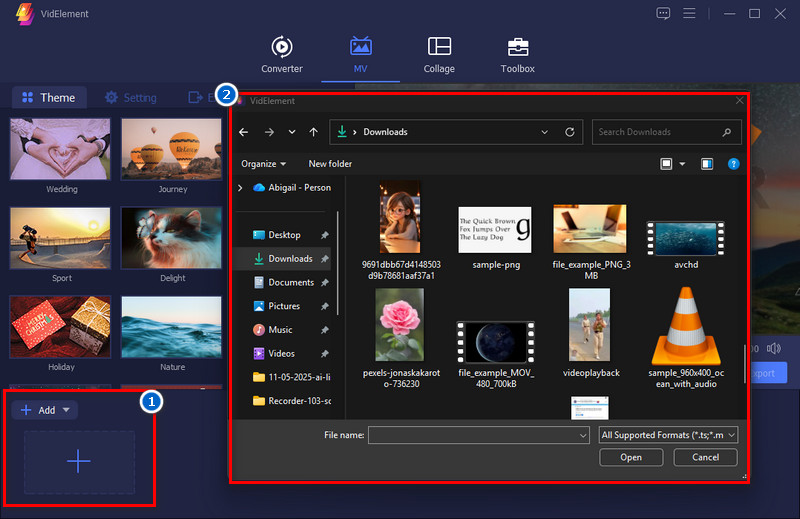
Step 1Add Videos and Photos
First, you need to import the videos and photos you want to use in your movies. Simply click the Add button or the plus icon below, then select the videos from the pop-up folder.
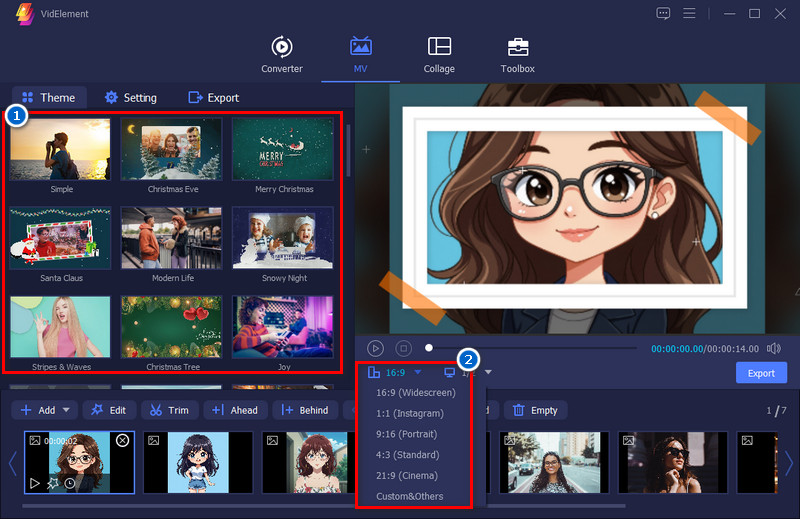
Step 2Select Preferred Theme
Next, choose your preferred video theme from the Theme section. You can choose happy, simple, Christmas Eve, snowy night, and many more. Also, select an aspect ratio from 16:9 (widescreen), 1:1 (instagram), 9:16 (portrait), 4:3 (standard), and 21:9 (cinema). Or you can customize your own size if you prefer.
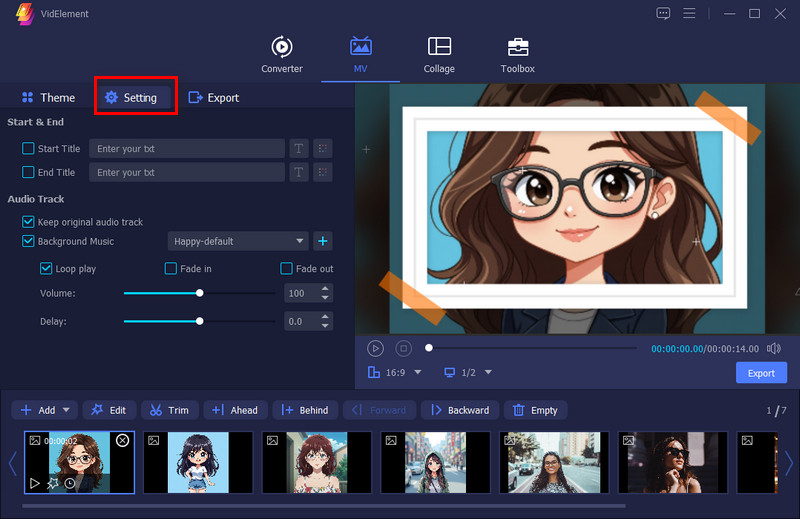
Step 3Edit the Video
To access audio settings, navigate to the Settings tab. Here, you can adjust the volume, delay, change background music, loop play, and more. Additionally, you can also add start and ending titles.
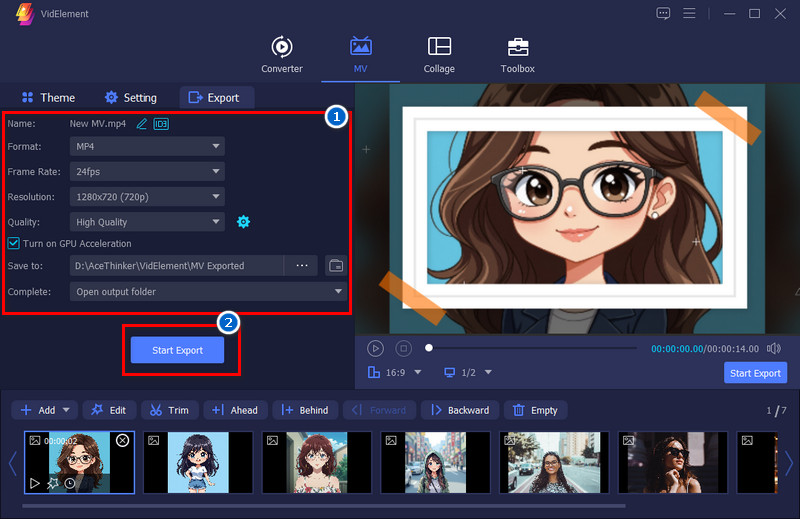
Step 4Export the MV
After that, preview the MV first before exporting it. Once satisfied, go to the Export section and set a name, format, frame rate, resolution, quality, and output folder. Finally, click "Start Export" to save the file.
How to Make Collage
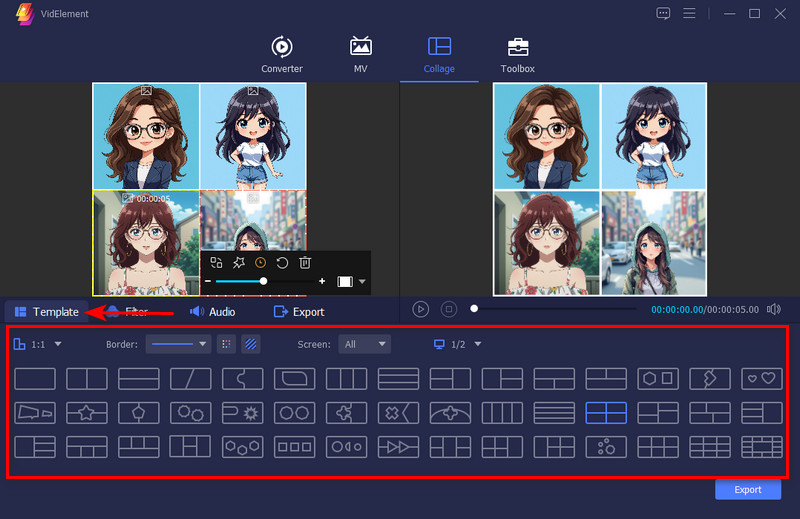
Step 1Choose a Template
Select a template you desire in the bottom part of the Collage section. Then, start adding photos and videos you want to see in one frame. You can also choose an aspect ratio and border line with customizable thickness, color, and design.
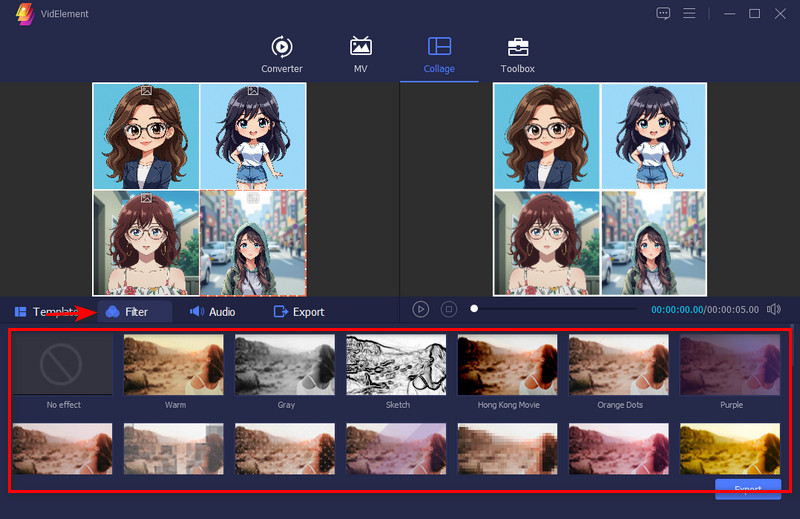
Step 2Choose a Filter
To add some vibes to the collage, you can add filters. AceThinker VidElement offers various filters, including sketch, brush, paint, cool, and more.
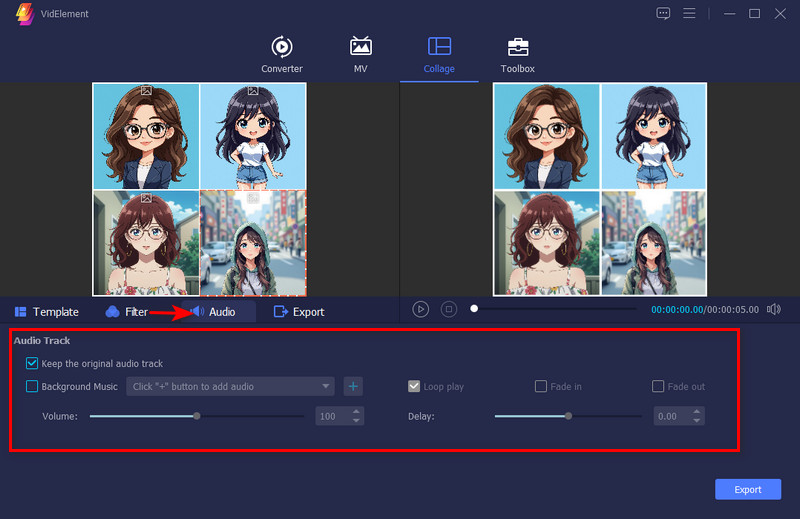
Step 3Add Audio Track
If you prefer to add background music, simply navigate to the ‘Audio’ section, where you can add an audio track. Then, adjust the volume, delay, and enable loop play, fade in, and fade out.
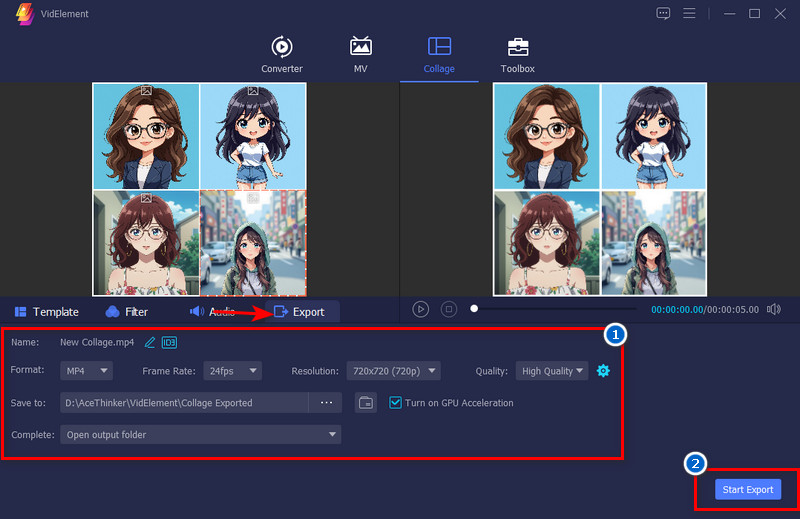
Step 4Save the Collage
When satisfied, go to the Export section. Here, you can rename the collage file and select your preferred format, frame rate, resolution, quality, and designated folder for output collage. Finally, click ‘Start Export’ to start exporting the collage.
AceThinker VidElment Toolbox
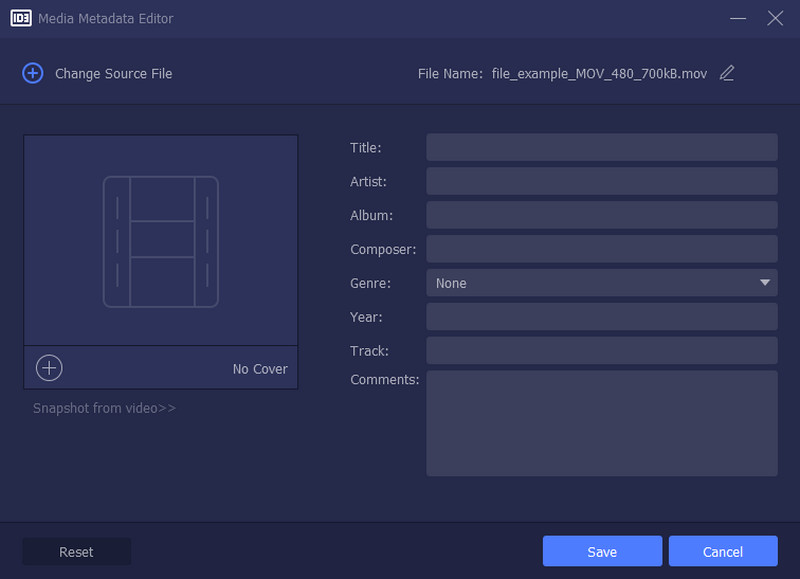
Media Metadata Editor
This feature allows you to edit or update information such as title, artist, album, and genre in your media files. It helps organize your videos and audio more neatly.
Add the file for which you want to edit the metadata. After that, you can start editing the title, artist, album, composer, genre, year, and track, and you can also add comments. Lastly, hit "Save" to confirm the changes.
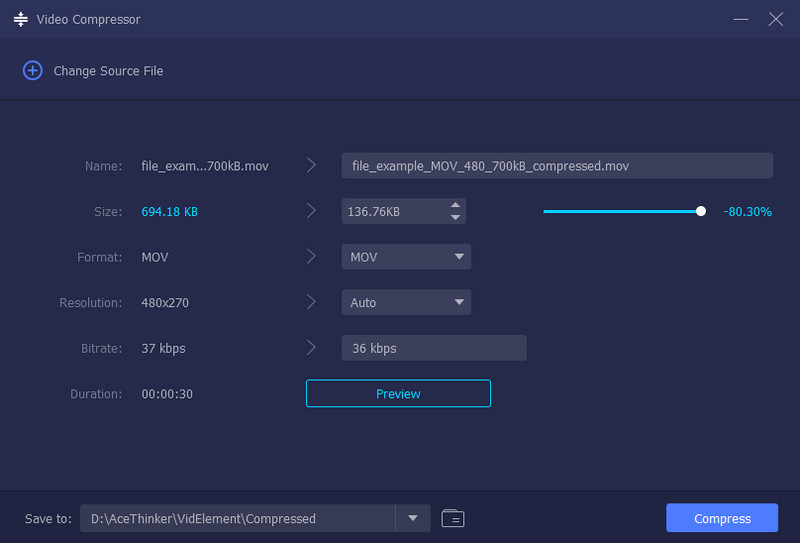
Video Compressor
This function helps you reduce the file size of your video without losing much quality. With this, you can save storage or upload videos faster.
Upload the video file you need to compress. From the next screen, you can adjust your desired size, format, resolution, and bitrate. Additionally, you can preview the video before compressing it to see how it will look after compression. Finally, hit the "Compress' button to start the process.
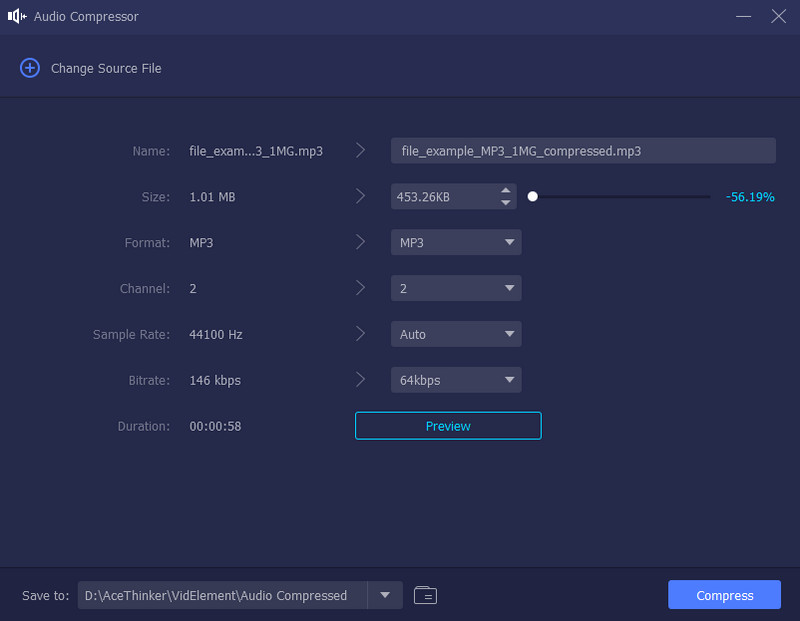
Audio Compressor
This feature helps you compress audio to reduce file size while maintaining clear sound quality. This helps make sharing and storing audio easier.
To do this, import your audio track to the tool. Next, set your preferred size, format, channel, sample rate, and bitrate. Additionally, like a video compressor, you can also preview the audio before compressing. After that, click the "Compress" button to start the compression process.
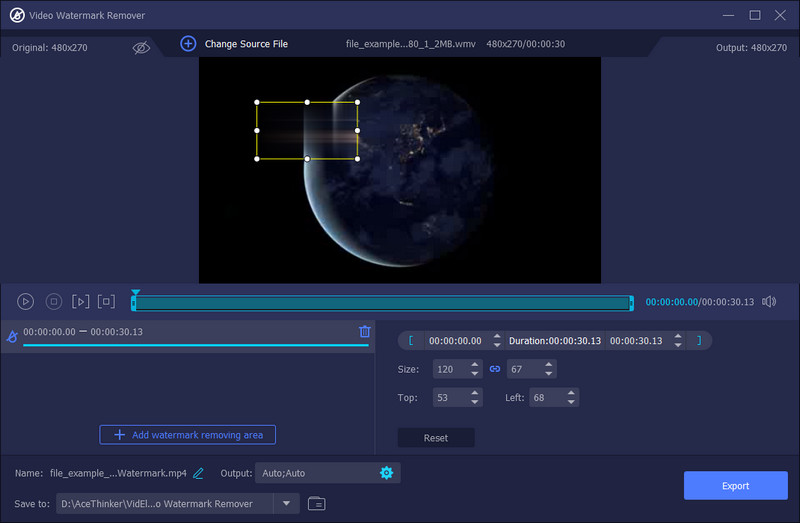
Video Watermark Remover
The tool helps remove unwanted watermarks, logos, or text from your videos. It gives your video a cleaner and more natural look.
To remove the watermark on the video, click the "Add watermark removing area" button below. Then, you can see an adjustable box within the video, which you use to cover the watermark.
Additionally, it also lets you set a duration for when the watermark should be removed. You can adjust the start and end times to target the exact part of the video where the watermark appears. Once everything is set, click the "Export" button to process and save the cleaned video.
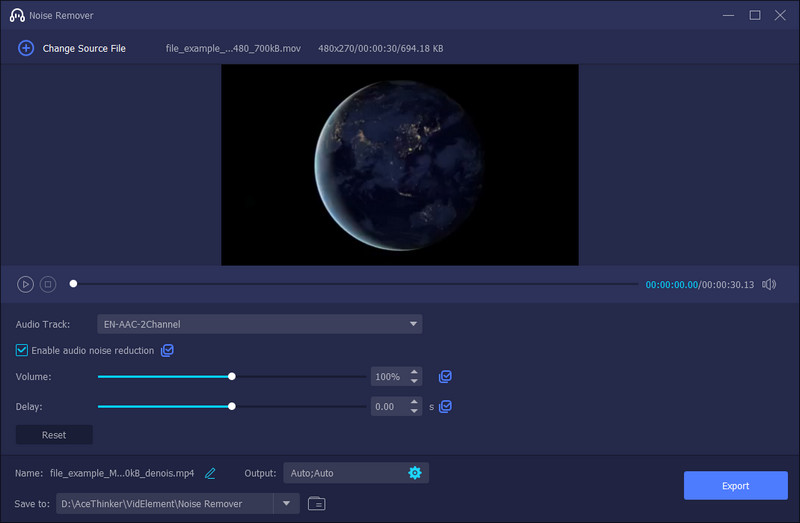
Noise Remover
This tool eliminates background noise or static from your audio or video. It enhances sound clarity for a better listening experience.
To do this, simply upload the video. Then, make sure that "Enable audio noise reduction is enabled in the next window. You can also edit the audio, like adjusting the volume and delay. After that, hit the "Export" button to confirm the changes.
GIF Maker
Turn your video clips or images into animated GIFs. You can easily customize the speed and duration of the animation.
To start making a GIF, open the GIF Maker tool and upload the video or images you want to turn into a GIF. Then, set a frame rate, duration, and zoom mode, and ensure that the Loop animation is toggled on. Finally, preview it and click the 'Export' button once you are satisfied.
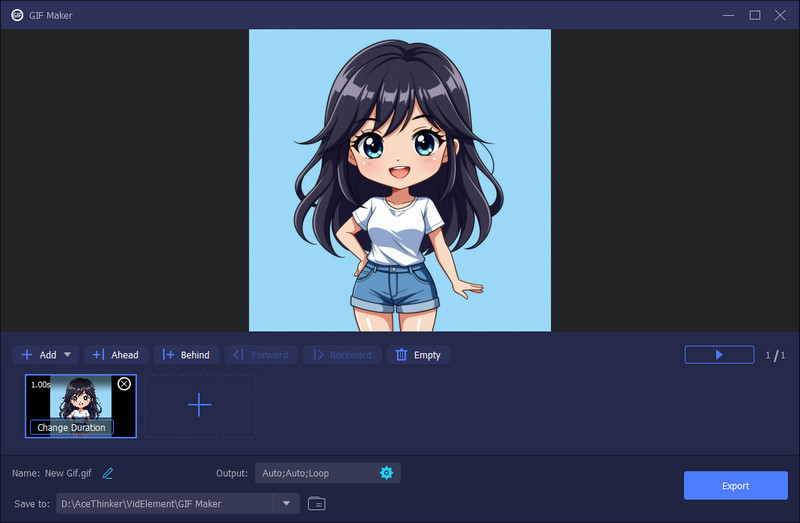
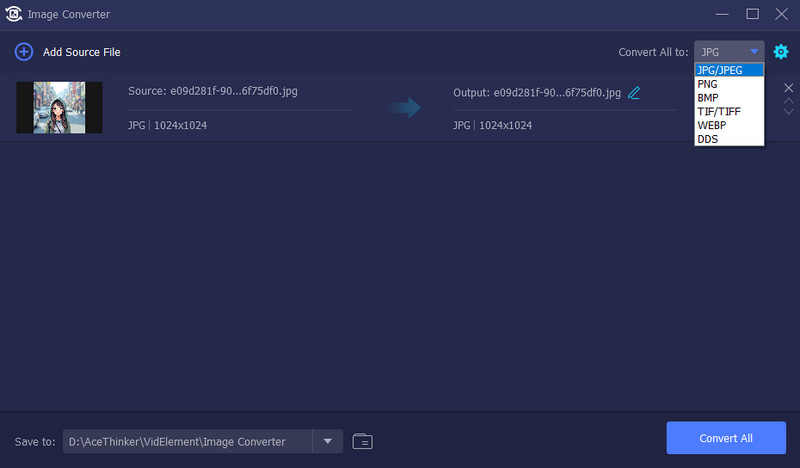
Image Converter
This feature converts images into various formats, including JPG, PNG, BMP, and others. It ensures your pictures are compatible with multiple devices or platforms. Additionally, the image converter supports batch conversion, making it ideal for converting multiple images at once.
Simply select all the images you want to convert and upload them to the tool. Once uploaded, click the "Convert All to" dropdown to select your desired output image format. Lastly, click the 'Convert All' button to start the conversion process.
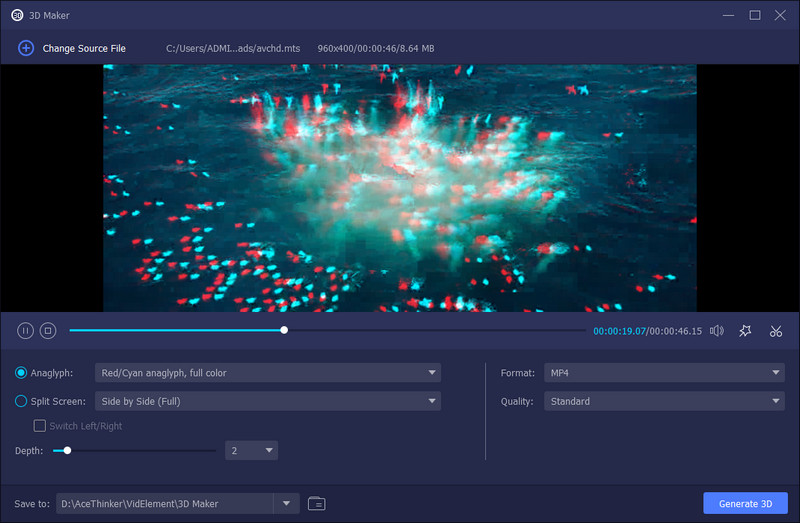
3D Maker
This 3D Maker tool helps you transform regular 2D videos into 3D format. This feature gives additional depth and dimension to your clips for a more immersive experience.
To make a 3D video, first import your video file. Then, choose a 3D type in the "Anaglyph" section or use the Split Screen mode for side-by-side 3D viewing. Finally, adjust the depth level, select the output format and quality, choose where to save it, and click "Generate 3D" to create your 3D video.
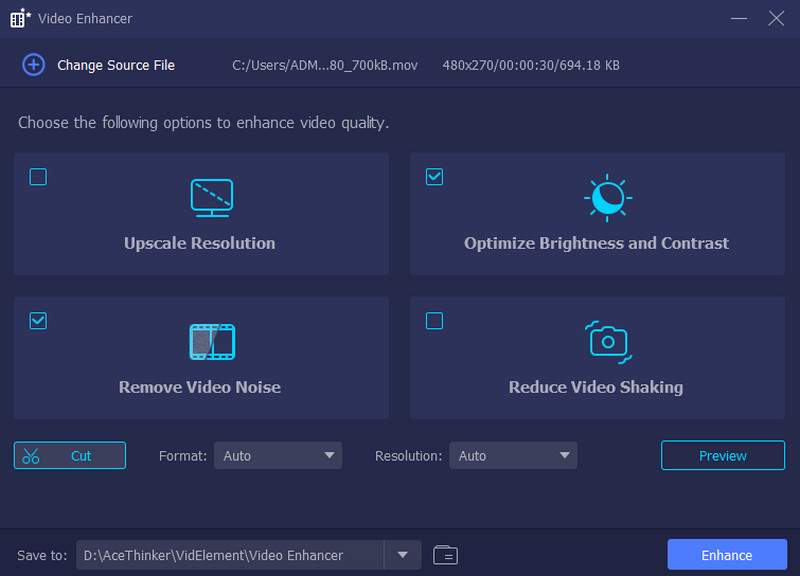
Video Enhancer
The tool improves video quality by adjusting brightness, contrast, and resolution. It helps make your videos look sharper and clearer.
To start enhancing the video, you need to import the video footage, of course. Then, you can select options such as Upscale Resolution, Optimize Brightness and Contrast, Remove Video Noise, and Reduce Video Shaking to enhance the quality. After choosing your settings, preview the changes and click "Enhance" to apply them and save the improved video.
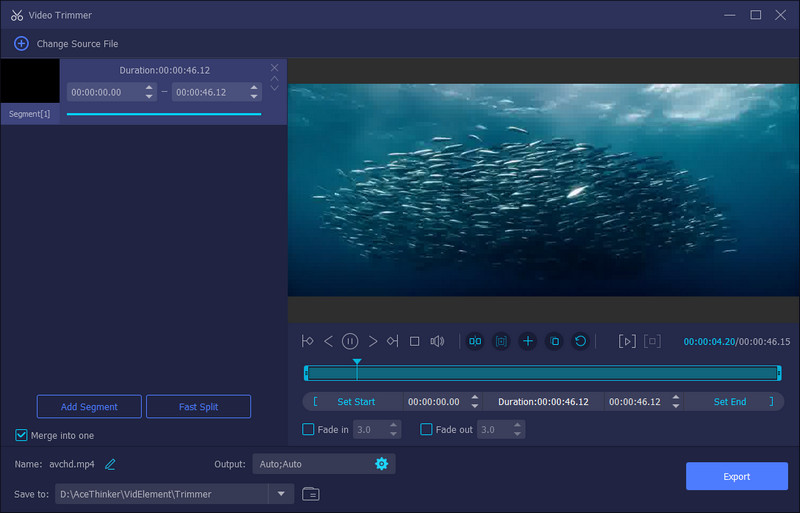
Video Trimmer
This feature enables you to trim unwanted sections from your video. It's useful for keeping only the most important scenes.
Simply upload your file, set start and end times, or use the Fast Split option to trim the video. You can also add segments, apply fade-in/out effects, and merge clips into one file. Once trimming is complete, select the save location and click Export to obtain the final video.
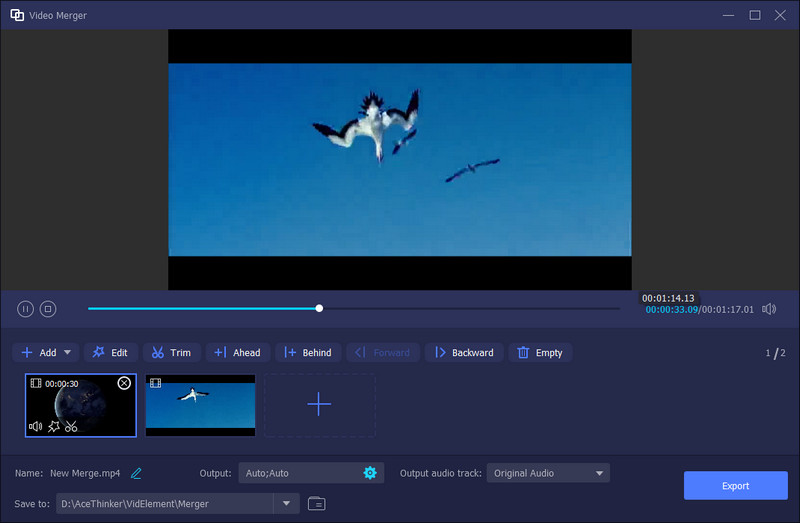
Video Merger
Try this tool to combine multiple video clips into one continuous file. It's ideal for creating a complete movie or presentation.
All you have to do is upload all the videos you want to combine into a single file. You can edit or trim the clips and arrange their order using the Ahead or Behind buttons. Finally, click "Export" to save your merged video.
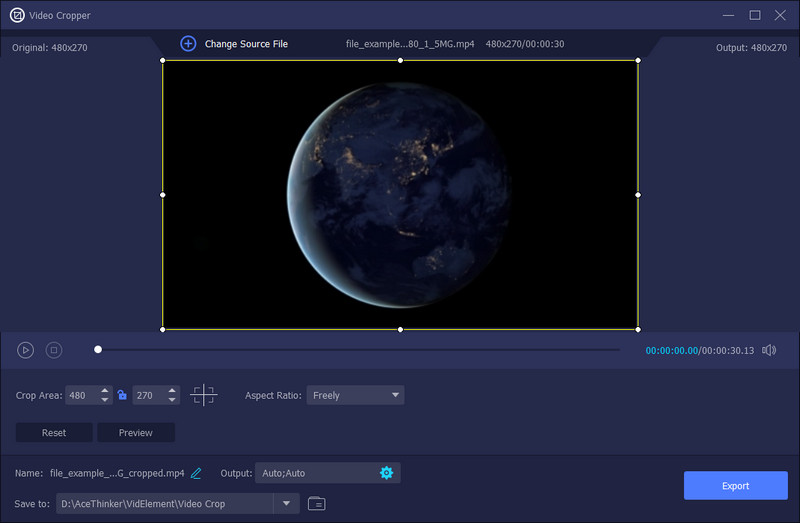
Video Cropper
The tool lets you remove black bars or unwanted edges from your video. That means you can focus on the main subject or adjust the frame size to suit your needs.
Simply upload the video file and set an aspect ratio using the "Crop Area" option. After that, click the "Preview' button to check the video before saving. Once satisfied, hit the "Export" button.
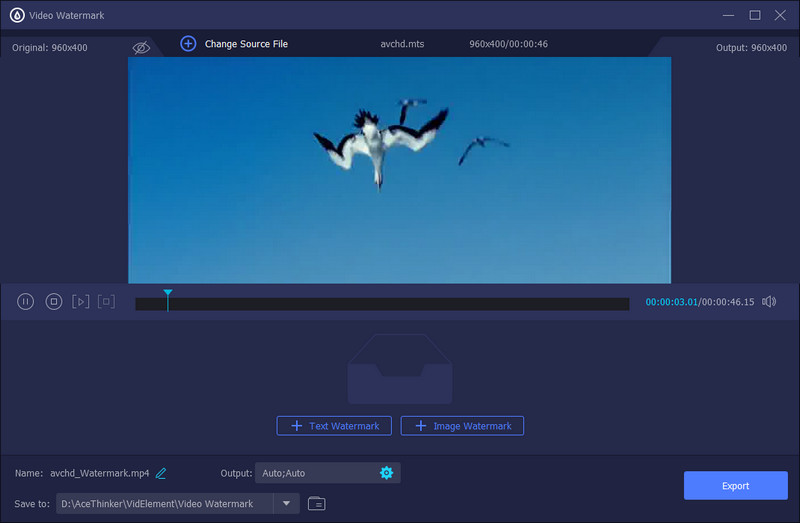
Video Watermark
Add your own text or logo watermarks to your videos with our Video Watermark tool. It helps protect your content and promote your brand.
To add a watermark, simply choose whether to add a text or an image watermark. Then, place it wherever you want the video and click "Export' once finished.
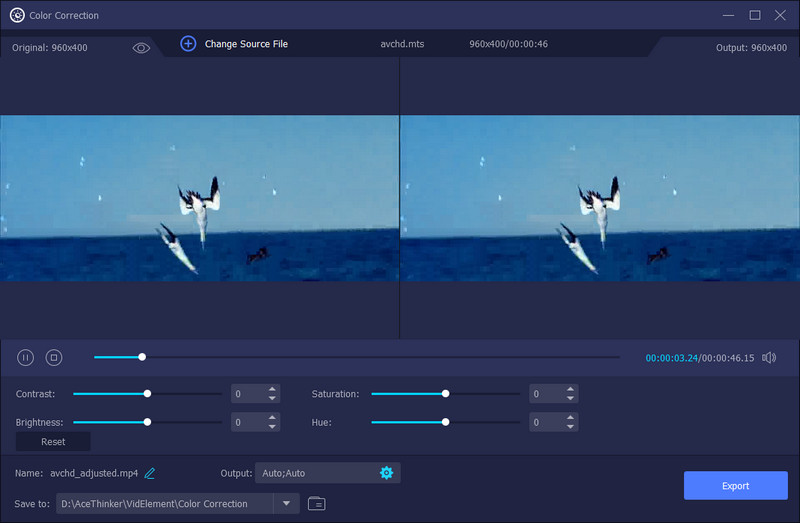
Color Correction
Adjusts the brightness, contrast, saturation, and hue of your video. Our tool helps you achieve a consistent and professional color tone.
Our Color Correction tool works by uploading your video first. Once uploaded, you can now adjust the slider for contrast, brightness, saturation, and hue of the video. While adjusting, you can see a real-time preview of your changes in the right corner. This lets you compare the original and edited versions side by side. Once you're satisfied with the color adjustments, click "Export" to save your enhanced video.
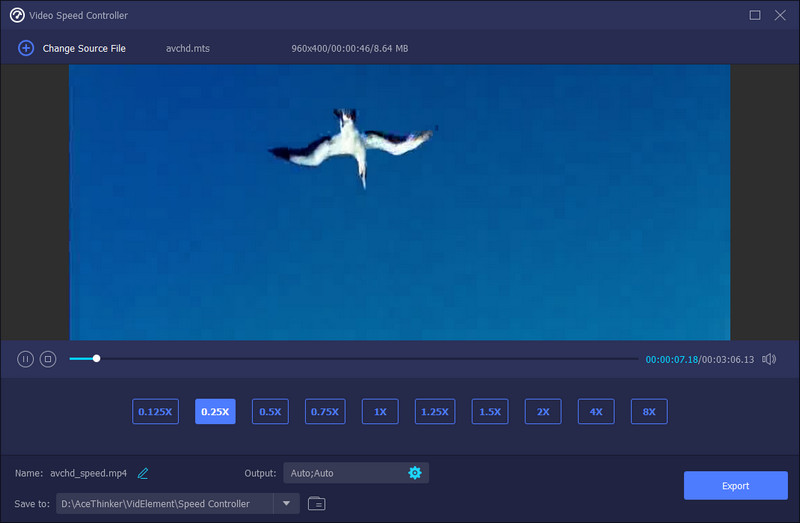
Video Speed Controller
Use our Video Speed Controller to change the playback speed of your video. You can make slow-motion or fast-forward effects easily. It also supports playback speeds ranging from 0.125x to 8x.
To change the playback speed of your video after uploading, select your preferred speed from the options below. Then, you can see a real-time preview above while finding the speed that suits you best. Finally, click "Export" to save the changes.
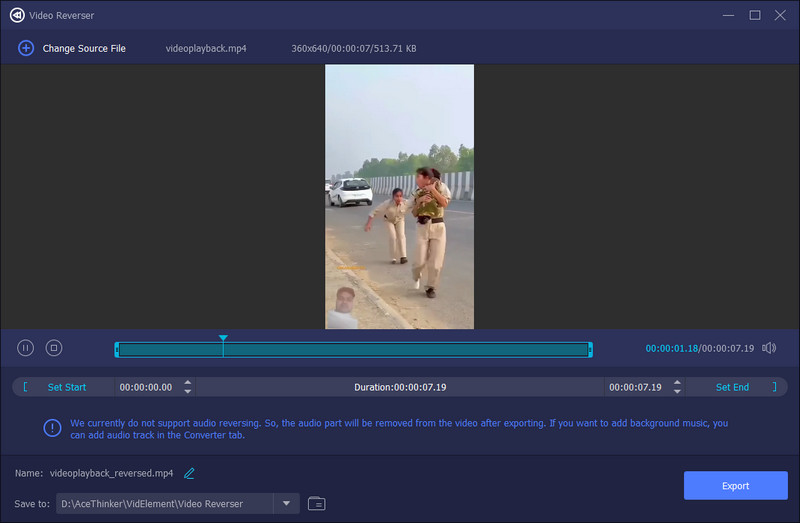
Video Reverser
This feature plays your video backward for creative or funny effects. It's great for making engaging and unique content.
To use this tool, after uploading your video, drag the blue sliders below the preview to set the start and end points of the clip you want to reverse. Then, preview the video first and click "Export" to create the reversed video.
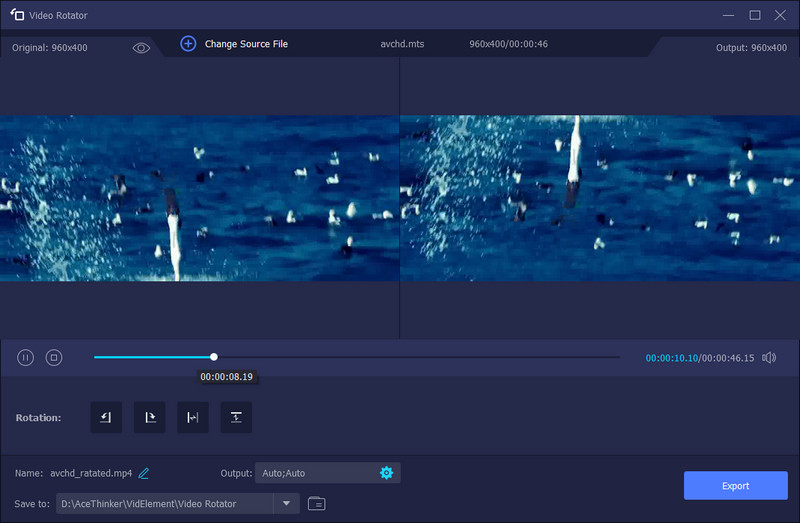
Video Rotator
The video rotator helps you rotate your video to the correct orientation. You can flip it 90°, 180°, or 270° as needed.
Simply upload the video and select the preferred orientation from the options below. You can see the changes immediately in the right corner. Next, click the "Export" button to save your changes.
Volume Booster
Suppose you have a video that has weak audio. In that case, this tool helps you increase the volume level of your audio or video. It makes quiet clips louder and easier to hear. You can adjust the volume to a level of up to 200%.
Simply upload the video, adjust the volume slider to your preferred level, and then set it accordingly. After editing, export the video and preview the changes.

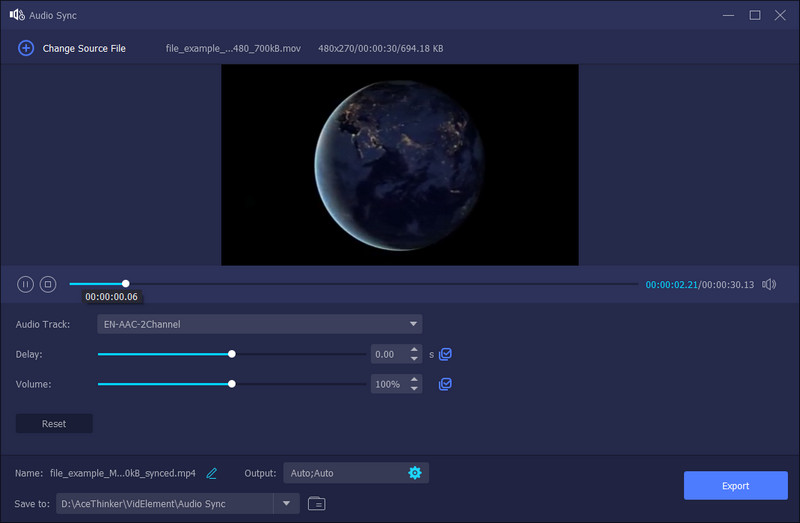
Audio Sync
For videos who have delayed audio, this tool is for you. It helps match the audio track with the video when they're out of sync. Also, the tool ensures voices and actions play in perfect timing.
Simply adjust the audio delay timing using the slider. After that, save the changes and preview the edited video afterward.
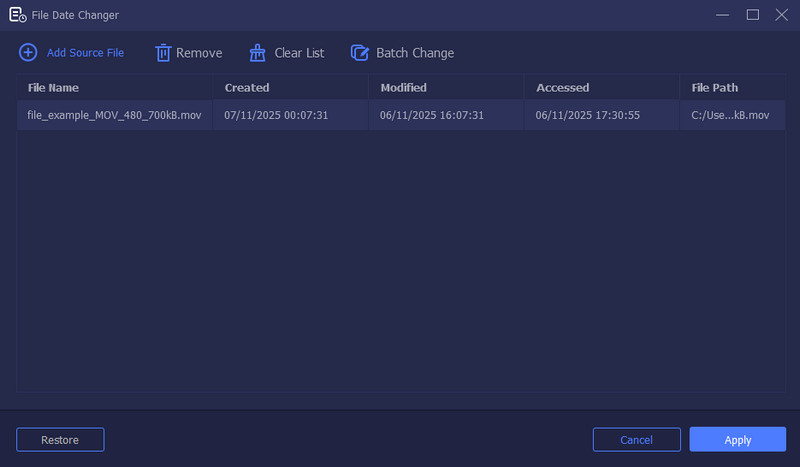
File Date Changer
Modify the creation, modification, or access date, as well as the file path, of your files with our tool. It's useful for organizing or correcting file details.
To do this, after adding your file, click on the date or time fields under "Created," "Modified," or "Accessed" to edit them as needed. You can also use Batch Change to update multiple files at once. Once you've made your changes, click Apply to save the new file dates.
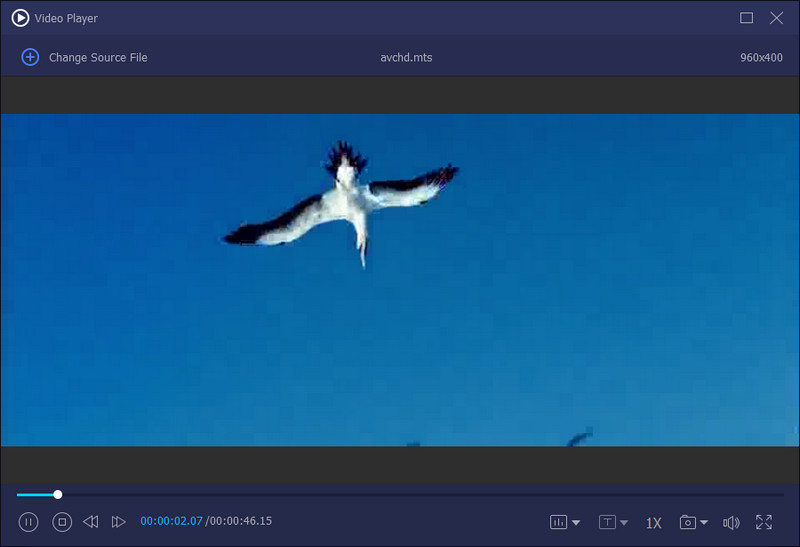
Video Player
Aside from conversion and other video editing tools, you can also use this tool as your video player. It allows you to play various video formats smoothly. The tool also offers playback controls for an enhanced viewing experience.
Simply access the tool, upload the video, and it will play automatically.
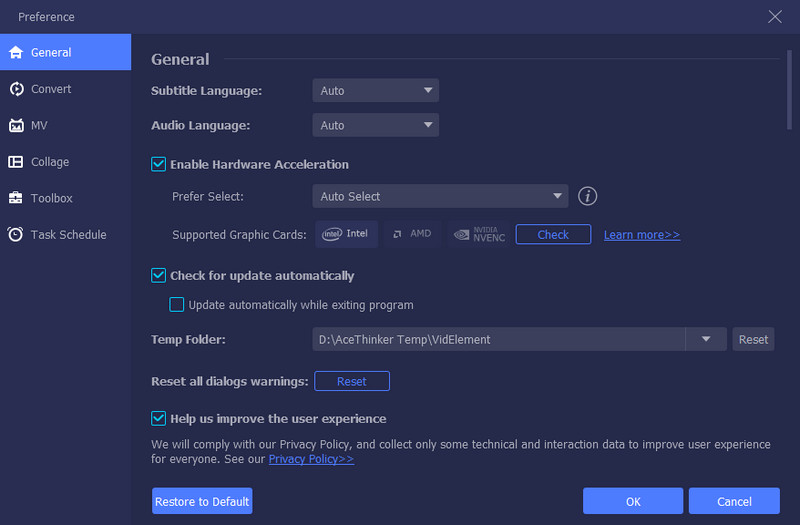
Choose Preferences as You Need
General
In this section, you can view options such as subtitle and audio language, hardware acceleration, automatic updates, and the temporary file folder for video editing.
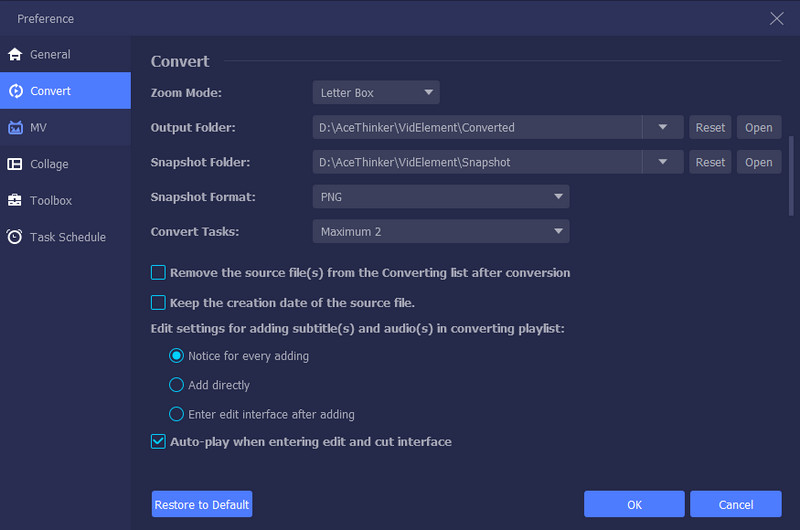
Convert
In the Convert settings tab, you can choose the zoom mode, output and snapshot folders, file format, and the number of simultaneous conversion tasks. Additional options are also available to control how subtitles, audio, and playback behave during editing and conversion.
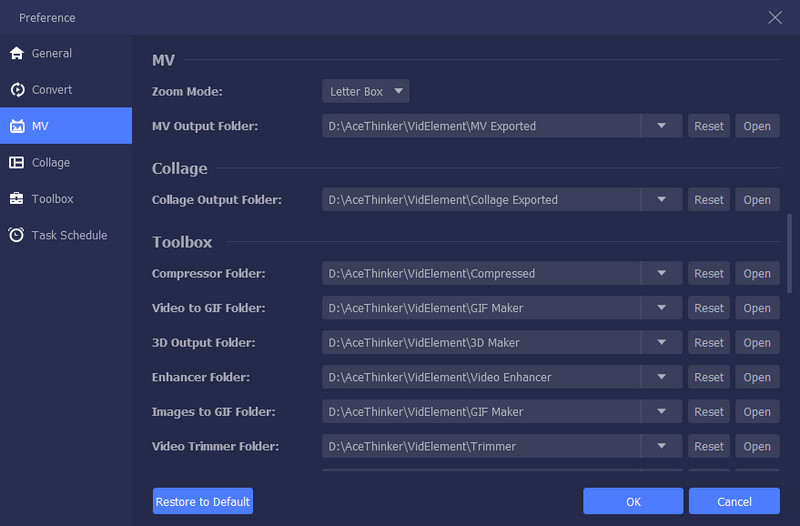
MV/Collage/Toolbox
In these three sections, you can select your preferred output folders for each tool.
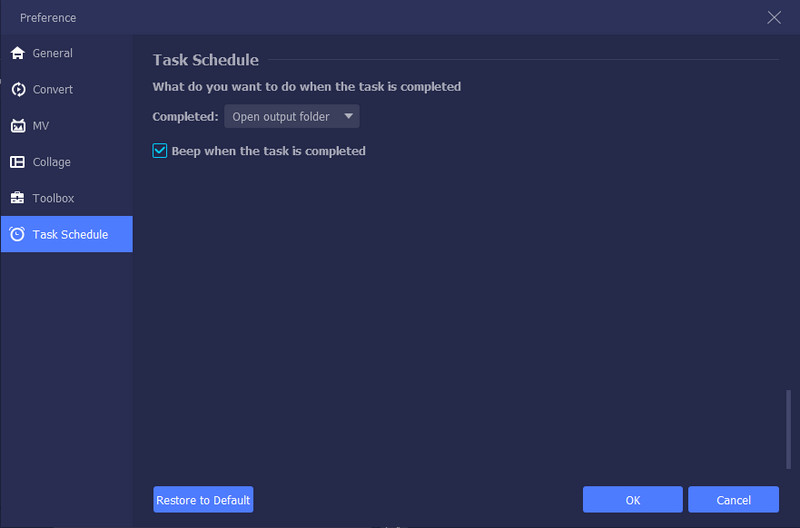
Task Schedule
Here, you can choose what to do after a task finishes, such as opening the output folder, exiting the program, or doing nothing. Also, you can enable a sound notification when the task is completed.