
- Download AceThinker iOS System Recovery on your device.
- Connect mobile phone to laptop or PC.
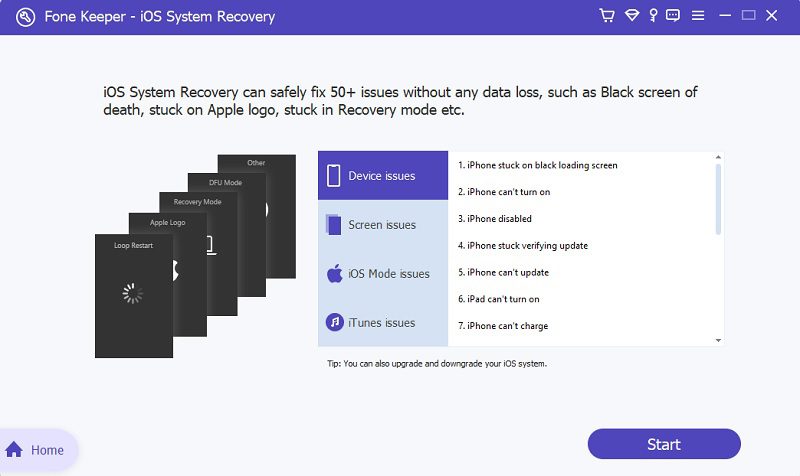
- Select a recovery method.
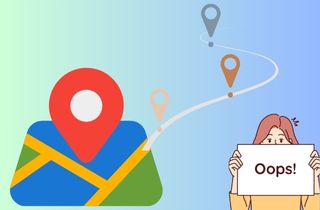
Google Maps Timeline is a function that allows you to view the places you have visited on a specific day, month, or year. It uses location data from your smartphone to create an explicit map of the locations you have been to and the routes you have taken. This function can be accessed through the Google Maps app on your smartphone or by logging into your Google on a web browser. With Google Maps Timeline, you can better understand your daily routine and the places you frequently visit. It can also be useful for recalling the places you have been to in case you need to retrace your steps or find a lost item. Additionally, Timeline can help you keep track of your travel history, making it easier to plan future trips or vacations. Yet, when Google Timeline not working on your device, this can become a major problem. Luckily, we have gathered the best solutions you can use to fix this issue.
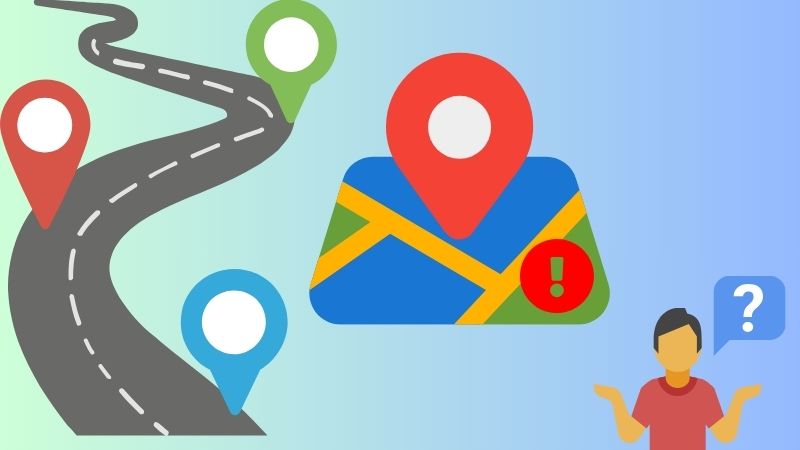
Why Maps Timeline Not Working
Google Map Timeline will not become unresponsive or cause Google Maps Timeline doesn t work error without any other reasons. We all know that getting why this error is occurring will help us greatly resolve the issue. Therefore, we listed possible factors why this issue occurs on your iPhone.
- Locations Services is Turn Off - Google Maps uses your location services to acquire the exact location device. If it is turned off, all its processes and features that Google Maps can do will not be possible. It can't save Timeline history even if you pass a specific location.
- App Permission not granted - If you have issues with Google Maps Timeline, it could be because app permission has not been granted. This means the app does not have permission to access your device's location data.
- Outdated App Versions - One of the reasons Google Maps Timeline may not work on your device is an obsolete app version. This might be the issue if you haven't updated your Google Maps app for a long time. Always use the latest version of Google Maps to avoid any compatibility issues and get the latest features.
- Connectivity Issue - Another reason Google Maps Timeline may not be working on your device is a connectivity issue. The Timeline feature requires a stable internet connection to work properly, so the feature may not function as expected if your device has a poor or no internet connection.
- Software Glitches - Sometimes, software glitches can cause Google Maps Timeline not to work as expected. If so, you can try clearing the app cache and data. This will remove any corrupted or outdated data that may be causing the issue.
Solve Google Maps Timeline Issue
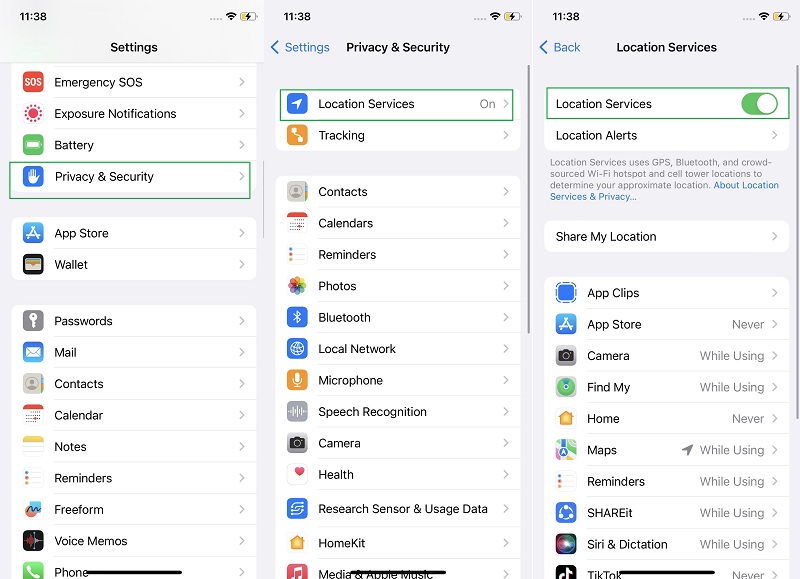
1. Check Location Services
Location Services on iPhone is a feature that allows your device to use GPS, Wi-Fi, and cellular network information to determine your location. Various apps and services can then use this information to provide location-based features, such as directions, weather information, and local search results. When setting up your iPhone, you will be prompted to turn on Location Services. If you choose to do so, your device will periodically send anonymous location data to Apple, which is used to improve the accuracy of location-based services. Location Services can also be customized to allow or restrict access to your location data per app. For example, you can enable your navigation app to access your location data but not your social media app. You can also switch off Location Services altogether if you prefer to keep your location data private from any apps. If you are wondering if Google Map Timeline not working iPhone, better check the Location Services option on your smartphone.
- The first step in fixing your Google Maps Timeline is to access the Settings app. Unlock your device and go to your home screen. Locate the gray gear icon to access the Settings app's main menu.
- Next, scroll down on your mobile screen and access the Privacy & Settings. Tap on its menu to access location functions on your iPhone settings. Check Location Services if it is enabled.
- Lastly, if it is switched off, toggle the button beside it and wait for it to turn green. The location services option will not be enabled on your device. Check your Google Maps and see if the Timeline function is now working.
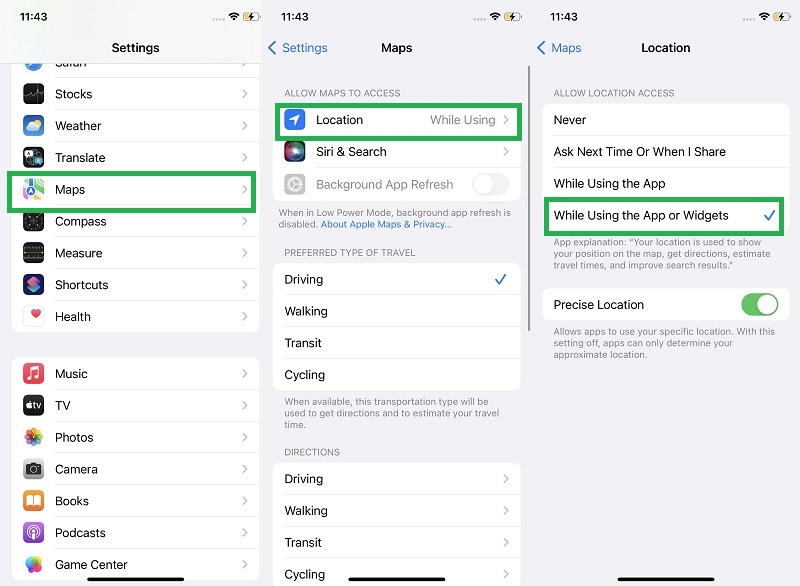
2. Enable Location Permission
Indeed, Location Services is one of the main reasons why your Maps Timeline not working. However, even if the feature is enabled on your device, if the app does not permit you to use the location services on your device, it will still not work properly. Therefore, you should check the App Permission on your Google Maps app to see if it is enabled. If this function is switched off or not granted, then the Timeline feature will not use any data on your device and input it on different sites or places you have been. It is easy to enable the permission on Google Maps. What you need to learn is the steps below to allow it to.
- Begin accessing your iPhone Settings from your home screen page. Tap the icon of the Settings app to access its menu. Then, please scroll down on its list of iPhone settings.
- Next, locate the Maps option and tap its icon. A new page will arise on your screen, which will give you different settings for the Maps app. Afterward, access the Location menu.
- Tap on it and choose to enable the app to access the location on your device while using Google Maps. It is recommended to use “While Using the App” to allow only the location while the app is running on your mobile device.
3. Use Third-Party Apps
The next solution when your Google Maps Timeline is having difficulty functioning on your iPhone is to use a system recovery tool. AceThinker iOS System Recovery is a proper application for fixing your device to restore its processes. Most of the iOS issues are caused by system glitches and bugs. These bugs are inevitable as they lurk on your RAM, which powers your entire device. To fix the problem and remove the bugs, you need to operate your device with the iOS System Recovery tool. This application has two options that will give you firmware to fix your device. You can use Standard Mode and Advanced Mode. What makes this tool more prominent compared to troubleshooting is that it can update your device or iOS system to the suitable version for your device. Check the precise guide below to learn how to operate this app.
Step 1 Download the App
Getting AceThinker iOS System Recovery on your device is the first step to fixing your Google Maps Timeline issue. Hit the Free Download icon below for this step and get the tools installer. Run the file on your device and pass through its prompts to install it entirely on your computer.Try it for Free
Free Download
Windows 8/10/11
Secure Download
Free Download
Mac OS X 10.15 and above
Secure Download
Step 2 Choose Recovery Method
Then, connect your iPhone to your PC or laptop with the lightning wire. Hit the Fix option to go through different configurations and permissions for fixing your device. Afterward, select a recovery method. It is recommended to use the Standard Mode, as it can improve your device while retaining 100% of your files. Click the Confirm button to continue.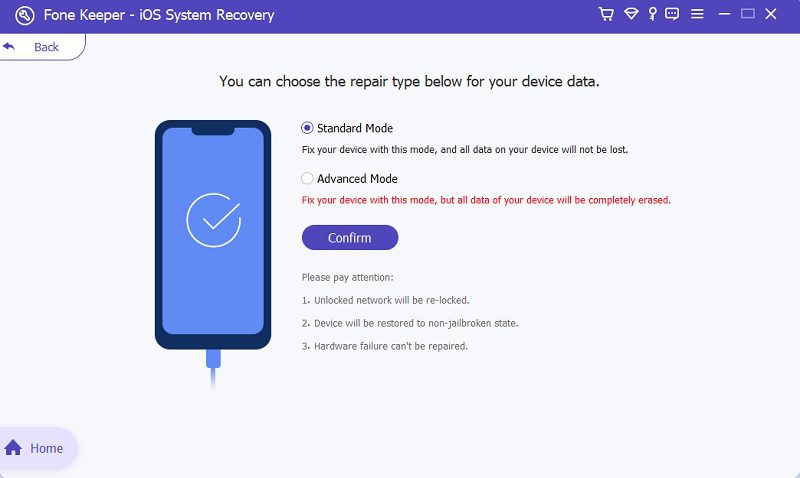
Step 3 Download Firmware
Lastly, a new page will prompt a list of firmware you can download. Select the one that contains the latest iOS patch. Hit the Download option or icon and wait for the process to complete. After that, hit the Next option to install the firmware and fix your device.
4. Restart iPhone Device
Rebooting an iPhone refers to the process of restarting the device. It is a simple procedure that involves turning off the device and then turning it back on again. Rebooting can help solve various problems causing the device to malfunction, such as slow performance, Apple Music keeps crashing, and battery drain. There are two ways to reboot an iPhone: a soft reboot and a hard reboot. But for this process's sake, we will do the soft reboot. A soft reboot involves turning off the iPhone using the power button or the software settings option and then turning it back on again. This method is useful when the device is still responsive and can execute commands. You can check the straightforward way below to reboot your device effectively.
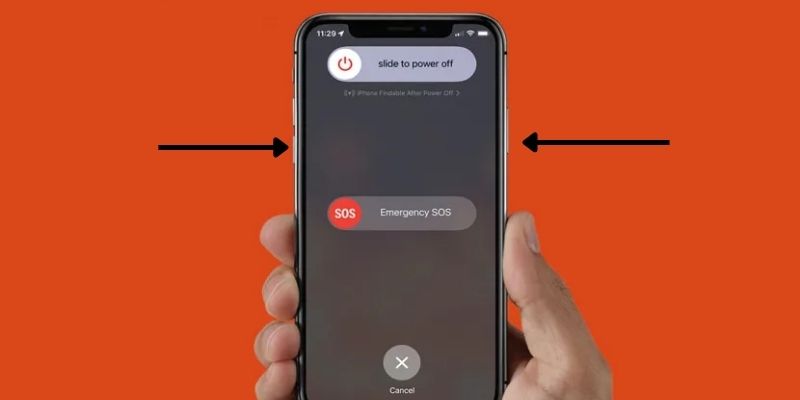
- As we stated above, a soft reboot involves your side buttons. We need to familiarize ourselves with the location of these buttons to have a better workflow process. The Power button is located on the right side of the iPhone, while the Volume rack is on the left part.
- Please hold and continue doing it on the Power and any of your device's Volume buttons. Release both buttons once the Emergency Alert page prompts on your screen. A slider will be available to switch off your iPhone.
- Lastly, glide the slider to the right to completely shut down your device. Please wait for half a minute to reboot your iPhone. Press and hold the Power button until the Apple logo prompts on your screen.
5. Update Google Map
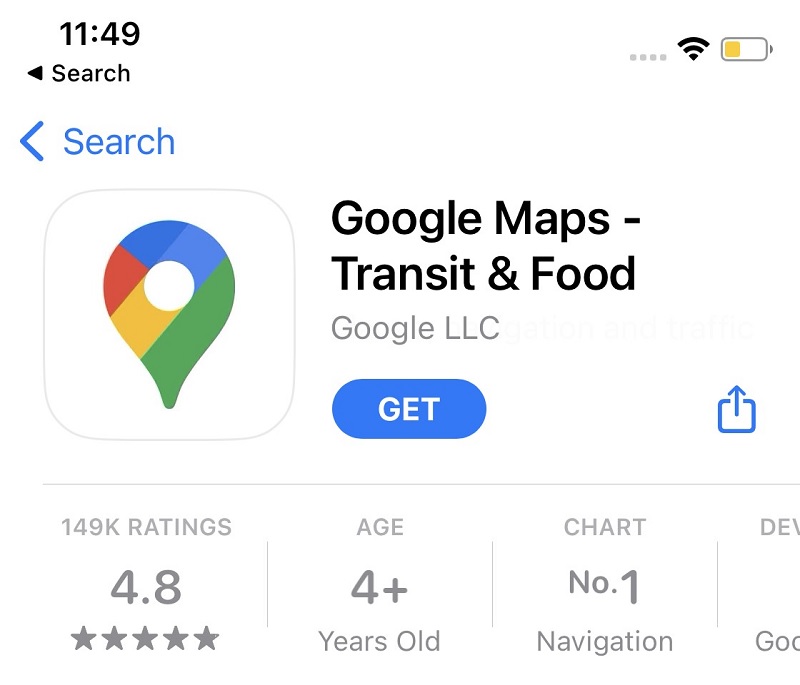
Updating Google Maps on your device offers several benefits that can improve your overall user experience. Firstly, updated maps provide accurate and up-to-date information about routes, locations, and traffic conditions. Additionally, updated maps provide information on new places, businesses, and landmarks that may have recently opened in your area. These updates can help you discover recent locations, attractions, and services you may have yet to learn. Another significant benefit of updating Google Maps is improved safety on your mobile device. The updates can fix any bugs or glitches that you may have been experiencing and can improve the app's overall performance, speed, and responsiveness. You can also clear out issues, including the Google Timeline stopped working. You can check the App Store and search for the Maps app to update your Maps app. Hit the Update button and install the latest version; the app will refresh. Relaunch the app once more and check if the error has been removed.
6. Update iOS Device
Another reason why Google Maps timeline not working is due to compatibility issues. This error can be affected by an outdated iOS version. Updating your iOS device offers several benefits that can improve your overall user experience. Firstly, updated iOS versions provide new features and functionalities that may have yet to be available in your previous version. These features can enhance your device's performance, speed, and security, making it more efficient and reliable while using a specific app such as Google Maps. Additionally, updated iOS versions can fix any bugs, glitches, or security vulnerabilities like the iPhone won't charge and more that may have been present in your previous version. This update can ensure that your device is safe from potential threats and that your data is secure. Another significant benefit of updating your iOS device is accessing new apps and services that may require the latest iOS version. Developers often create apps and services compatible with the latest iOS versions, providing you with more options for entertainment, productivity, and communication. Follow the guide below to learn how to update your device efficiently.
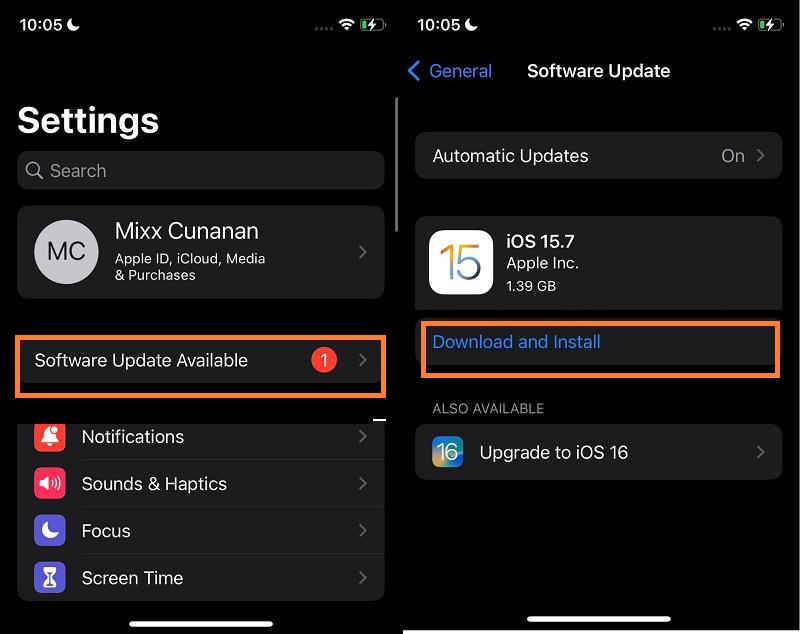
- Begin access to the Settings app on your mobile device. Go to your home screen page and check for the gray gear icon. Tap on it to access the list of settings menu on your device.
- Next, check for the Software Update Available option. This feature will prompt your settings if your device is outdated. Tap on it to access the main page to download the new iOS patch.
- Finally, hit the Download and Install to get the newest iOS patch. Please wait for your device to fully install it. Then, your iPhone will reboot to apply the changes acquired from the update.
7. Refresh Your Google Maps Logins
If you're having trouble with Google Maps, one solution is to refresh your login credentials. This can help resolve issues such as being logged out of your account or difficulty accessing certain app features. Refreshing your Google Maps logins on your iPhone can offer several benefits to improve your overall user experience. Firstly, refreshing your login can ensure that you have access to the most delinquent features and functionalities of the app. Google Maps frequently releases updates that offer new features, bug fixes, and security enhancements. By refreshing your login, you can ensure you're using the latest app version and receiving the most up-to-date information about your location and routes. Secondly, refreshing your login can improve the app's performance and speed. Over time, your login credentials may become outdated, causing the app to malfunction or crash. You can clear any cached data or temporary files that may slow down your device by refreshing your login. This can improve the app's response time and make it more efficient. To log out of the account saved on your Maps, you will need to observe the steps below.
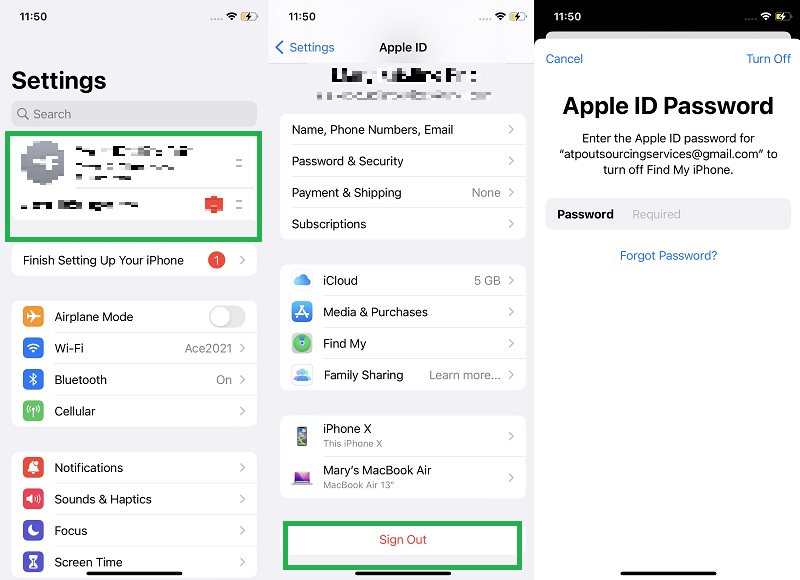
- To log out of the Google Maps account, you must log out of the Apple ID, which is connected to your Google Maps account. Go to the Settings app on your home screen layout. Hit the Settings icon to launch the list of menus.
- Then, go to the Apple ID option and access the settings of your Apple ID. Choose the Sign-Out option. Then, refresh the Settings app.
- Lastly, log in to your Apple ID in Settings and exit the app. Go to the Maps option and check if the Timeline feature works.
Conclusion
There you have it; we have already listed the seven possible solutions to fix your device. You can choose the top-up to the bottom solution to repair your device. The detailed causes in this article are also helpful in determining the correct answer to fixing the issue. If you have similar issues regarding your location services or GPS problems, you can always read this link. It holds different information to resolve your location services issues.