 Sometimes, your camera moves while taking the shot, causing a blurry or unclear photograph. Other times, your subject moves too fast, or your camera isn't focused properly. These photo concerns can make great moments look unclear or ruined. That's why learning how to unblur images is so helpful. It lets you bring back the sharpness and details in your pictures. In that line, Photoshop is one of the best tools for fixing this. It has powerful features that help you sharpen and improve blurry photos. Whether it's a small blur or a more serious one, Photoshop gives you several ways to fix it. In this article, you'll learn simple methods to unblur images in Photoshop. With a few steps, your blurry photo can look clear and crisp again.
An Overview of Image Blur
Before we jump on how to unblur photos in Photoshop, it is important to understand what causes blurry images. Image blur happens when a photo loses sharpness, making it look soft or unclear. This can result from different issues during shooting.
Types of Blur
- Motion Blur – Caused when the subject or camera moves while the shutter is open. This often creates streaks or lines in the direction of movement.
- Out-of-Focus Blur – This happens when the camera doesn't focus correctly on the subject, making the whole image or parts look soft.
- Camera Shake – This occurs when the camera slightly moves while taking a photo, especially in low light or with slow shutter speeds.
When Can Blur Be Fixed
Not all blur can be fully corrected, but many can be improved. Motion and camera shake blur can often be reduced using Photoshop's shake reduction tool. Out-of-focus blur is harder to fix, but sharpening tools can still enhance details. The more minor the blur, the better the results will be. You can also use these same enhancement techniques to fix pixelated image and make your photos appear clearer and more defined.

Photoshop Features for Reducing Image Blur
Photoshop offers several tools to help you on how to unblur images in Photoshop and restore the clarity of your photo. Each tool is designed for different types of blur and image needs, much like the best AI image upscaler, which automatically enhances image quality and sharpness. Here's an overview of the most useful Photoshop tools you can use:
- Shake Reduction Filter: This great tool is particularly designed to reduce image blurring from slight camera motion. It minimizes the blurring of an image and applies correction to improve the sharpness.
- Smart Sharpen: As its name suggests, this Photoshop tool sharpens blurry images. This feature of Photoshop is ideal for online images, allowing you to adjust the sharpness, shadow, highlights, and more. Besides, it minimizes the noise or grain in low-contrast areas to improve the quality of your images.
- High Pass Filter: If you don't want to experiment with different sliders, you can use this Photoshop tool. It enables you to set an overlay or soft light blending mode to add edge contrast and improve the quality of your images.
- Camera Raw Filter: You can refine the details of your image with this Photoshop tool's sharpening panel. It is effective at enhancing RAW and high-quality photos.
- Unsharp Mask: This traditional Photoshop sharpening tool enhances the edges and details of your photos. This tool is perfect for improving the focus on the topic of your photo and fixing little blur.
- Photoshop's Layer Mask Sharpening: This method is used for layer masking. Using a layer mask, you may change the effect on particular regions of your image. If only a portion of your image is blurry, this is a decent technique.
How to Make a Photo Unblurry in Photoshop
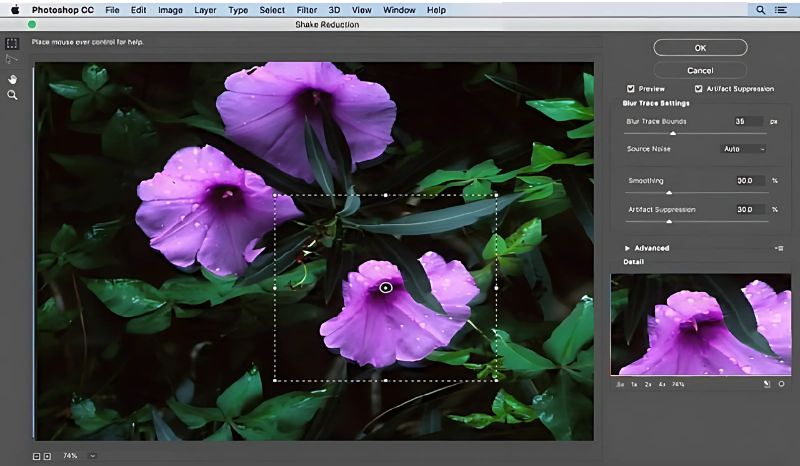
1. Use Shake Reduction Filter
When you move your camera unintentionally while taking a picture, the result could be motion blur. But you can use Photoshop's Shake Reduction Filter to fix this. It can automatically assess your picture and sharpen it by reversing the direction of the blur. With a noticeable tremor pattern, this Photoshop sharpening tool for clear and crisp images performs best at high resolution. To use the Shake Reduction Filter to unblur an image, follow these instructions.
User Guide:
- The first thing that you should do is open the image in Photoshop. When your photo has been uploaded, go to the Filter menu. From here, select the "Sharpen" option and click "Shake Reduction."
- After that, Photoshop will automatically examine your photo and pinpoint the blurring areas, making the necessary adjustments to fix them. You can alter the "Smoothing," "Blur Trace Bounds," and "Artifact Suppression" sliders to fine-tune the correction.
- Additionally, you can drag the filter to highlight a certain area. Once everything is in place, click "OK" to apply the modifications after viewing the updated version of your photo. That's how to unblur images in Photoshop using the Shake Reduction Filter.
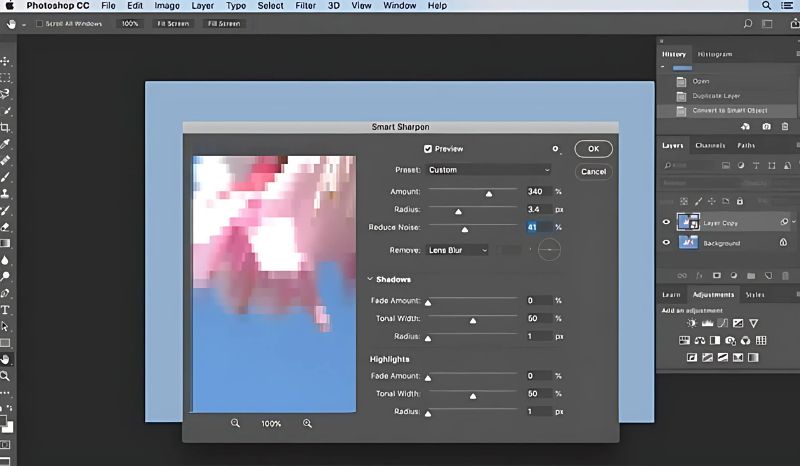
2. Utilize the Smart Sharpen Tool
If you want more control over the sharpening process, the Smart Sharpen tool is an excellent alternative. Unlike the Shake Reduction Filter, this tool gives advanced control over image sharpening. It enables you to remove specific types of blur, such as Gaussian, Leans, or Motion. Besides, this feature is useful for all-around sharpening needs, especially when you want to control the amount and type of sharpening applied. Here's how you can sharpen images in Photoshop using the Smart Sharpen tool:
User Guide:
- Just like the Shake Reduction Filter, you must open your image in Photoshop first. After uploading your blur image, go to the "Filter" menu and select the "Sharpen." From here, click "Smart Sharpen."
- On the Smart Sharpen dialog box, from the "Preset menu," pick "Default." Then, you can lower the "Reduce Noise" slider and adjust the "Amount" and "Radius" sliders for sharpening strength. Select "Lens Blur" in the "Remove" dropdown menu to remove blur.
- Your photo can look sharper, but you can adjust the "Radius," "Fade Amount," and "Tonal Width" values in the "Highlights" and "Shadows" sections of the Advanced settings. Then, preview your image to see the difference you made, and download it if you are satisfied.
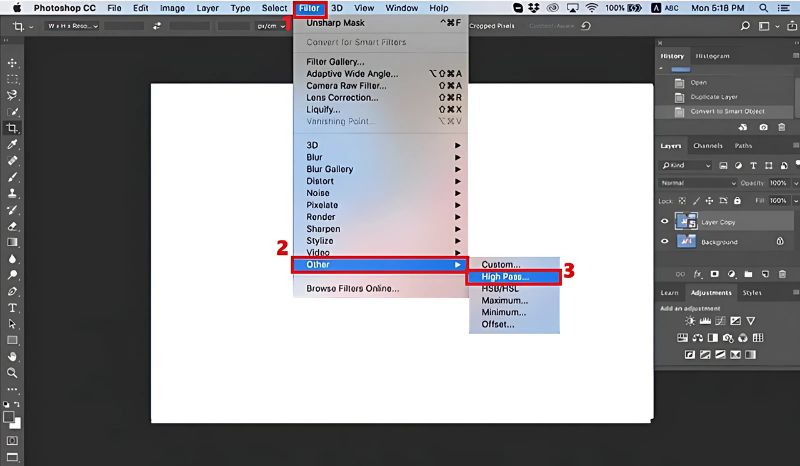
3. Employ the High-Pass Filter
Can you unblur photos in Photoshop? The answer is yes; you can use the High Pass filter. This allows you to add edge contrast, which is a great way to make the details of your photos pop for an unblurred look. It is usually utilized with blending modes like Overlay or Soft Light to sharpen only the edges without affecting the overall tone of your photos. To unblur an image with a High Pass filter, here are the steps:
User Guide:
- The initial step is to you need to heed is to open your blurred image in Photoshop. Then, duplicate the layer by pressing "Ctrl+J" ("Command+J" on Mac). After that, go to the "Filter" menu and select "Other."
- From here, choose "High Pass." In the High Pass dialog box, adjust the radius value to the minimum and smash the "OK" button. This setting will enable you to add grayscale to your image. Then, you can alter the blending mode to your image.
- In the Layers panel, set the blending mode of the replicated or duplicated layer to "Overlay" or "Soft Light." If the sharpening effect is too strong, lower the layer's opacity. When you are pleased with the results, you can save your photo or export it for further use.
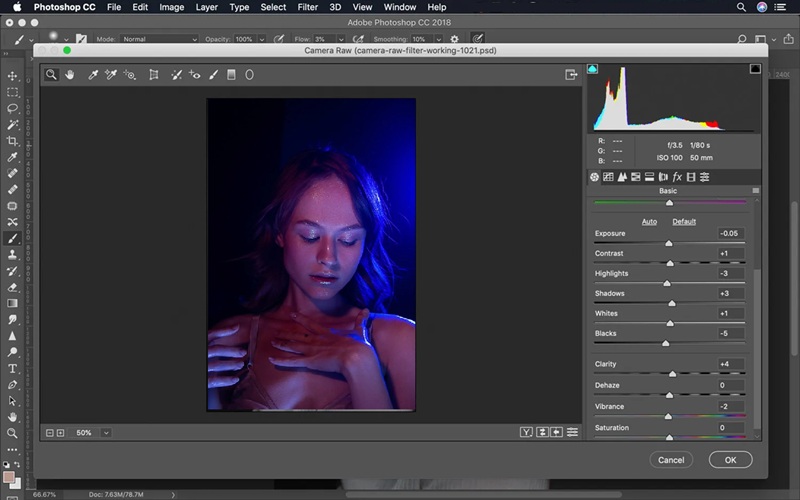
4. Leverage the Camera Raw Filter
The Camera Raw Filter in Photoshop delivers a non-destructive way of editing and sharpening your photos. It includes a sharpening panel with different options to enhance details without permanently altering your image. This filter is excellent for RAW photos and high-quality JPEGs. Below is a simple guide to effectively unblur your images using the Camera Raw Filter of Photoshop.
User Guide:
- Upload your blurred image in Photoshop. Then, convert your layer to "Smart Object" for non-destructive editing. Then, go to the "Filter" menu and select "Camera Raw Filter."
- In the Camera Raw dialog box, go to the "Detail" tab, which has the "Sharpening" option. Here, you will see different options such as "Amount," which controls the amount of sharpening; "Radius," which adjusts the sharpness of details; and "Detail," which sharpens the edges.
- You can also use the "Clarity" and "Texture" options under the basic tab to boost mid-tone contrast and make the details of the photo more visible. Once you are happy with the preview, click "OK" to use the filter to your image.
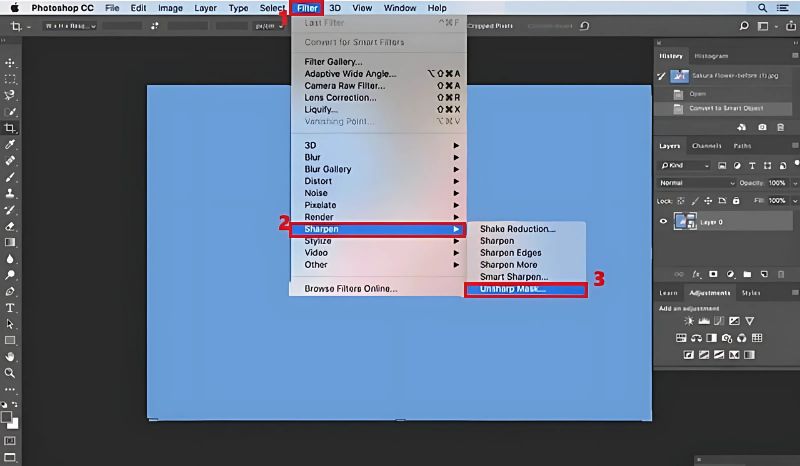
5. Use the Unsharp Mask
Another way to unblur photos in Photoshop is the Unsharp Mask filter, which can sharpen your image with ease. It corrects blurring by increasing contrast between pixels along the edges to create the illusion of sharpness. This filter is very handy for bringing back lost details and clarifying edges. It is the quickest way to enhance your photos in Photoshop. The steps on how to unblur an image with the Unsharp Mask are listed below.
User Guide:
- To commence the unblurring process with the Unsharp Mask filter, ensure that your image is open in Photoshop. Subsequently, navigate to the "Layers" panel and go to the "Filter" menu.
- After that, pick the "Convert for Smart Filters" option to sharpen your image without permanently changing it. Then, click "Sharpen" from the "Filter" menu. Once you hit the "Sharpen" option, you will see the "Unsharp Mask."
- After clicking the "Unshraph Mask" option, you will see a dialog box with different options such as "Amount," "Radius," and "Threshold." You can modify the amount for each of these to achieve the best results for your images. The "Amount" slider refers to the intensity of sharpening, "Radius" is the width of sharpening, and "Threshold" is the minimum brightness change.
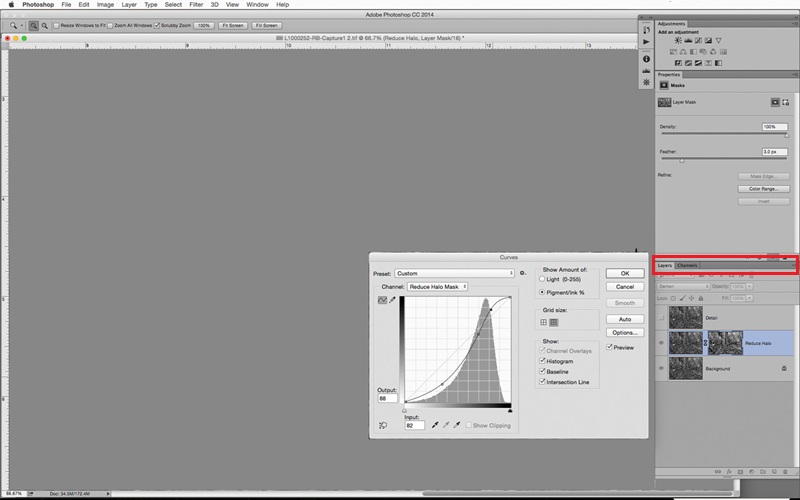
6. Utilize the Layer Mask Sharpening
The layer masking and sharpening technique in Photoshop delivers targeted image sharpening. For instance, your photo has particular areas requiring more sharpening. It is vital for avoiding over-sharpening and preserving a natural look. Similarly, this method permits you to apply sharpening effects on your photos selectively. With this feature of Photoshop, you can duplicate layers and use a mask to apply sharpening selectively, giving you control over which parts of your image should be sharpened. Here are the steps on how to unblur pictures in Photoshop with layer masking sharpening.
User Guide:
Conclusion
To sum up, Photoshop offers a number of excellent methods for resolving fuzzy images. Using Shake Reduction, Smart Sharpen, High Pass, Camera Raw, and other tools is part of this. Different blur kinds respond better to diverse techniques, so it's useful to experiment to determine what looks best. To ensure that you can always go back and make adjustments, try to employ non-destructive modifications like layer masks and smart objects. You can enhance photographs and bring back lost details with a little effort and imagination. To further improve your editing abilities, you should continue to experiment with Photoshop's features.
| Photoshop Tool | Time Required | Difficulty Level | Best Use Case |
|---|---|---|---|
| Shake Reduction Filter | 3–5 minutes | Medium | Motion blur, camera shake |
| Smart Sharpen | 3–6 minutes | Medium | General sharpening, lens blur, fine-tuning |
| High Pass Filter | 2-4 minutes | Easy | Enhancing edges, subtle blur |
| Camera Raw Filter | 4–6 minutes | Medium | RAW files, high-resolution images |
| Unsharp Mask | 2-3 minutes | Easy | Minor blur, quick fixes |
| Layer Mask Sharpening | 5–8 minutes | Hard | Selective sharpening, localized corrections |

