
 Our iPhones have become a part of us, holding everything from our most treasured memories to important information. The built-in notes app is a powerful tool, enabling us to capture short-term thoughts, organize work, and store important information. But what if we need to write down something sensitive, something we don’t want anyone else to see? The Notes app itself doesn’t have a simple “hide” function. This may seem like a restriction, but don’t worry! There are effective ways to hide notes on iPhone. This guide will show you how to turn your iPhone Notes app into a haven for confidential information.
How to Hide Notes on iPhone
The Notes app on iPhone doesn’t have a built-in “hide” function but don’t worry. Apple has powerful ways to protect your sensitive notes from prying eyes. The secret lies in using the app’s built-in lock and password protection. These features enable you to turn your Notes app from an ordinary notepad into a haven for sensitive information.
There are two main ways to lock notes on iPhone:
- Leveraging Your iPhone's Passcode: This convenient option utilizes the same passcode you use to unlock your phone. Any note you lock with this method will require your device passcode for access. This is a great choice if you already have a strong passcode setup and prefer a streamlined approach.
- Creating a Unique Password: This option offers an extra layer of security, particularly if your device passcode is easily accessible to others, such as family members or roommates. Creating a separate password for your Notes app adds a hurdle for anyone accessing your sensitive information. This method is ideal if you want ultimate control over who can view your locked notes.
User Guide:
- Open the Notes app and select the note you want to hide. Tap the three dots icon in the top right corner. Select "Lock" from the menu.
- Choose "Use iPhone Passcode" if you want your phone's passcode to unlock the note. Alternatively, select "Create Password" to set a unique password just for this note. You can also enable Face ID or Touch ID for easier access.
- Follow the prompts to set your chosen lock method. Organize your notes into folders and hide less sensitive folders in the iCloud settings if you use iCloud for Notes. This way, only the most important folders appear on your device
Backup and Recovery Options
Part 1. Know the Importance of Backing Up Note Before Hiding Them
Before we get into the nitty-gritty of encrypted notes and encrypted passwords, it’s essential to address one of the most important steps: backing up notes. Think of it like putting your belongings in a fire-resistant vault before locking them up. Like a physical vault, a passcode-protected note keeps your notes safe but won’t protect you from unexpected twists and turns. Here’s why backing up notes is so important to hidden notes iPhone:
- Accidental Deletion: Even the most careful among us can make mistakes. A misplaced tap or a swipe gone wrong could lead to the unintentional deletion of a locked note. A backup ensures you can recover your precious information if such a mishap occurs.
- Technical Issues: Technology, while remarkable, is manageable. Software glitches or hardware malfunctions could corrupt your notes data. A backup is a safety net, allowing you to restore your notes if such an issue arises.
- Upgrading or Replacing Your Device: When you upgrade to a new iPhone or replace a damaged one, your locked notes won't automatically transfer unless you have a backup. Backing up your notes ensures a smooth transition to your new device.
There are several ways to back up your iPhone notes, including iCloud backup and third-party note-taking apps that offer their backup solutions. In a later section, we'll explore the different methods for backing up your notes in more detail. Remember this golden rule: always back up your notes before locking them! It's a simple technique that can save you a lot of heartache in the long run.
Part 2. Exploring Different Backup Options
Method 1. Backup Notes Using iCloud
Losing precious notes can be a real headache. This guide dives into a reliable solution: backing up your hidden notes iPhone with iCloud. Built into your Apple devices, iCloud offers a seamless way to create a secure copy of your notes. By enabling this feature, you can rest easy knowing your notes are automatically stored in the cloud, accessible from any of your Apple devices. Here, we'll walk you through the process of setting up iCloud backup for your notes, ensuring they're always safe and sound.
User Guide:
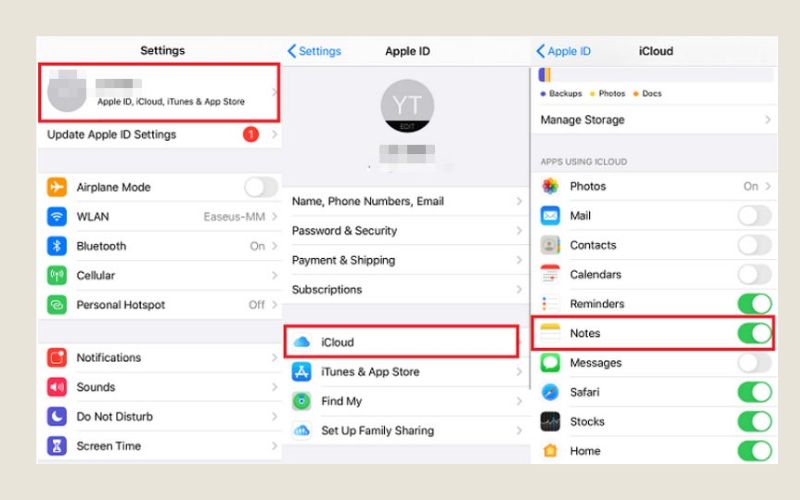
- First, activate iCloud backup for your notes. Access your Settings app and tap on your Apple ID at the top. Choose "iCloud" and scroll down to find the "Notes" option. Simply toggle the switch next to "Notes" to the "On" position. This ensures your notes are automatically added to your iCloud backups.
- Verifying that your backup is functioning properly is good practice for peace of mind. Head back to your Settings app and tap on your Apple ID again. Pick "iCloud," scroll down to the bottom, and tap "Backup." Here, you can see the date and time of your most recent iCloud backup. If it's been a while, consider initiating a manual backup.
- Now that your notes are safely stored in the cloud, how do you access them from another device? It's simple! Sign in with the same Apple ID you used to enable iCloud backup on your other Apple device. Open the Notes app, and voila! All your notes should be synced and readily available.
Method 2. Backup Notes Gmail Account
iCloud is a great backup tool for Apple users. But what if you’re looking for something a little more flexible? In this method, we will show you how to use Gmail as your backup tool for note-taking. Gmail is one of the most popular to backup files out there. Because of its accessibility, it is the first choice because it offers cloud storage. The best part is that it’s super easy to use. With just a few button taps, you can access all your notes anywhere worldwide. Whether using Windows, Chrome, or Android, your notes will be secured in the cloud. Let’s look at how to use Gmail for easy note backups.
User Guide:
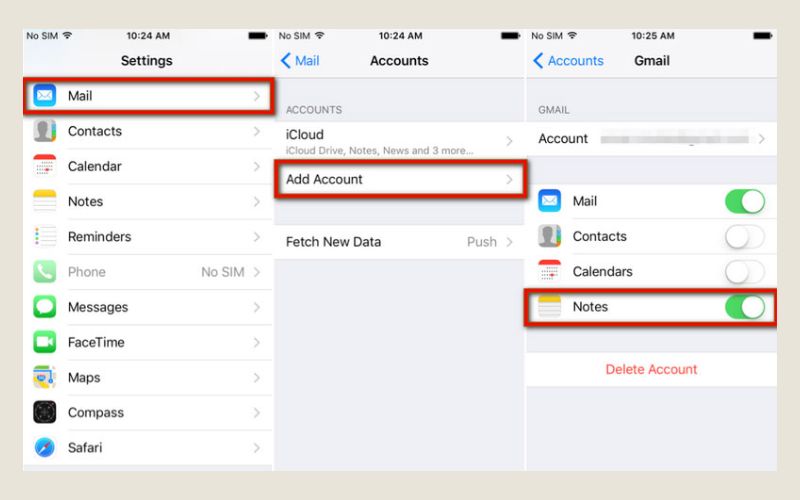
- The first step is to navigate to the Settings application on your screen. Go down until you find the Mail tab, and tap on it. It will move you to a new window, and you will see the possible options.
- Within the Mail settings, tap Add Account to select Google account. Then, follow the instructions to add your Gmail account. After adding your account, you can see that on the list of available accounts.
- Afterward, select Gmail on your accounts, which you can see next to iCloud. Once you open your Gmail, you can now turn Notes on. After that, all the iPhone notes can be found on your Gmail account.
Method 3. Backup using Third-Party Tool
If you’re looking for the best way to protect your data, you’ve come to the right place. Built-in solutions such as iCloud and Gmail provide a convenient way to back up your notes. AceThinker iOS Data Backup & Restore software is designed specifically for iPhone notes. It’s more than just a backup solution; AceThinker iOS Data Backup & Restore provides a comprehensive suite of features to protect your valuable notes. Let’s look at some of the unique benefits of AceThinker iOS Data Backup & Restore and how it can enhance your experience to hide notes on iPhone. Imagine having a single tool that allows you to create secure backups and explore advanced features such as selective data recovery and flexible storage options. You can even restore notes to another device with AceThinker iOS Data Backup & Restore. This gives you full control over your notes, which are always safe and accessible.
Try it for Free
Step 1 Download and Install AceThinker iOS Data Backup & Restore
Head to AceThinker iOS Data Backup & Restore's official website and download the software compatible with your computer's operating system. Once you get it, follow the on-screen instructions to install AceThinker iOS Data Backup & Restore on your computer.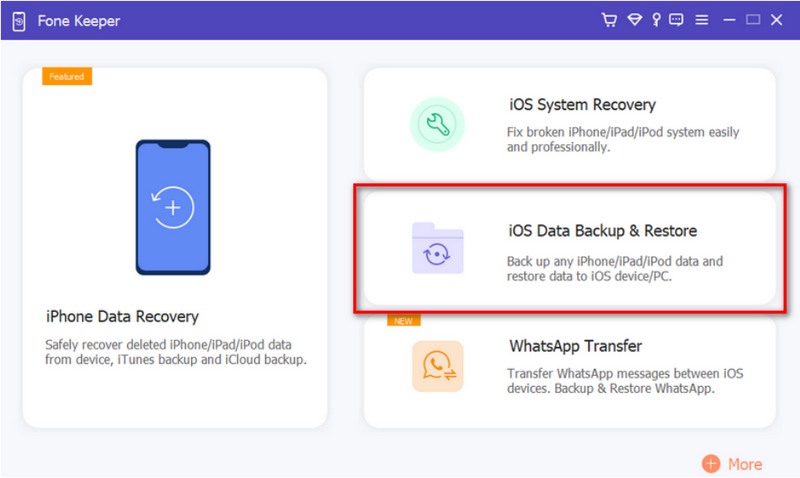
Step 2 Connect Your iPhone and Launch Application
With the software installed, connect your iPhone to your computer using a reliable USB cable. Then, launch the software, which automatically detects your connected iPhone.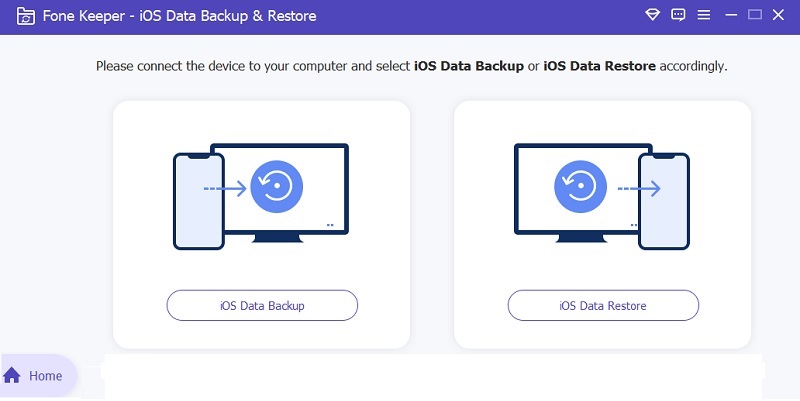
Step 3 Select iOS Data Backup & Restore and Choose Backup Mode
Navigate to the "iOS Data Backup & Restore" module on the main interface. Here, you'll be presented with two backup modes: "Standard Backup" and "Encrypted Backup." Standard backup offers a faster process but without encryption. If you prioritize extra security for your notes, choose "Encrypted Backup" and set a secure password for the encrypted archive.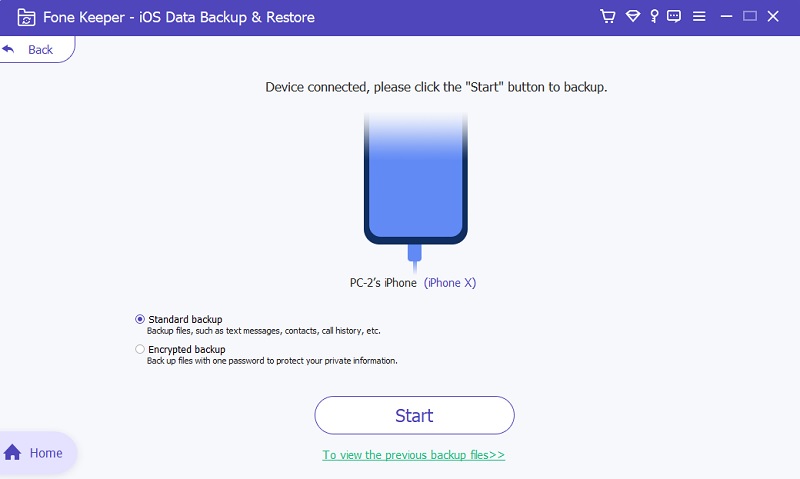
Step 4 Customize Your Backup and Initiate the Process
AceThinker iOS Data Backup & Restore lets you selectively choose the data types you want to back up. In the provided list, tick the checkbox next to "Notes" to ensure your notes are included in the backup. If desired, you can also choose other data types like contacts, messages, and photos. Once you've selected your desired data, click the "Next" button to initiate the backup process. will create a secure backup of your notes on your computer, providing a reliable safety net in case of data loss on your iPhone.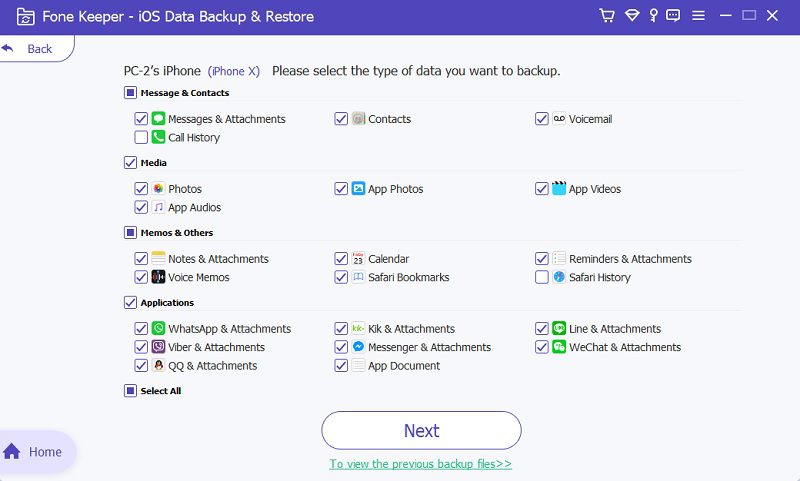
Part 3. Recovery Option in Case of Device Loss or Corruption
How to find hidden notes on iPhone? Data loss can be one of the most devastating things that can happen to you. Especially when it comes to your irreplaceable notes, you can’t imagine spending hours and hours writing notes on your iPhone only to have it disappear, stolen, or damaged by something unexpected. AceThinker iPhone Data Recovery software is here to save the day. These specialized programs act like digital lifesavers, carefully scanning your device’s storage or backups to find lost data, including those precious notes. Think of them like digital detectives, searching through the remains of your devices’ storage or backups to find what may seem lost forever. Using iOS data recovery software gives you a fighting chance to get your hidden notes iPhone back. Let’s look at how this technology works and how it will help you navigate your data loss situations more confidently.
- It can recover lost notes from your iPhone, even if deleted or overwritten. It can also scan iTunes and iCloud backups to find missing notes.
- It goes beyond notes! Many data recovery tools can recover many data types, including contacts, messages, photos, videos, etc.
- Don't need everything back? Most software lets you preview recoverable data and choose only the specific notes you want to restore.
- These programs employ powerful scanning algorithms to uncover even deeply lost or corrupted data, increasing your chances of successful recovery.
- Despite its technical prowess, data recovery software typically features a user-friendly interface, making the process accessible even for non-technical users.
Conclusion
This guide looked at ways to keep hidden notes on iPhone. We covered things like using iCloud for a smooth backup, Gmail for platform-independent access, and a feature-rich third-party solution like AceThinker iOS Data Backup & Restore. Remember that privacy and security should always be top of your to-do list. Using these methods, you’re taking control of your valuable information and ensuring that your notes are always available and protected. Take control of your digital life, and keep your thoughts safe!