
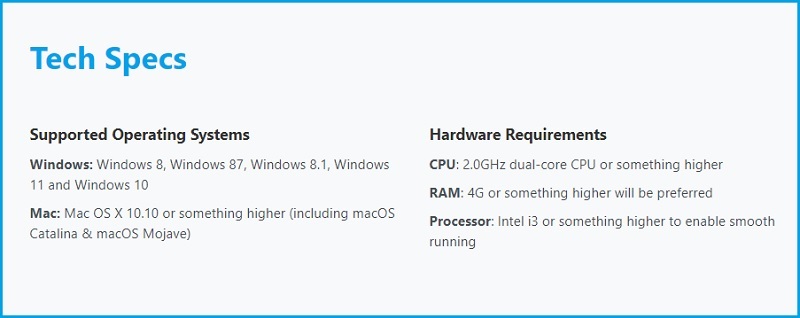
- Install Aqua Demo.
- Start the recording process.
- Stop the recording and export the recorded video.
The process of capturing everything that appears on your computer or mobile device's screen and saving it as a video file is known as screen recording. It serves various purposes and has become increasingly important in today's digital age. Screen Recording allows you to create tutorials, capture gameplay, report bugs or technical issues, preserve important moments, and more. Despite the usefulness of screen recording, users may sometimes encounter cases where the recorded video displays a screen capture video black screen instead of the expected content. This problem can be frustrating and hinder the intended purpose of screen recording. This guide aims to help users troubleshoot and resolve the issue of black screen recordings. By following the steps and suggestions provided, users can identify the potential causes of the issue. And at the same time, they can also implement appropriate solutions to ensure successful screen recording without encountering the black screen problem.
Possible Causes of Black Screen Recording
Screen recorders give us the power to record what is happening on our screen and save it for future playbacks. Yet it can still encounter some problems while recording, such as a black screen while screen recording. It is also the same as OBS black screen issue; you can visit this page for more information. What will be the causes or reasons for this scenario? Below are some factors hindering you from properly capturing or recording your screen.
A. Incorrect screen capture settings: One of the common causes of a black screen while screen recording is improper screen capture settings. This can happen if your screen recording software needs to be configured correctly. It is crucial to ensure that the screen capture settings are accurately set up to capture the desired screen, window, or specific area.
B. Graphics driver issues: Outdated or incompatible graphics drivers cannot be able to handle the screen recording process correctly, resulting in a black screen. Keeping the graphics drivers up to date is recommended to avoid such issues.
C. Hardware acceleration conflicts: Hardware acceleration is a feature that offloads specific tasks to dedicated hardware components within the system. This can sometimes conflict with the screen recording software you are currently using. In some cases, enabling hardware acceleration can cause a black screen recording.
D. Software compatibility issues: Screen recording software may encounter compatibility issues with other applications or system components, resulting in a screen record showing black screen. This can happen if the recording software is not fully compatible with your computer's operating system or other software.
E. Security and privacy settings: Certain security and privacy settings on the computer can interfere with screen recording and cause a black screen. For example, some security software or system settings may block or restrict access to the screen, preventing the recording software from capturing the screen properly. Also, some applications can restrict it according to your privacy settings.

Best Solution for the Recording Issue
Step 1: Check Screen Capture Settings
The very nature of screen recording software is to capture, record and edit the video or image output with their built-in editors. One of the best screen recorders you can utilize is the Aqua Demo from AceThinker. With this schedule screen recording tool, you can record high-quality videos. However, just like any other screen recorder, you can sometimes encounter some problems while using it. One of these issues is the black screen recording, and you can alter the capture settings of the software depending on the circumstances. You must ensure that the area of your recording is correct, or you can follow the steps below to verify the capture settings.
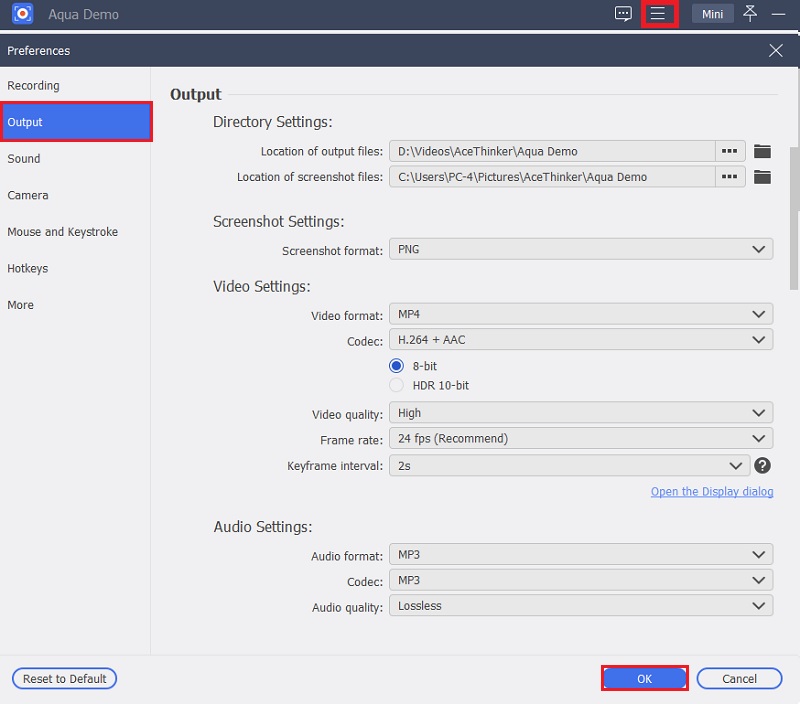
- First, open the AceThinker Aqua Demo on your desktop computer. Then at the upper right part of the tool, click the "Hamburger" button and hit the "Preferences" button.
- Afterward, you will be redirected to the "Preferences" menu. In the "Output" section, you can modify the capture setting by adjusting the frame rate to the recommended fps, which is 24 fps. You can also change the video quality and output format to be compatible with your computer.
- Lastly, after the modifications, click the "OK" button to keep the changes you have made. Restart the Aqua Demo and see if the problem is solved.
Step 2: Update Graphics Drivers
A graphics driver draws every pixel on your computer's display. Your graphics driver determines what you see in games, on websites, and on video streams, whether text or an image (such as a picture or a video). New graphics driver updates are released periodically to fix bugs, increase your computer's stability, and help with communication issues. As mentioned above, out-of-date or incompatible graphics drivers can hinder recording activities and can cause black screen while screen recording. Luckily, the process of updating your graphics drivers, audio drivers, and other drivers is almost the same. If you use a Windows OS, follow the guide below.
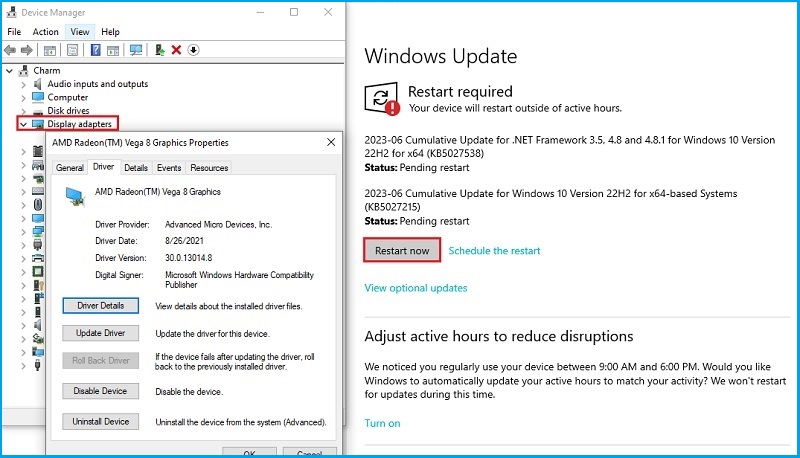
- On your Windows PC, open the "Start" menu, then type "Device Manager" on the search bar. A pop-up window will emerge, requesting you to permit the app to make changes on your device; click "Yes," and it will proceed to the Device Manager.
- After that, right-click on the "Display Adapters" and select the "Properties" option. Another window will appear, then navigate to the "Driver" menu and note your driver model and version.
- Once you have your driver's model and version, visit your manufacturer's website and see if there are some updates. Then, if the current version of your GPU's driver matches the version on your PC, your driver is up to date; if not, you can install the latest version. Finally, restart your PC after the installation.
Step 3: Disable Hardware Acceleration
When any application runs higher digital computing systems, hardware acceleration combines the flexibility of general-purpose processors, like CPUs enabling greater efficiency. For instance, visualization tasks could be allocated to a graphics card to speed up. Additionally, it will improve the quality of movie and game playback while freeing up the CPU for other tasks. Disabling or adjusting hardware acceleration settings in the full screen recorder can help resolve this scenario. For instance, if you are using Aqua Demo from AceThinker, you can apply the steps to disable the Hardware Acceleration.
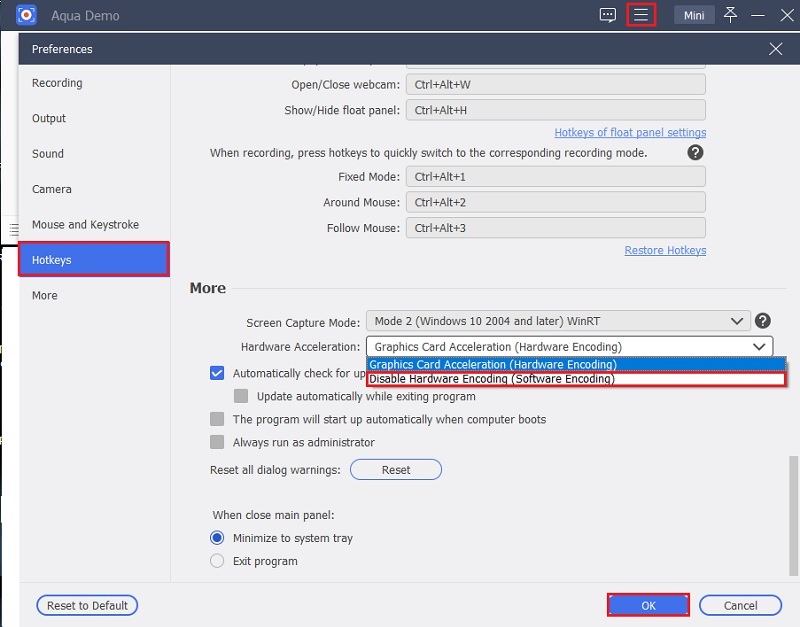
- The first step you have to do is open your screen recording application. Navigate to it and click the three horizontal lines on the upper corner of the tool to open the "Settings" menu.
- Once you have accessed the Settings, click the "Preferences" option. Under the Hotkeys menu, you can see the Hardware Acceleration option. Click on the drop-down option and choose "Disable Hardware Encoding."
- Save the modifications by hitting the "OK" button at the bottom part of the menu. Subsequently, restart your recording software to see if the screen record showing black screen issue is resolved.
Step 4: Check for Software Compatibility Issues
Software compatibility testing determines the program's compatibility with different hardware, platforms, and operating systems. A seamless user experience is achieved by ensuring the screen recording software is compatible with the system requirements, and using the latest version can help alleviate compatibility issues. For example, you can check the operating system compatibility by verifying if the software works on Windows, macOS, or Linux. On the other hand, you can also turn off some applications installed on your computer conflicting with the recording process. You can retry the screen recording after making sure there are no compatibility issues to see if the black screen recording is fixed.
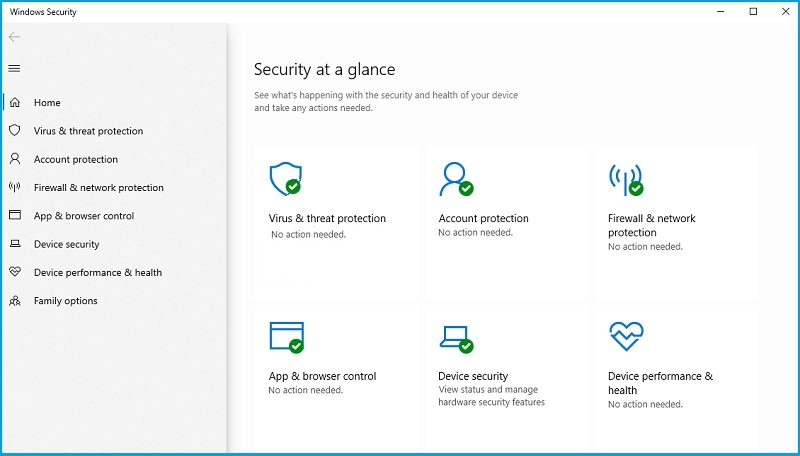
Step 5: Adjust Security and Privacy Settings
Computer security generally focuses on preventing unauthorized access and usage of computer systems. It is important to allow the necessary permissions on your computer for your screen recording application to function correctly. Suppose you are experiencing black screen while screen recording; it may be caused by your device's security and privacy settings. Check the security setting on your device by opening Windows Security. Afterward, grant necessary permissions and disable any settings that may meddle with your recording.
Step 6: Seek Additional Help
If you have tried all the troubleshooting solutions above and still your screen record showing black screen, you can visit the page of the screen recorder and get their email to contact customer support. Fixing the issue yourself can induce further damage to your device after all commercial screen recorder creators offer pro-level support services. Inclined with it, you can also seek information on online forums and communities with the same problem you are experiencing. You can chat with them and ask some queries so they can analyze and give some tips to fix the issue of your screen recording.

Conclusion
If you're experiencing black screen recording issues, there are several troubleshooting steps you can take to resolve the problem. First, ensure that your recording settings are correct and that you have up-to-date drivers installed. This can often resolve many common issues. If you're still experiencing problems, feel free to seek assistance from the software's support channels or online communities. They can provide valuable guidance and help you get back on track. Successful screen recording without black screen interruptions can significantly enhance productivity and make your work more efficient.
- It offers a user-friendly interface that is easy to navigate the functions.
- It allows users to record their screens in high definition.
- Users can edit their videos in real-time, allowing them to see the changes they make as they make them.