Exploring Snipping Tool Video Recording: A Comprehensive Guide

author portrait
0 min
0
Need an advanced screen recorder for Windows?
  • Get the Aqua Demo on your PC and launch it.
  • Start capturing video by hitting the Rec button.
  • End the recording and save it on your computer for future use.

Screen recording has become an essential element of modern communication and productivity, serving various purposes across various scenarios. It's either you creating instructional tutorials or sharing software demonstrations, the ability to capture your screen activity can significantly enhance your effectiveness. One of the most versatile tools for screen recording is the Snipping Tool, a built-in feature on Windows 11 computers that allows you to capture screenshots and record your screen. This article will show you how to record screens using Snipping Tool video recording. So whether you are a teacher, a trainer, or someone who wants to keep memoirs, let's dive into an excellent recording journey.

Record Screen using Windows Snipping Tool

Microsoft's Windows NT operating system released Windows 11 in 2021. Along with the new version of Snipping Tool, this update offers users the ability to record their screen activity. Although Snipping Tool is commonly associated with capturing static screenshots, it now has a screen recorder feature perfect for users of all skill levels. This screen recorder Windows 11 has an intuitive layout that makes creating interesting and educational videos easy. To access this feature of Snipping Tool, you must hold a Windows 11 build number of 22621.1344 or higher. Want to learn how to use the Snipping Tool record video? Here are the simple steps.

Step 1 Launch the Win 11 Screen Recording

To start, open the Start menu on your Windows 11 computer and look for the Snipping Tool. Double-clicking the application will automatically launch. Once the tool is opened, you can see its straightforward interface, and you will notice that the interface is different from the previous one.

snipping tool interface

Step 2 Start Recording your Window's Screen

Click the camera icon and the "+New" button on the tool's main interface. After that, you can select a specific region on your Windows screen. Hit the "Start" button to screen record with Snipping Tool. While recording, you can click the Pause button to stop the recording for a while and resume when you want to record again.

snipping tool start recording

Step 3 Save and Check the Output

Press the Stop button to end the recording, and you will be taken to the Snipping Tool window. Hit the Save button on the upper-right corner of the tool's interface, then type the file name and save it in your preferred location on your Windows. You can check the recording by double-clicking it, as it will play on your default media player.

snipping tool save recording

Frequently Asked Questions

What is the Snipping Tool, and how does it differ from other screen recording tools?

The Snipping Tool is a built-in Windows application primarily used for capturing screenshots. While it may not offer the advanced features of dedicated screen recording software, its simplicity, and convenience make it an attractive choice for basic screen recording needs.

faqs about snipping tool

Can I record specific windows or applications using the Snipping Tool?

Yes, the Snipping Tool can be utilized to record specific windows or applications. To do so, select the window or application you want to record before starting the Snipping Tool. However, it does not have the ability to target specific windows or applications like some other dedicated screen recording tools.

faqs about snipping tool

Does the Snipping Tool support audio recording?

Unfortunately, the Snipping Tool does not support audio recording as it focuses on capturing visual content from your screen. You may need to use a different tool if you wish to record audio along with your screen recording.

faqs about snipping tool

How can I edit the screen recording within the Snipping Tool?

Once you have captured your screen recording with the Snipping Tool, you can edit it using various tools. For example, you can use the built-in editing tools to crop or resize your recording or import it into a video editing program for more advanced editing.

faqs about snipping tool

What are the recommended settings for high-quality screen recordings?

The recommended settings for high-quality screen recordings will depend on your specific requirements. However, some general tips to keep in mind include using a high-resolution display, selecting a high-quality recording format, and using a high-quality microphone if you need to record audio.

faqs about snipping tool

Alternative Way to Screen Record Windows

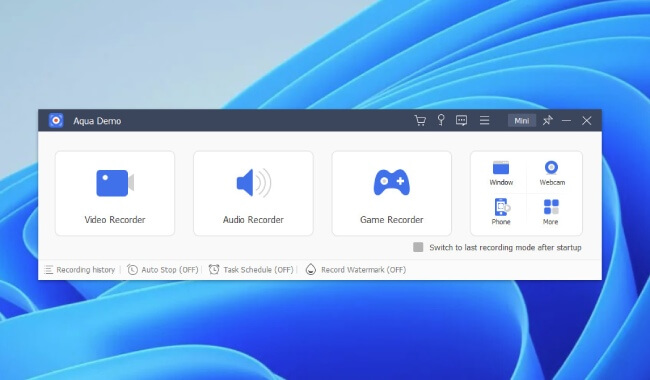
As the Snipping Tool offers a basic screen recorder, Aqua Demo is a great choice if you are looking for an advanced recorder to record your screen. This 4k screen recorder for Windows 11 allows users to record any screen activities with high-quality video output. With Aqua Demo, you can also add audio from your microphone or system to your recordings, making it perfect for creating tutorials, presentations, or gaming videos. Furthermore, the tool has different recorder modes such as Game Recorder, Video Recorder, and Audio Recorder. With these modes, you can easily record what you need. Another good thing about this recorder is that it can record your smartphone's screen on your computer. Suppose you want to record your Windows 11 screen; a simple guide is beneath.

Try it for Free

Step 1 Get and Install the Video Recorder on your Windows

On your Windows computer browser, go to the website of Aqua Demo and hit the "Free Download" button to get its file installer. Alternatively, you can click the download button above these steps. Then, open the file installer and run the setup wizard. Complete the prompts to install the software on your Windows computer.

aqua demo interface

Step 2 Start Recording on your Windows

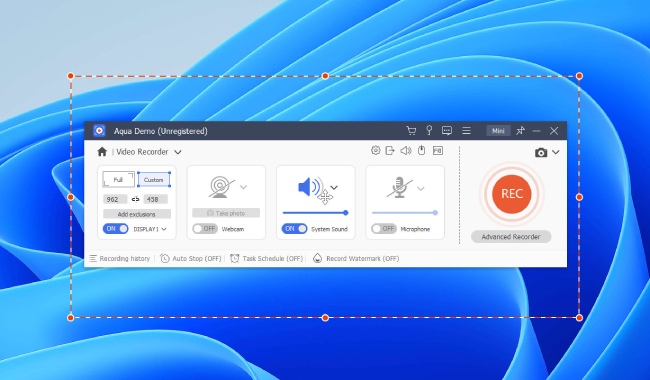
On the tool's main interface, click "Video Recorder" and then "Custom" to select a specific region, or you can record in full screen. After that, you can toggle the webcam, system sound, and microphone to include them in your recording. Then hit the "REC" button so the tool will start the recording process.

aqua start recording

Step 3 Save the Windows 11 Recording

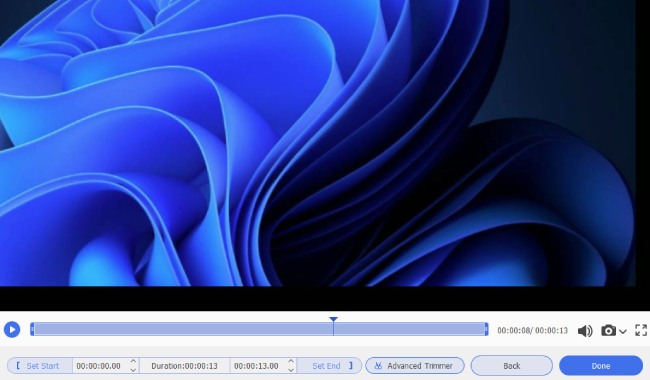
Hit the "Stop" button once you are satisfied with the footage you have recorded. Then, a preview window will appear where you can adjust the recording duration. Afterward, acquire the "Done" button to keep the recording on your Windows 11.

aqua save recording

Step 4 Play the Recording

Once you click the "Done" button, you will be redirected to the recording library, where you can play and locate the video file. Here you can also access simple editing tools to enhance your video recording. Finally, click the play button to check your recordings.

aqua video playback


Leave your comment and join our discussion
movie search
Back to Top
Contact Us
Learning Center