Flash Video is a format utilized to stream video content over the internet. Adobe Systems developed this format for video delivery on websites like YouTube, Vimeo, and Hulu. It is a versatile format that offers high-quality video playback. It has numerous features, such as dynamic streaming, interactive content, and closed-captioning. Countless interesting Flash streaming videos are available online, waiting to be explored and appreciated. Although these videos are available online, they cannot be watched without an active internet connection or shared with friends when offline. Therefore, it is essential to record Flash Video for later viewing and sharing. Recording Flash videos allows you to save them for later viewing and to share your favorite videos with friends and family. Additionally, recording a Flash video enables you to create backups. It ensures you will always have access to your favorite videos, even if they are removed from the internet. To help you with recording flash videos, we've compiled the best solutions available to get started.
What is Flash Video?
How is Flash Video Different From Other Video Formats?
Flash Video is a specific format developed by Adobe Systems to stream video content over the internet. Unlike other video formats, it offers numerous features such as dynamic streaming, interactive content, and closed-captioning. Moreover, Flash Video ensures that video playback is stable and of the highest quality possible. Some other video formats may have compatibility issues with specific devices or browsers and may offer the same level of interactivity as Flash Video.
Advantages and Disadvantages of Using Flash Video
Flash Video is a highly compressed format, allowing faster loading time and smoother playback, even on slower internet connections. Another advantage of Flash Video is that it can be easily embedded and played on websites. It makes it ideal for sharing content online. However, its disadvantage is that it cannot be viewed offline without recording or downloading the content. It also requires Adobe Flash Player to play back the video content which has become less common due to security and compatibility concerns.
How to Record Flash Video on Windows/Mac
2.1 Aqua Demo
Aqua Demo is one of the best screen recording software that allows you to record Flash videos easily on both Windows and Mac systems. Using this tool, you can effortlessly capture Flash streams from any website by clicking a button. It offers various recording options, including full screen, custom region, or webcam. Additionally, you can capture both your screen and audio at the same time. You can annotate your recording with text, shapes, or arrows to highlight essential points in the video. The recorded video can be stored in various formats, including MP4, AVI, WMV, and others. Also, you can use the task scheduler to plan and schedule video recordings, even when you're not at your computer. Here is the quick process on how to record Flash video. Follow the simple steps below to record Flash Video using the tool.
Try it for Free
Free Download
Windows 8/10/11
Secure Download
Free Download
Mac OS X 10.15 and above
Secure Download
Step 1 Download and Launch the Flash Video Recorder
To begin with, select the "Download" buttons above to set up the tool on your system. Ensuring you acquire the correct download button that matches your computer's operating system is vital. Next, follow the installation instructions given to store it on your device. Once installed, launch the tool and acquaint yourself with its functions.Step 2 Configure the Settings for Flash Video Recording
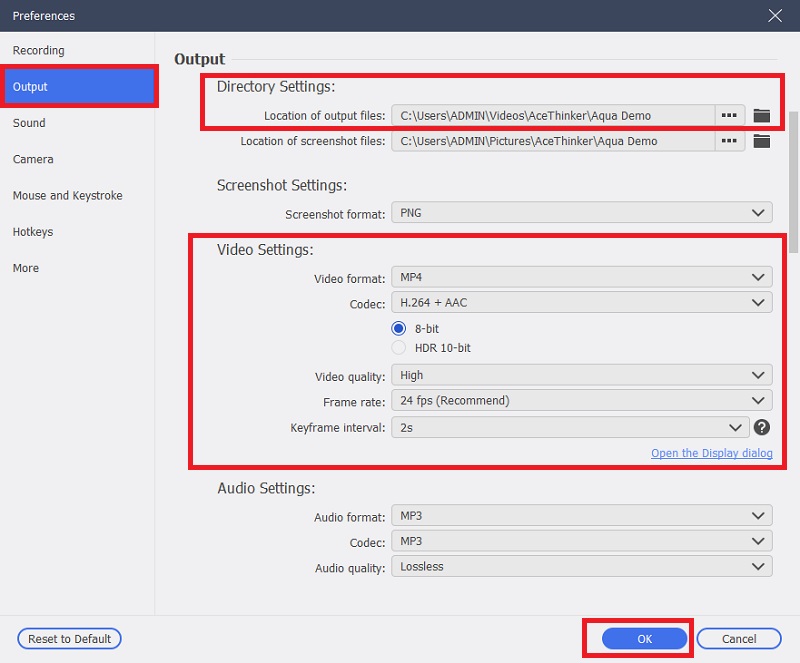
Firstly, click on the "Three-lines" icon at the top right of the tool and select "Preferences." At this point, all key options for capturing screen videos will be visible. Customizing these settings according to your preference before commencing with recording is essential. Go to "Output" and modify your video preferences, such as format, resolution, frame rate, and directory folder.Step 3 Start to Record the Flash Video
Choose between full-screen or custom mode to initiate the screen recording. Full-screen mode captures the entire screen, while custom mode only records a specific area you select. Ensure that both "Microphone" and "System Sound" settings are enabled. Then, hit the "Rec" button to begin capturing streaming video.Step 4 End and Save the Recorded Flash Video
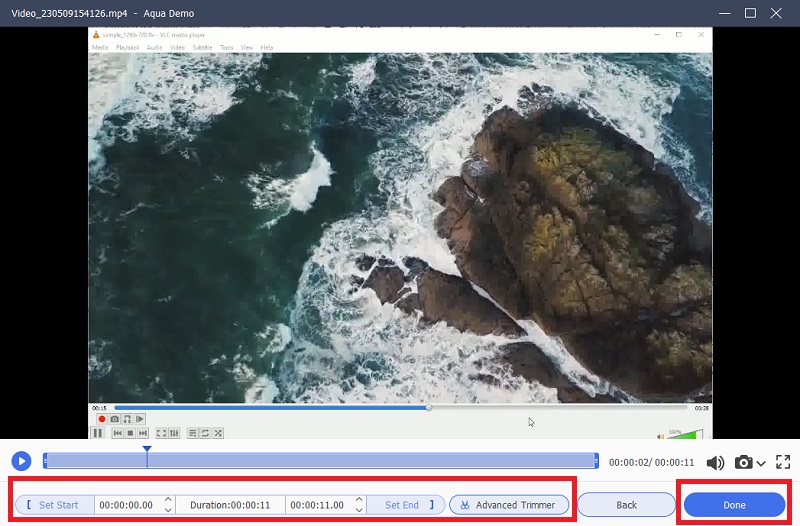
Once you finish recording, tick the "Stop" button. Then, wait a moment as the software begins to finalize the video. Within seconds, it will be stored in your designated folder and accessible on the main interface's video list. You can preview your video or make necessary adjustments, such as trimming excessive parts. Press "Done" to export it on your computer or share it to your preferred online platforms.- It supports different output formats for your recorded video, such as FLV, MP4, MOV, AVI, and more.
- The tool comes in different recording modes, making it easier for you to record your screen.
- It has a simple editing tool allowing you to trim and merge your screen recordings.
2.2 OBS Studio
OBS Studio is a popular free and open-source software for screen capturing, live streaming, and video production. This program is another great option for recording Flash Video on Windows, Mac, or Linux computers. With its ability to customize hotkeys, recording Flash Video becomes a breeze when using this software. Furthermore, it supports multiple audio tracks, various video sources, and filters allowing users to create professional-looking videos. Additionally, a preview editor will enable you to see the end product before finalizing your project so that any important modifications can be made in advance. Its advanced features are perfect for producing high-quality content without compromising quality or functionality - making it an ideal choice. To learn how to save Flash videos using OBS Studio, follow the steps below.
User Guide:
- Go to the official OBS Studio website to download and install the software. Select the right version for your computer system. Run the file installer of the tool by following its installation process. After successful installation, launch the software to begin using it.
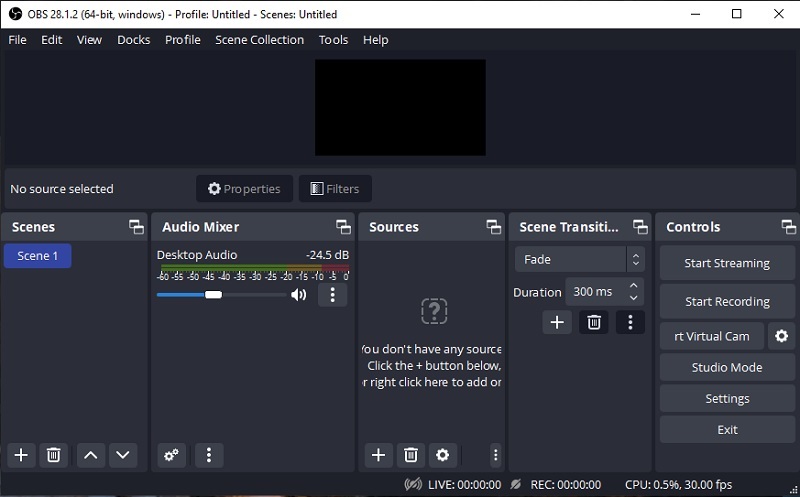
- After installing and launching OBS Studio, the first step is adding a new source by clicking the "+" button under the "Sources" section. Choose the "Display Capture" option and adjust the recording area to capture your Flash Video playing on the screen. Select the correct audio input by clicking the "Gear" icon under "Audio Mixer" and selecting the Microphone and System Audio.
- Once you have captured the Flash Video playing on your screen, click "Start Recording" to start recording. After recording your Flash Video, click "Stop Recording" on the tool's interface. The video will be saved to your designated folder on your computer. It can be edited, trimmed, or shared directly from OBS studio.
2.3 QuickTime Player
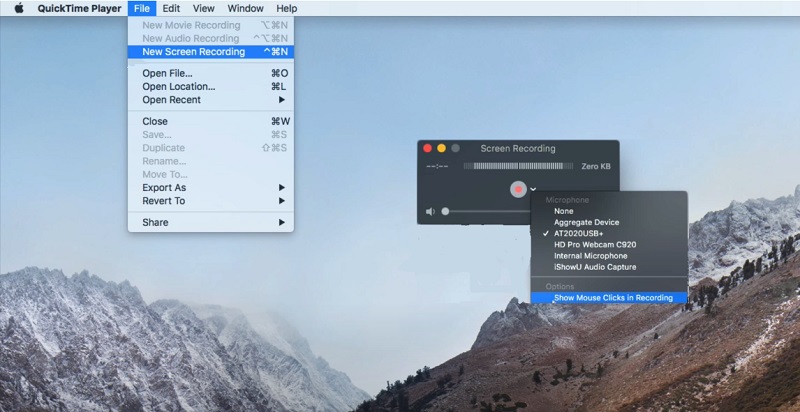
QuickTime Player is a pre-installed multi-media player for Mac OS X that can record Flash video on your Mac. This free podcast software for Mac is user-friendly and has a primary feature for recording video. Additionally, this Flash video recorder is effortless to utilize the recording function of this tool by following a few uncomplicated steps. It allows for audio recording from a microphone or other external sources. In addition, this tool can serve as video editing software that enables users to trim, rotate, divide, and combine recorded videos. For further instructions, read the following step-by-step guide below.
User Guide:
- First, you need to open the QuickTime Player application on your Mac. Click on the "File" menu tab and choose "New Screen Recording ."This will open a new recording window to initiate how to record Flash video stream.
- Next, adjust the recording setting, such as microphone volume, quality, and location of the saved file. With that, click the "Arrow" button next to the "Record" button. Also, select the area you want to record by pressing and dragging your mouse cursor over the relevant section of your screen.
- After ensuring all the settings are in place, tick the "Record" button to start recording your Flash Video. Afterward, click the "Stop" button to end the recording in the menu bar. Your recorded file will be saved in the designated location you set in the previous steps.
2.4 Screenflow
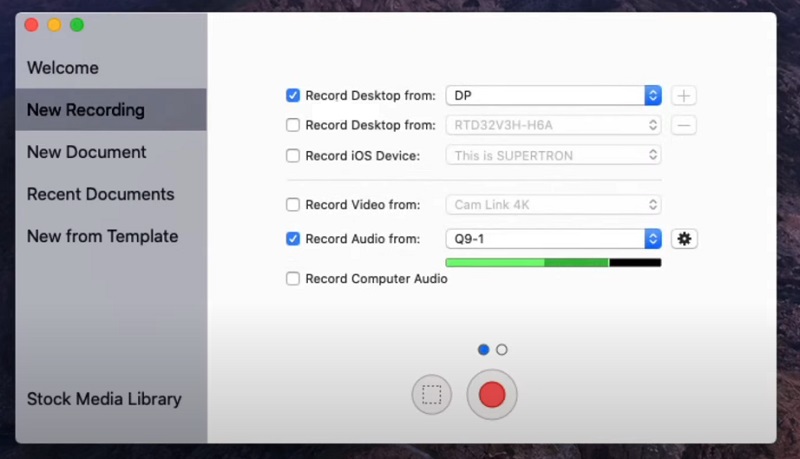
Screenflow is a professional video recording and editing software for Mac users. With its advanced technology, this tool offers a diverse array of features. These include multi-channel audio recording for high-quality sound capture. Its video annotation is used to enhance visual presentation. There are text animation capabilities that add an engaging element to your content. Additionally, there are even more innovative features available to explore. The tool enables you to capture audio and video from various sources. Users have the option to utilize a camera, microphone, and system audio. ScreenFlow facilitates the creation of presentations, demos, and different other content. It displays mouse click effects and highlights mouse movement for more precise presentation and engaging video content. It is an ideal screen recorder for users who want a more professional and feature-packed solution for creating high-quality Flash video capture on their Mac devices.
Step Guide:
- To begin using Screenflow, open the application on your Mac system. From the main menu, select "New Recording ."This will initiate a new video recording from the tool. Next, adjust your recording settings, such as microphone volume and quality. Choose whether to capture system audio or record from an external microphone.
- After setting up all the recording settings, select the screen dimension that you want to record. Hold and drag the mouse cursor over the area you want. Once done, click the "Record" button from the menu bar to capture Flash video on your screen. Make sure to monitor your recording progress using the timer that appears on your screen during the process.
- Lastly, click the "Stop" button when you finish recording. This will bring up the editing window in Screenflow. You can access the editing tools to enhance your recorded video. Make all the necessary cuts and edits before saving the final video file.
2.5 AceThinker Free Online Screen Recorder
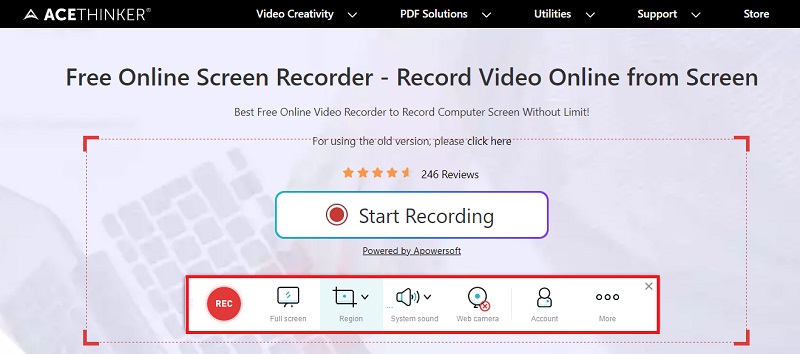
AceThinker Free Online Screen Recorder is a free and easy-to-use web-based tool. It allows you to screen record with microphone and enabled system audio. You can visit the tool's website on any web browser, including Safari, Google Chrome, or Firefox, and start recording immediately. Additionally, it enables users to record their screen in HD with a maximum resolution of 1080p. Also, it offers a feature to add annotations, shapes, and text to highlight important points during recording. This tool is an excellent option for those who do not desire to download any software and prefer the convenience of recording their screen directly from the browser. For you to explore the full capabilities of AceThinker Free Online Screen Recorder, visit their website and adhere to the simple steps on how to record Flash video from website
User Guide:
- Visit AceThinker Free Online Screen Recorder's website on your preferred web browser. Click on the "Start Recording" icon to begin recording your screen. The launching process will load automatically. It will ask you to download the launcher for the first time and install it.
- After installing the launcher, hit the installed button to launch the recording interface. Before you start recording, navigate to "Settings" to change your video format output to FLV and click "OK" to save the changes. After that, select your preferred recording mode – full screen, custom area, or webcam – and configure your audio settings. Once you've set up your recording preferences, click the "REC" button to capture your screen.
- While recording, you can annotate or highlight important parts of your video using the built-in annotation tools. Hit the "Pen" button to add lines, shapes, or text. You can also pause and resume the flash video recording at any time. After you have completed the screen recording, click on the "Stop" button to finish. A preview of your recorded video will display. You can trim the video and directly upload it to your preferred cloud storage or social media platform for free.
Tips for Recording Flash Video
Optimizing Your Computer's Performance
To ensure a smooth recording experience, optimizing your computer's performance before starting the screen recording process is crucial. You can achieve this by closing unused applications, freeing up memory and storage space, and disabling unnecessary background processes that could interfere with the recording. Moreover, you may adjust your display settings to reduce resolution and visual effects further to minimize the processing load on your computer. This will assist in enhancing the overall quality of your recorded content while preventing any lag or glitches during playback.
Ensuring Audio and Video Quality
To ensure optimal audio and video quality of your Flash video recording, it is recommended to use a high-quality microphone and webcam that can capture clear sound and images. Moreover, testing your audio and video settings beforehand is essential to avoid audio sync issues or unwanted background noise. It is also vital to ensure adequate lighting in your recording environment to avoid grainy visuals when recording Flash videos.
Extra Tips for Editing Recordings with Wind Cut
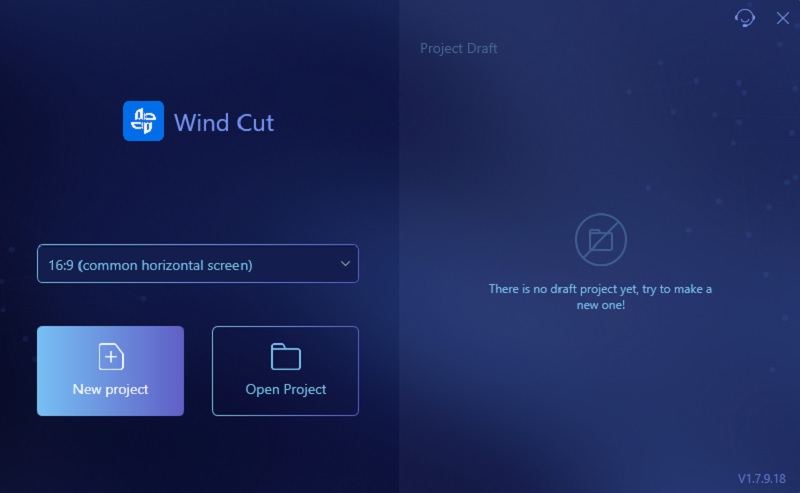
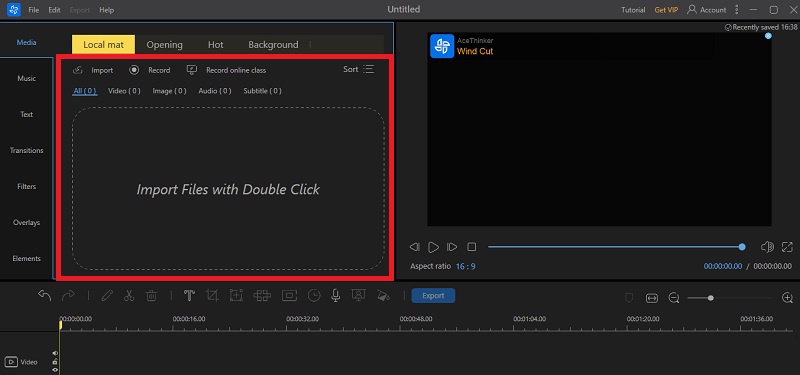
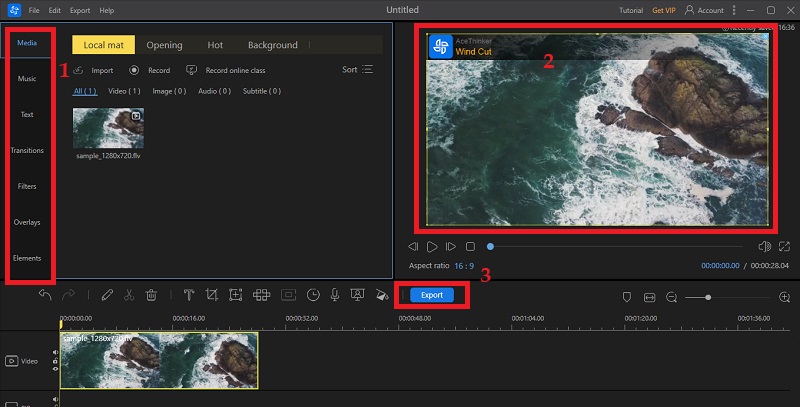
AceThinker Wind Cut is a powerful video editing tool that can help you enhance and refine your Flash video recordings. It enables you to trim and crop your videos to remove unwanted parts. You can also adjust the screen dimension of your recording and add transitions, filters, and text overlays to make it more engaging. In addition, Wind Cut offers advanced audio editing features that enable you to remove background noise, adjust volume levels and add music or voice overs. Overall, utilizing Wind Cut can take your Flash video recordings to the next level and make them more polished and professional-looking.
Try it for Free
Free Download
Windows 8/10/11
Secure Download
Free Download
Mac OS X 10.15 and above
Secure Download
