Podcasting has become increasingly popular over the years, with millions of individuals tuning in to listen to their favorite shows regularly. The benefits of podcasting are numerous, including the ability to listen on the go, learn new things, and stay up-to-date on current events. Podcasts allow diverse content creation, from storytelling and interviews to educational discussions and entertainment. These podcasts can be uploaded as digital audio to streaming platforms, and others can share it with everyone. If you're interested in creating your podcast or you want to preserve them for future reference, you may wonder where to start. That's where this guide comes in. We aim to explore the best way to record podcast on Mac, so you can start sharing your voice with the world.
GarageBand
GarageBand is a powerful built-in software on Mac that can be an excellent option for recording podcasts. It is a fully furnished music creation studio with a wide sound library that includes instruments, presets for guitar, and voice. It provides a user-friendly interface, extensive editing capabilities, and the ability to incorporate music and sound effects. It's an excellent choice for beginners and those looking for an all-in-one solution for recording and editing podcasts on a Mac. Besides, you can adjust input gain on your audio interface to compensate wherever it's too loud or soft.
- Open the GarageBand application on your Mac; then, you can create a new project, select "Empty Project" to create a custom template or choose a podcast template if available.
- Click the "+" to create a new track. You can choose "Audio" for a regular podcast, then you will be prompted to add your first track and choose the track with an image of the microphone. After that, hit the red "Record" button to start the recording.
- Once you've finished recording, you can edit podcast recordings on a Mac. You can trim unnecessary sections, add music, adjust volume levels, and apply audio effects. When you're satisfied with the edits, go to the "File" menu and choose "Export to Disk." Select your preferred file format and specify the destination folder.
Podcast Recording on Mac through Aqua Demo
Another tool you can use as the best podcast recording software for Mac is Aqua Demo. It is a prominent tool that can record audio inputs. This tool allows you to record any screen activity, and it can also record internal audio on Mac. It comes with multiple audio formats, such as MP3, M4A, WMA, FLAC, OPUS, AAC, and WAV. Further, you can alter the audio codecs and quality from lowest to lossless. With the “Microphone Noise Cancellation” feature of the tool, you can reduce the background noise while recording, making it effective to record podcasts on your Mac computer. You can also set the length of your recording so you can easily track the time or duration of your audio recordings. Here are the steps you can follow on how to record podcasts using Aqua Demo.
Try it for Free
Free Download
Windows 8/10/11
Secure Download
Free Download
Mac OS X 10.15 and above
Secure Download
Step 1 Download the Podcast Recorder
On your Mac computer, download the podcast recording software Mac, you can utilize the button above, or you can visit the authorized page of the Aqua Demo. Wait until the download process is done and click the file installer. Then, you have to follow the instructions to finish the installation process. Once done, the tool will launch on your Mac computer.Step 2 Configure Audio Settings
On the podcast recording app for Mac interface, click the "Settings" button, represented by a hamburger button. Then, go to "Preferences" and navigate to the Output panel. Under "Audio Settings," you can select your preferred output format and audio quality. You can also choose the audio input and activate your microphone's noise canceling and enhancement on the "Sound Settings." To keep the changes you have set, click the "OK" button.Step 3 Start Recording your Podcast
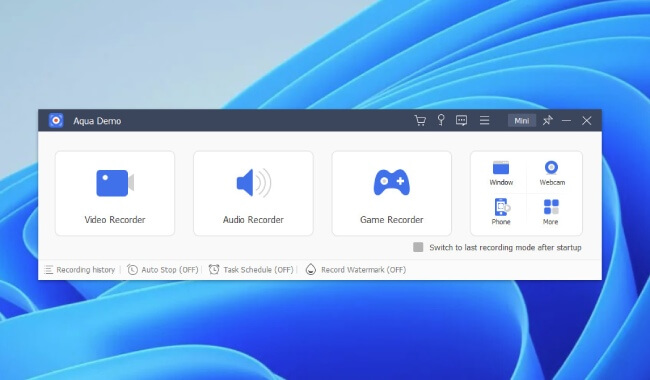
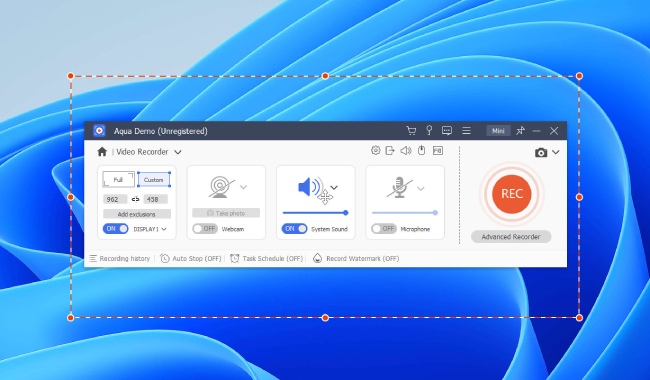
To commence the audio recording click the "Audio Recorder." After that, you must toggle off the system sound since you need to record the microphone audio. Subsequently, click the "REC" button to record your podcasts. You can pause your recording if you need to take a break and to wrap up your recordings, you can click the "Stop" button.Step 4 Edit and Save the Podcast
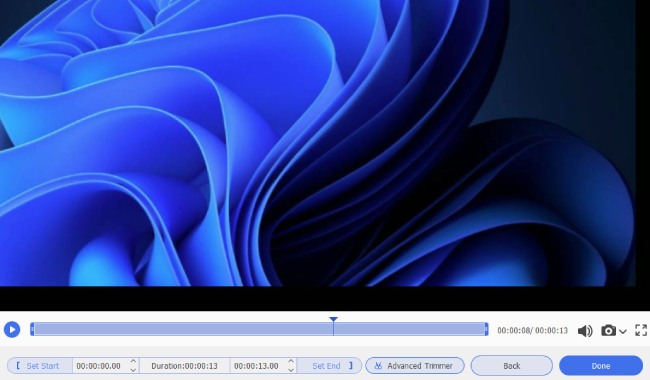
When you click the "Stop" button, a preview window will appear. Here you can access the "Advanced Trimmer," which allows you to trim and merge files. You can also adjust the fade in and out of each segment of your podcast, and when you're done, click the "Trim" button on the bottom right part of the panel. You will return to the preview window and hit the "Done" button to save your podcast.Mac-compatible Podcast Hosting Platform- Zencastr
Zencastr is one of the Mac-compatible podcast hosting platforms you can utilize. Zencastr is an online recording platform specifically designed for podcasters. It delivers features that make remote podcast recordings with guests or co-hosts a seamless experience. It offers audio and video recording options for your podcasts. You can also easily sort your podcasts as it comes with 3 different options such as Rooms, Shows, and Episodes. Moreover, you can easily submit your podcast on Apple Podcasts, Google Podcasts, and Spotify. However, you must note that the program is only supported in Brave, Google Chrome, and Microsoft Edge. Here's how you can use Zencastr for recording podcasts:
- Go to the website of Zencastr and create an account. Once logged in, you can click on the "+New" button to record podcast on Mac. Select which podcast option you need; for instance, if you want to create an episode type of podcast, click it and name your episode. After that, you will be prompted to record audio and video transcriptions or the audio itself.
- When you have clicked the option you need, click the "Create" button. You will be redirected to the record dashboard, and here you can click "Start Recording" to begin the podcast. Hit the "Stop Recording" button to save the podcast on your profile. If you have invited a guest to your podcast, the audio recording will be processed, mixed, and made available for download for each participant.
Tips for High-Quality Podcast Recording
A. Choosing a suitable microphone for podcasting: Selecting the right microphone is crucial for capturing clear and professional-sounding audio. Consider microphone type (dynamic or condenser) and connection options (USB or XLR). USB microphones are the best option for beginners because they are easy to set up. In contrast, the XLR are microphones that require additional hardware and external power sources.
B. Ensuring a quiet recording environment and minimizing background noise: Find a quiet space to record your podcast. If you must record your podcast in a less ideal environment, find a spot away from doors, windows, or vents. Consider using acoustic treatments or soundproofing techniques to minimize unwanted background noise. You can also utilize a screen recording app without background noise to make your podcasts.
C. Positioning the microphone properly for optimal sound quality: Position the microphone at an appropriate distance from your mouth to achieve a balanced and clear sound, don't let your audience hear the sound of your breathing. Experiment with microphone placement to find the sweet spot for your voice.
D. Conducting sound checks and adjusting audio levels: Before recording, perform sound checks to ensure your audio levels are properly adjusted. Monitor the input levels of your microphone to avoid sound distortion or clipping and make adjustments as necessary.
E. Monitoring audio quality during the recording process: Use podcast headphones for Mac or monitors to listen to your audio in real time. This process lets you catch any issues or abnormalities during the recording, ensuring a higher-quality end of podcasts.
Conclusion
To recap, we discussed three different methods of recording a podcast on a Mac: GarageBand, a built-in software, Aqua Demo for Mac, a third-party recording software, and Zencastr, an online recording platform. Each approach has advantages and may cater to different podcast recording setups on Mac. We emphasized the importance of audio quality in podcasting and provided tips for achieving high-quality recordings on a Mac. By choosing the right microphone, creating a quiet recording environment, positioning the microphone properly, conducting sound checks, and monitoring audio quality during the recording process, you can ensure a successful podcast recording experience. Remember, capturing high-quality audio is essential for engaging and retaining your audience, so invest time and effort into optimizing your recording setup. Happy podcasting!