
Need and alternative for OBS?
- Download and install the OBS alternative.
- Connect your webcam and start recording.
- Stop and store the recording.
Open Broadcaster Software (OBS) stands as a cornerstone in live streaming and content creation. This open-source software, available on multiple platforms, empowers users to broadcast their content seamlessly across various online platforms. At the core of OBS lies the integration of different sources, including audio, video, and multiple media files, into a unified streaming experience. In the context of live streaming, the role of a functioning camera within OBS is paramount. The camera serves as the lens through which creators connect with their audience, adding a personal touch to the content. A malfunctioning camera can disrupt this connection, leading to a subpar streaming experience. This article will provide a comprehensive troubleshooting guide for the OBS Studio camera not working. Read on to fix this issue.
Troubleshooting Solutions
1. Restart the OBS Software
The initial and often the most effective method to resolve camera issues in OBS involves restarting the application. Restarting OBS when Streamlabs not detecting webcam is a common troubleshooting step to address the various problems that may arise during the operation of the software. Like any complex software, OBS may encounter glitches or memory leaks during its process, and sometimes, settings can become corrupted, leading to camera issues. Restarting the tool ensures that you begin with a clean slate and helps clear these temporary issues. Here's a step-by-step guide on how to perform this task.
Step 1 Close OBS using Task Manager
Open your "Task Manager" using the key combination CTRL + Shift + ESC. Then, locate OBS Studio on the "Processes" tab of the Task Manager. Right-click on OBS Studio and select "Go to details" to view detailed information about the OBS Studio process. In the "Details" tab, locate the OBS Studio process and right-click on it. Choose "End Process Tree." This option terminates the OBS process and all related subprocesses.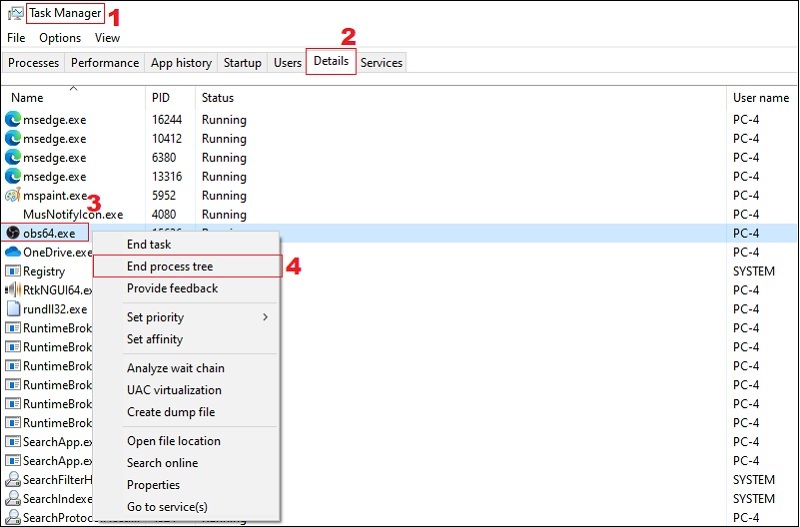
Step 2 Start OBS as Administrator
After ending the OBS Studio process tree, close the Task Manager. Launch OBS Studio again, ensuring you run it as an administrator to have elevated privileges. You can search it on your computer search bar and right-click on it. Then, pick the "Run as administrator."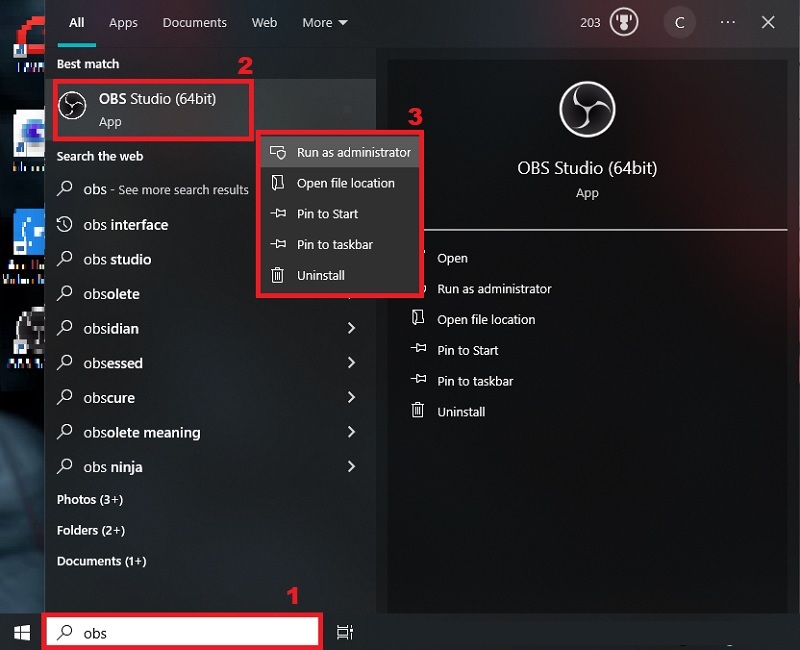
2. Enable Camera Permission
If you're experiencing issues with your OBS virtual camera not working, ensuring that the necessary camera permissions are enabled is essential. Modern operating systems, like Windows, macOS, and Linux, implement security features that control which applications can access hardware devices like cameras. If camera permissions are not granted, OBS Studio won't be able to use the camera. In addition, system updates or setting changes might unintentionally restrict camera access for specific applications. Verifying and enabling camera permissions ensures that any recent system changes do not hinder OBS Studio's ability to utilize the camera. Follow these steps to check and facilitate camera permissions in your Privacy & Security settings on your Windows devices.
Step 1 Open your Windows Settings
Start the process by pressing "Windows + I" to open Settings. Then, on the search bar on this tab, search the "Task Privacy Settings" and hit the "Enter" key on your keyboard.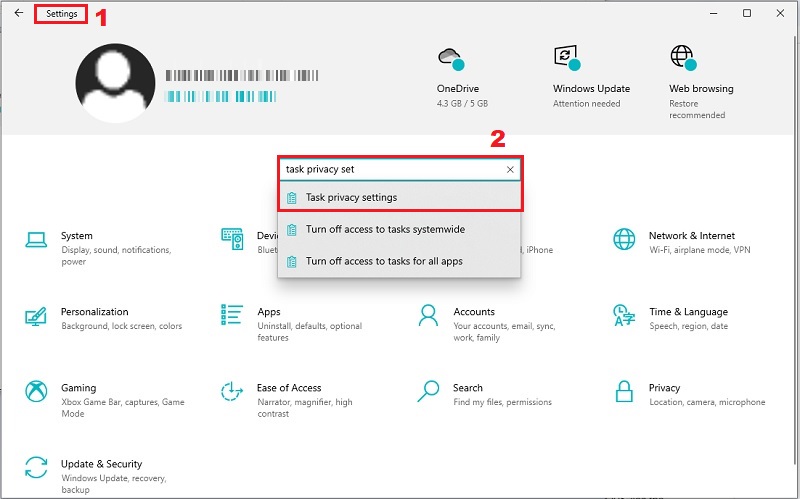
Step 2 Authorize Camera Permission
nce you hit "Enter," you will be moved to another window. Under the "Privacy" panel, scroll down to access the "App permissions. " Click "Camera" to see the "Allow apps to access your camera" option. Toggle the button to enable the camera. Then, see if your OBS webcam is working.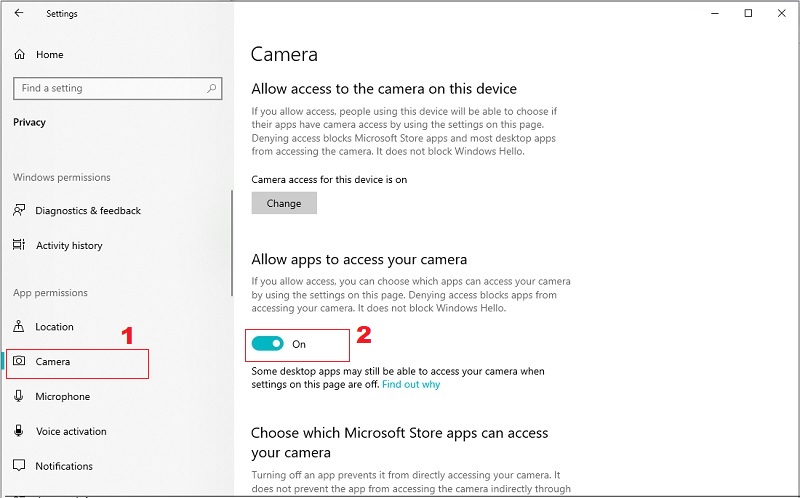
3. Update OBS
If you are encountering problems with the OBS camera not working, ensuring that OBS Studio is up to date is crucial to resolve potential compatibility issues. Software updates constantly include bug fixes, optimizations, and security patches, protecting your system from potential vulnerabilities. Besides, updates might include compatibility improvements, especially concerning virtual camera plugins. Updating OBS Studio ensures that you benefit from the latest enhancements, potentially addressing issues with the virtual camera.
Step 1 Head into Help Options
Open OBS Studio on your computer. Then, navigate to the "Help" menu. This menu is usually located in the upper part of the OBS Studio window.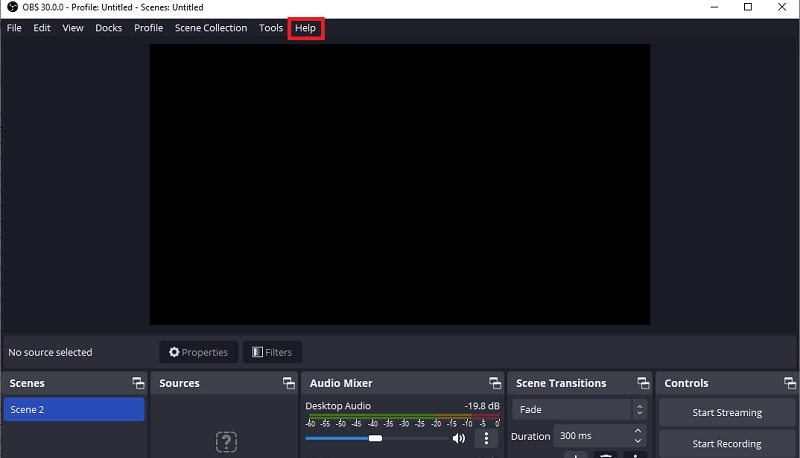
Step 2 Click on Check for Updates
Look for the "Check for Updates " option in the " Help " menu. Click "Check for Updates" to prompt OBS Studio to search for the latest version. If an update is found, pursue the on-screen instructions to download and install it.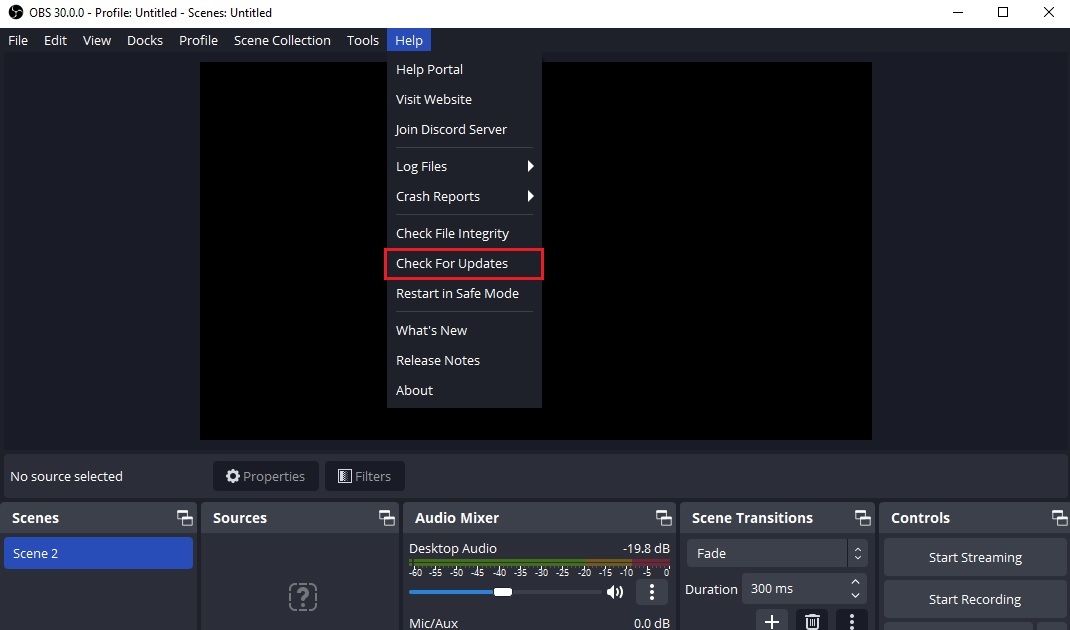
Note: Remember to restart OBS Studio after updating to ensure the changes take effect. This step is crucial for implementing the newly installed updates and ensuring a smooth operation of OBS Studio, including its virtual camera features.
4. Try Adjusting the FPS and Resolution
Adjusting the FPS and resolution of OBS when you encounter the Streamlabs webcam not working issue can be a viable solution. Plugins for virtual cameras can have particular needs in terms of the frame rate and resolution. By changing these parameters, OBS Studio can comply with the requirements of virtual camera plugins. Plugins for virtual cameras may have particular needs in terms of frame rate and resolution. Users want to improve the environment's compatibility with OBS Studio's virtual camera features through these modifications. Experimenting with various settings is crucial to determine which functions best with OBS Studio and the virtual camera plugin. Remember that these parameters might change based on the requirements and particular virtual camera plugins.
Step 1 Adjust the Base Canvas Resolution
Launch OBS Studio, then go to the "Settings" menu, usually found in the lower-right corner of the OBS Studio window. Within the "Settings" menu, select "Video" from the left sidebar, then locate the "Base (Canvas) Resolution" dropdown menu. Change the resolution to a lower setting.
Step 2 Alter FPS and Save the Changes
Still, within the "Video" settings, find the "Common FPS Values" dropdown menu. Then, change the FPS value from 30 to 60. After making these changes, click on the "Apply" button and save the settings by clicking on the "OK" button. Restart OBS Studio to ensure the changes take effect.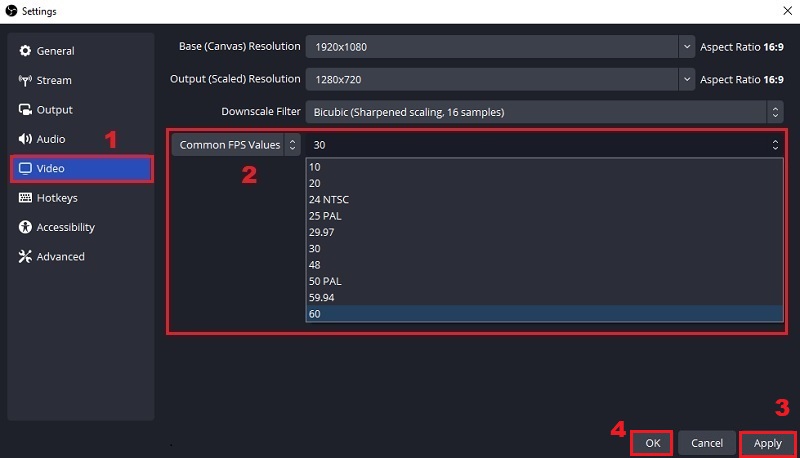
5. Reinstall Camera Driver
Another troubleshooting step is reinstalling the camera driver. If corrupted files were associated with the camera driver installation, installing and reinstalling it can resolve the potential issue. This process ensures the camera driver is compatible with the camera hardware and OBS Studio. Besides, it provides a fresh camera driver installation, eliminating any potential conflicts or errors from the previous installation. Below are the steps you can heed to reinstall your camera drivers on the Windows operating system.
Step 1 Uninstall the Camera Device
Press the Windows key + X to unlock the shortcut menu, and from the menu, select "Device Manager." In this menu, find your "Camera" category and click the drop-down menu to see your camera attachment. Afterward, right-click on your webcam, and from the context menu, pick the "Uninstall device" option, then confirm the uninstallation if prompted.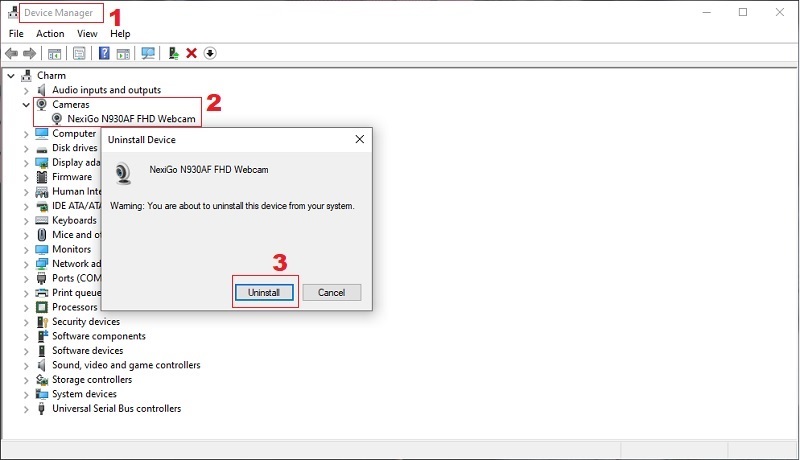
Step 2 Scan for Hardware Changes
After uninstalling the camera device, click on the "Action" menu at the top of Device Manager and choose "Scan for hardware changes." This prompts Windows to detect and reinstall the missing camera drivers. Once the drivers are reinstalled, restart your computer to ensure the modifications take effect.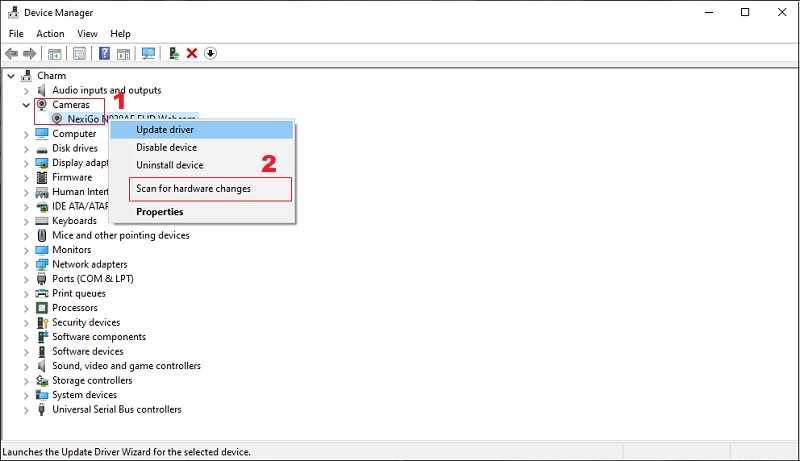
6. Uninstall and Reinstall OBS
Uninstalling and reinstalling OBS Studio can solve the OBS virtual camera not working since it can improve performance and functionality, including virtual camera support. Over time, the OBS installation files may become corrupted for various reasons, like incomplete downloads, interrupted installation, or file conflicts. Furthermore, if OBS Studio has undergone significant updates or changes since the initial installation, an outdated version may be incompatible with certain features, including the virtual camera. Reinstalling ensures you have the latest version, compatible with recent updates and improvements.
Step 1 Uninstall OBS Studio
Access your computer settings and locate " Apps & features." Then, go to the "Apps & features" and find OBS Studio in the list of installed applications. Then, click OBS and hit the "Uninstall" button to completely remove it from your PC. After uninstalling OBS Studio, deleting any leftover residual files associated with the application is essential.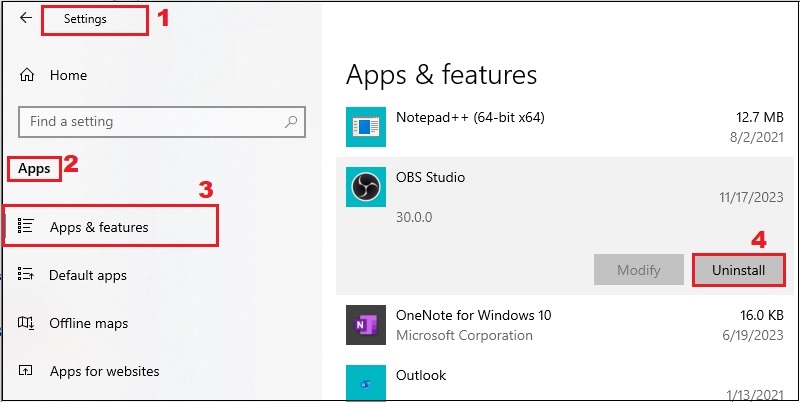
Step 2 Download the Latest Version of OBS Studio
Visit the official OBS Studio website to download the latest application version. Then, install OBS Studio on your PC by following the on-screen instructions. After reinstalling, open OBS Studio and add a "Video Capture Device" to inspect if the camera functions correctly.
7. Contact Support
Contacting support for OBS camera not working issues can be necessary in certain situations. The camera's failure to function can be caused by complex technical factors requiring in-depth software knowledge. Support teams are equipped to handle intricate technical problems and provide detailed solutions. They can access advanced troubleshooting techniques and guide users through more complex steps not covered in standard user guides. This can be especially helpful when common troubleshooting steps have been exhausted. Further, they can provide information on upcoming updates, patches, or fixes related to virtual cameras and OBS black screen window capture issues. This guarantees that users know potential solutions or improvements in subsequent software releases.

8. Use An Alternative Screen Recorder
If you have tried all the solutions above and the OBS camera not working issue still exists, you can use another screen recorder. Aqua Demo is one tool you can employ to record your screen while overlaying your webcam. Users can customize the webcam view by selecting it as a circle, square, or rectangle. This function is perfect for recording gameplay, tutorials, presentations, and more. This tool lets users record the system sound and microphone to make your video recording more engaging. In addition, users can include shapes, lines, arrows, text, and more in real-time recording. This function makes the screen recording more informative. This screen recording software allows you to schedule screen recording with its "Task Scheduler" feature. This means the tool will automatically record your screen activities at your set time, making it ideal for scheduled live-streaming videos.
Try it for Free.
Free Download
Windows 8/10/11
Secure Download
Free Download
Mac OS X 10.15 and above
Secure Download
Step 1 Acquire Aqua Demo
Begin by obtaining the screen recorder's file installer, you can utilize the button above. Then, go through the installation setup to install it on your computer. After that, launch the tool and acquaint yourself with its simple interface.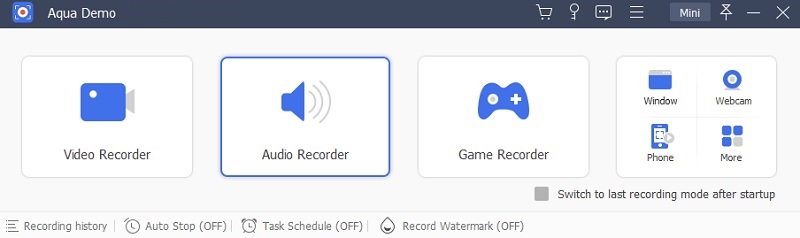
Step 2 Set the Parameters of your Webcam
Connect your webcam to your computer once you familiarize yourself with the tool's interface. Then, click the "Webcam" icon on the tool's main interface. You'll be moved to the webcam's settings, where you can choose the resolutions and toggle the System Sound and Microphone. Clicking the "Property" beside an option will let you access the other settings for your webcam.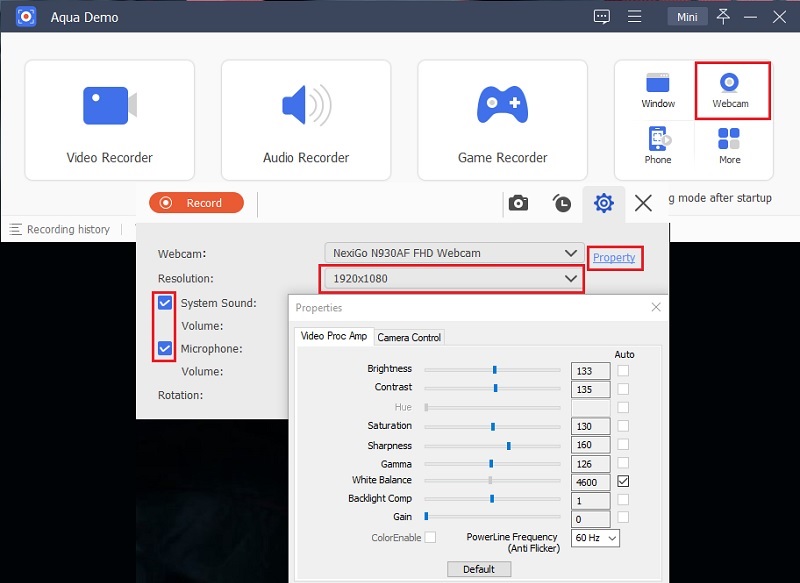
Step 3 Commence the Recording
Click the "Video Recorder" on the screen recorder's main interface. Choose to record in full or custom mode. Then toggle your webcam, system sound, and microphone. After that, commence the recording by clicking the "REC'' button.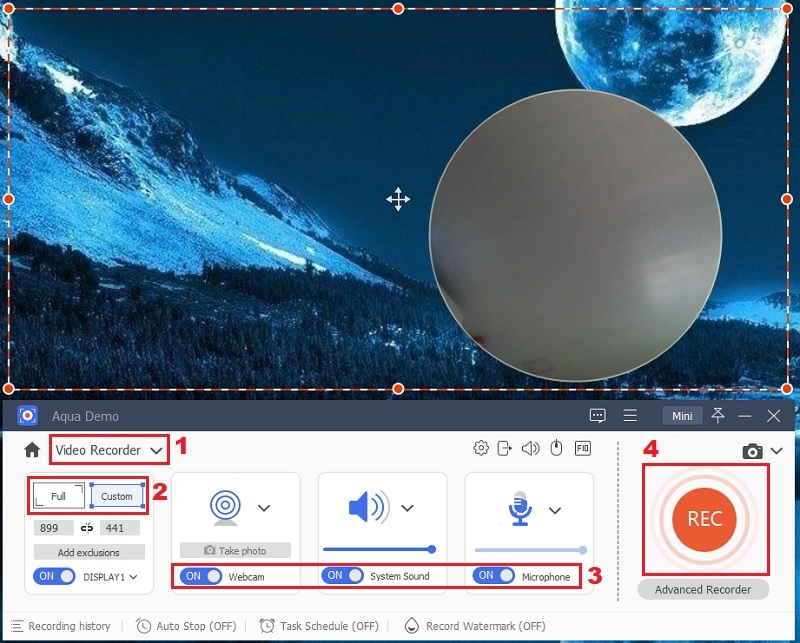
Step 4 Stop and Save the Recording
With your webcam on during recording, you can easily monitor your reaction to your recordings. When you are satisfied with your recording, hit the small red square near the pause icon to stop it. Then, a preview window will emerge where you can trim your recording. Clicking the "Done" button will save it in your output folder.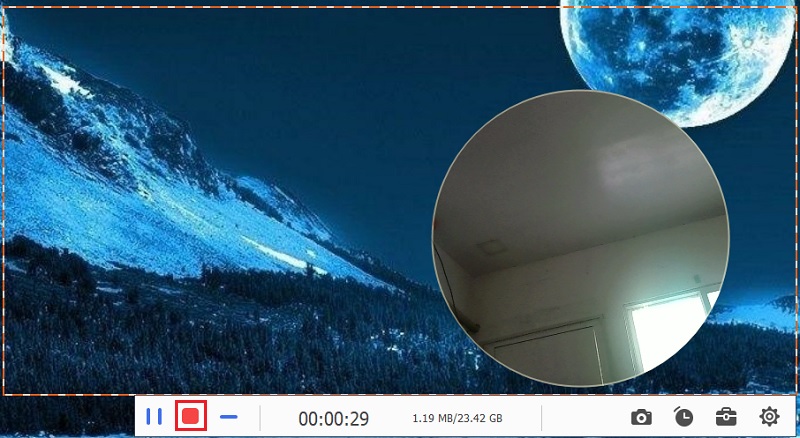
Step 5 View the Video Playback
You can also access the recording on the built-in library of the tool. Here, you can double-click the recent file you have recorded, and it will play with your default media player.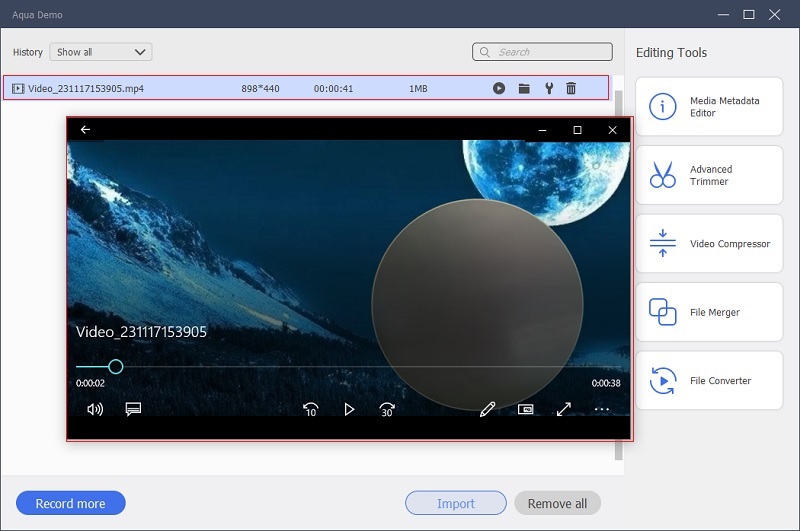
Conclusion
The importance of a functioning camera in OBS cannot be overstated. It serves as the visual line between content creators and their audience, enhancing the overall streaming experience. This troubleshooting guide equips users with the knowledge to address common camera issues within OBS. By following these step-by-step solutions, users can ensure a seamless and uninterrupted streaming experience, fostering a stronger connection with their viewers. Remember, a well-maintained camera enhances the visual quality of the content and the overall professionalism of the broadcast.