
- Get the best screen recorder and install it on your PC.
- Connect your webcam and choose a specific window to record, then hit the “Rec” button.
- Stop the recording and save it on your computer.
Capturing your screen and yourself has become essential to communication and collaboration in our era today. Whether creating software tutorials, giving presentations, or conducting online meetings, the ability to capture yourself and your screen effectively conveys information and engages with your audience. By utilizing a screen recorder, you can easily capture everything happening on your screen. This technology allows you to showcase processes or narrate your thoughts in real time, providing clarity and context to your audience. Additionally, recording yourself and your screen adds a personal touch to the content. It also enables you to establish a stronger connection with your viewers. With the increasing reliance on remote work and virtual interactions, the ability to record yourself and your screen has become a valuable tool for communication and knowledge sharing. This article will guide you through recording yourself and your screen and exploring different tools and approaches to improve the quality of your video recordings.
Things to Remember Before Screen Recording
Before you hit that record button to capture yourself and your screen, several crucial points must be considered to ensure a seamless and practical recording experience. Here are some key things to remember to create engaging and professional video presentations that effectively communicate your message while recording yourself and your screen:
- Check Your Equipment: Ensure that your microphone, webcam, and screen recording software are all working properly. Test them beforehand to avoid technical glitches during the recording session.
- Clear Workspace: Eliminate distractions and clutter from your workspace to maintain focus and professionalism in your recording. A tidy environment can enhance the quality of your video recording.
- Script or Outline:
Prepare a script or outline of what you'll discuss or demonstrate in your recording. This will help you remain organized and show your message clearly and concisely. - Choose the right software:Select a reliable screen recording software that suits your requirements and preferences. Look for HD recording, webcam overlay or integration, and editing capabilities.
Best Way to How to Record Your Screen and Yourself
Aqua Demo boasts a wide array of features tailored to fulfill the diverse needs of users. This tool can seamlessly record screen and webcam simultaneously. It gives you an option where you can place the webcam while recording, and you can modify the resolutions. Users can effortlessly annotate recordings and add captions, text, or shapes in real-time recording to enhance the video content. Moreover, it authorizes you to record audio from the microphone or system sound, providing flexibility for narration or capturing any audio output during the screen recording. This screen recorder also offers high-quality recording up to 4K, providing users with a smooth visual experience. The output formats it supports are versatile, including popular options such as MP4, AVI, MOV, and more. So whether you are an aspiring content creator who wants to record YouTube videos or a business professional looking to create an instructional video, this screen recorder is a perfect tool. Here are the steps you can observe on how to record yourself and share your screen:
Acquire it for Free
Step 1. Acquire the Screen and Webcam Recorder
To start recording, you must download the Aqua Demo file installer from the official website. You can also hit the download button above this guide. Make sure to go through the installation process and launch the screen recorder on your device.
Step 2. Configure the Screen Recording Settings
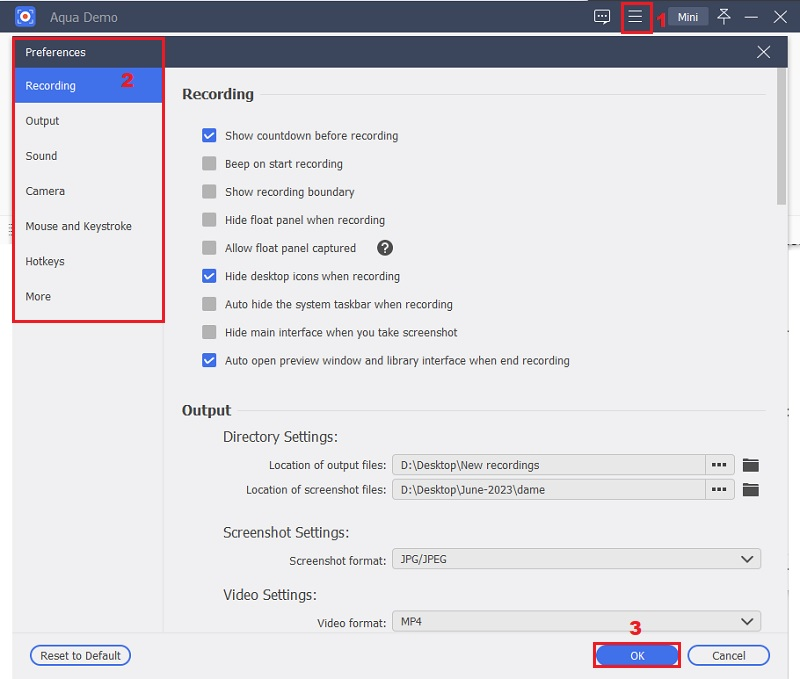
Once you have launched the tool, you can configure the screen recording settings according to your preferences. On the tool's interface, click the "Hamburger" icon in the upper right corner. Then, hit "Preferences" and tweak the various settings, such as video and audio quality, mouse effects, and more, that suit your recording needs.
Step 3. Start Recording Yourself and Webcam
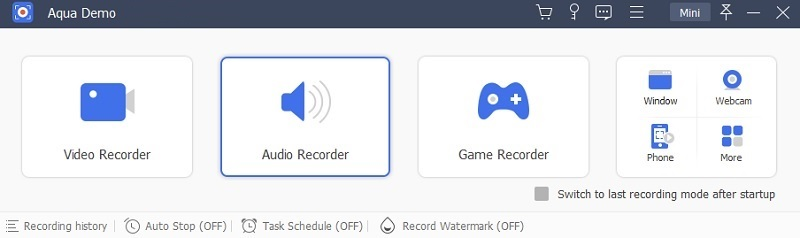
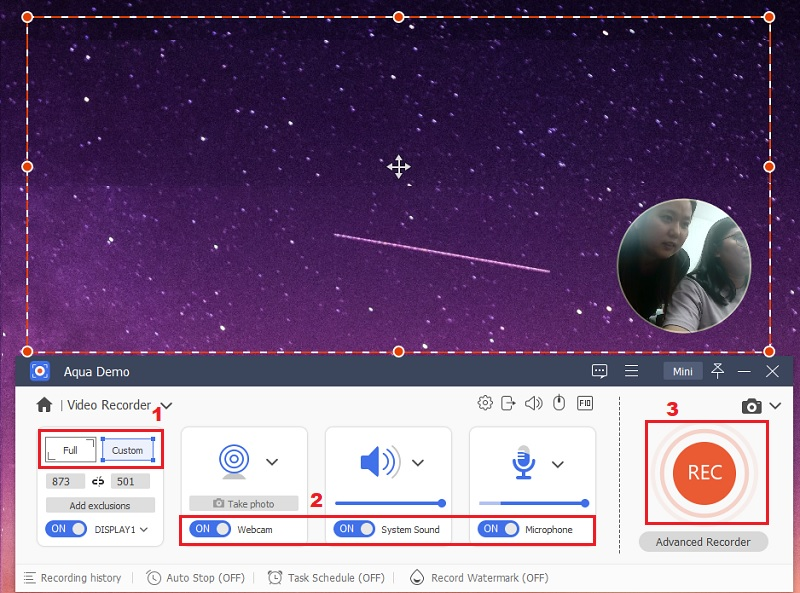
Before you screen record, you must enable your webcam and position it to capture your face. Then, click the "Video Recorder" button on the screen recorder's interface. This will open the option for your recordings; choose the capture window to capture the entire screen or select a specific area. After that, toggle the buttons under the webcam, system audio, and microphone, and hit the "Rec" button.
Step 4. Stop the Recording Process
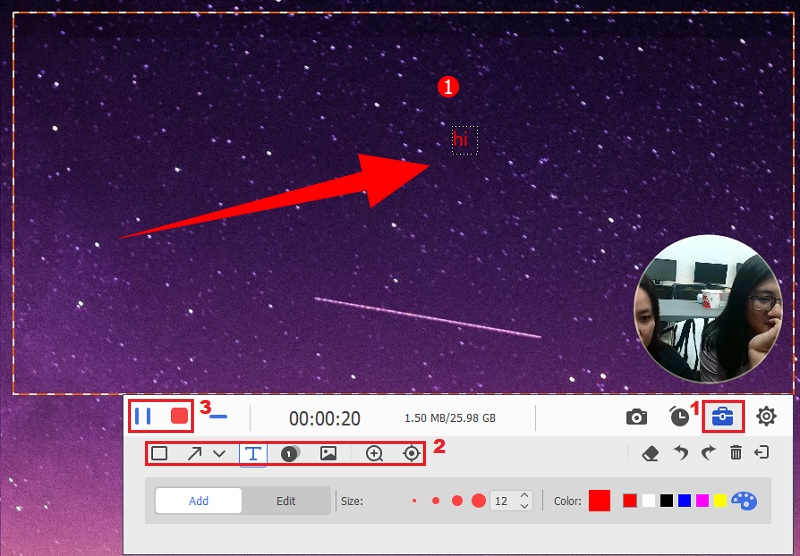
While recording, you can annotate the important details of your presentations or your computer screen. The recording software also gives you the option to pause your screen recordings, then when you're done, click the "Stop" icon. A preview window will appear afterward. You can review your recording and click "Done" to save it from there.
Step 5. Review the Recorded Video
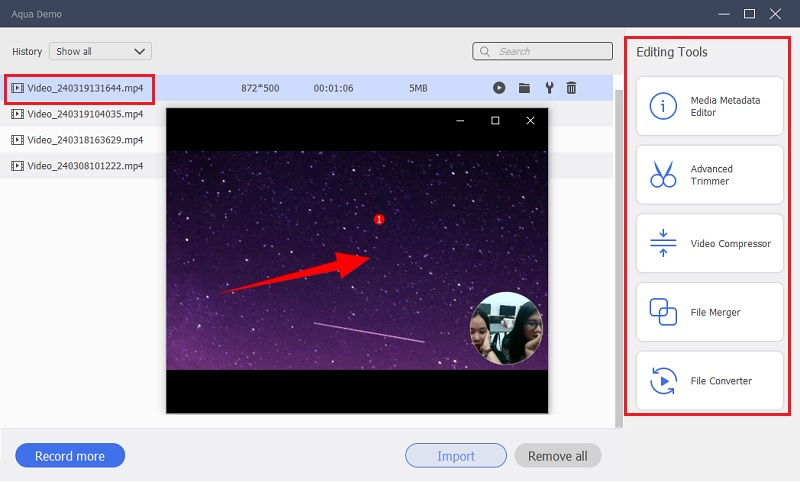
After completing the recording, you can review the recorded video on the "Recording History" tool. Double-clicking the video file will play it on your default media player. Here, you can also see the video editing features of this screen recorder, where you can edit the video.
Tips: This screen recording software also allows users to facilitate a webcam recording and audio recording, making it a versatile tool for video presentation recording yourself and your screen.
Alternative Methods on How to Record My Screen and Myself
1. QuickTime Player
Suppose you own a Mac computer, and you don't want to get additional software. In that case, you can use the built-in screen recording feature, QuickTime Player. It is a free multimedia software compatible with Mac operating systems that lets you record your webcam and screen simultaneously. Whether demonstrating software functionalities or crafting a tutorial, this movie recorder provides a reliable platform for Mac users. Aside from tutorials, you can also record Discovery Plus content, live stream, podcasts, music videos, and other things. Underneath is a quick tip on how to record yourself and screen on Mac:
- First, locate QuickTime Player in your Applications folder or use Spotlight Search to find and open it. Then launch QuickTime Player, navigate to the upper menu bar and click "File." From the dropdown menu, pick the "New Movie Recording." This will open a window with your webcam feed.
- Next, go to the "View" menu and choose "Float on Top." This option ensures that your camera window remains visible on top of any other application windows open on your desktop screen. Return to QuickTime Player and again select "File" from the top menu. This time, choose "New Screen Recording." A recording control panel will appear on your screen.
- Once you're ready to start recording, click the red "Record" button in the control panel. Then, to stop or finish recording, either click the stop button in the recording control panel or use the keyboard shortcut Command-Control-Esc. Finally, save your recording by going to File > Save. Choose a location on your computer to hold the video file and give it a descriptive name to access easily.

3. OBS (Open Broadcaster Software)
OBS Studio is another alternative that you can use to record both the screen and the web camera at the same time. It enables users to configure multiple sources, including screen captures, webcam feeds, and even additional media files within a single recording session. It also permits users to capture in full screen, a browser tab, or a particular window and application. Furthermore, it offers various customizable settings, from adjusting recording resolutions and frame rates to fine-tuning audio levels and visual effects. Users can also record system audio or sounds, a computer's microphone, or both using this free screen recorder. Since it is an open-source software, it supports Linux, Mac, and Windows. This tool can also record video conferencing, streaming videos, video tutorials, or capture online classes. A simple guide on how do you record yourself while recording your screen is below:
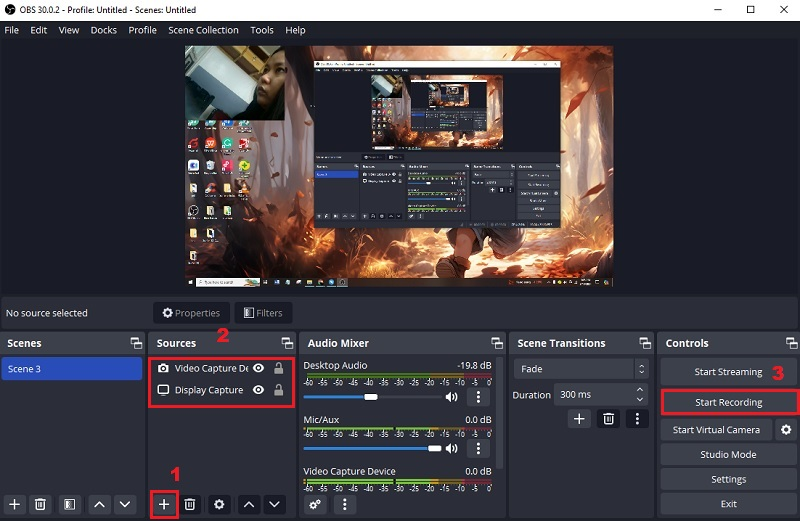
- Obtain OBS Studio and install it on your computer. Make sure to select the version that is compatible with your operating system. Once OBS is installed, launch the application and add your screen as a source. Click on the "+" icon in the "Sources" box and select "Display Capture" to capture video in full screen.
- After that, to add your webcam as a source, click on the "+" icon again and select "Video Capture Device," then choose your webcam from the dropdown menu. Once your sources are set up, you can begin capturing high-quality video recordings by clicking the "Start Recording" button in the bottom right part of the tool's interface.
- To stop the recording, hit the "Stop Recording" button in the bottom right part of the OBS interface. Your recording will be saved to the specified location on your computer. You can review the footage and see if you are satisfied with it. Since OBS doesn't support editing tools, you can edit the clips using video editing software.
Frequently Asked Questions
How do I insert just my screen into the recording?
Most screen recording software lets you choose which parts of your screen to capture. You can typically select specific application windows or areas of your screen to record. To insert just your screen into the recording, ensure that your webcam or video input source is disabled or positioned off-screen during recording.

What basic editing features should I look for in a recorder?
Basic editing features typically include trimming, cutting, merging, adding text overlays, annotations, transitions, and basic audio editing capabilities. These features allow you to refine your recordings and make them more engaging for your audience. However, you can use a third-party video editor or desktop app for major editing videos.
What is recording mode, and how does it affect my screen recording?
Recording mode refers to the method used to capture your screen, such as full-screen, selected window, or custom area recording. Each mode offers different flexibility and control over what you capture, allowing you to tailor your recordings to specific needs.
Conclusion
In conclusion, recording yourself and your screen is a powerful way to communicate and collaborate across various platforms and devices. Whether creators are Windows users, you're into Mac computers or are simply looking to share screens effectively; numerous options are available to suit your needs. From dedicated screen recording software like Aqua Demo to built-in features like QuickTime Player, the ability to record meetings, tutorials, and presentations has never been more accessible. By leveraging these tools, users can enhance communication, engage with their audience, and easily streamline their workflows.