
 In today's fast-paced world, sharing experiences and knowledge has become more accessible than ever. Whether you're a seasoned gamer, a budding content creator, or want to demonstrate a process on your computer, recording your screen can be a powerful tool. OBS (Open Broadcaster Software) stands out as a versatile solution among the plethora of screen recording software available online. It offers multiple features enabling individuals to capture their digital activities easily. Imagine being able to showcase your latest gaming achievements, create tutorials for your favorite software, or even share memorable moments from your online interactions with friends and family. With OBS, all of this becomes possible with just a few clicks. In this comprehensive guide, we will dig into the OBS screen recording, its functionalities, tips, and tricks to help you master the art of capturing your screen with finesse. So, grab your mouse, and let's dive into the exciting world of OBS for screen recording.
What is OBS?
OBS, short for Open Broadcaster Software, can screen record still images and videos from your screen, making it a versatile tool for various purposes. It is widely popular among content creators, gamers, educators, and professionals for its versatility, reliability, and extensive feature set. Its ability to record screen activity and system or external audio makes it a preferred choice for users looking to preserve webinars and online presentations for future reference. It offers customizable layouts and screen transitions, empowering creators to create professional-quality live streams and recordings efficiently. Additionally, OBS serves as a valuable resource for streamers on platforms like Twitch, allowing them to capture on-screen actions alongside webcam footage during live broadcasts seamlessly.
Obtain OBS Studio
To acquire the open-source software, you can see the instructions below:
- The initial process is to go to the OBS Studio website. Once you are on the website, navigate to the " Download" section. This screen-capturing software is available for various operating systems, including Windows, macOS, and Linux. Hit the appropriate download link for your operating system.
- After downloading, uncover the downloaded file on your computer and run the installer. Go through the on-screen instructions to install OBS Studio on your system.
- Once the installation is concluded, launch OBS Studio from your desktop or application menu. Before using this source screen-capturing software, you can configure some settings according to your preferences.

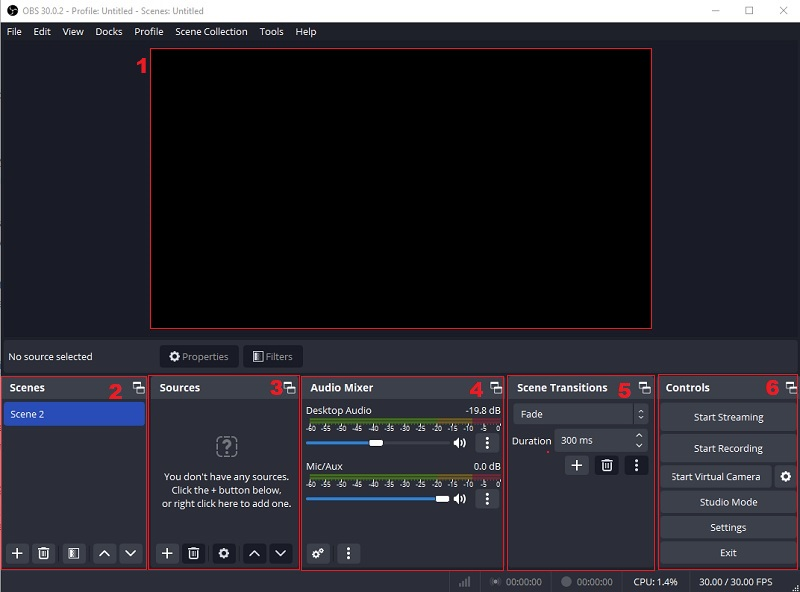
Sections of OBS
Navigating the OBS Screen Recorder interface can confuse beginners, especially if you must familiarize yourself with recording terminology. To simplify the learning process, let's break down the interface into six distinct sections:
- Preview Window: After recording, this section displays a preview of your recorded video. Use it to experiment with different settings and ensure optimal quality before broadcasting or saving your recording. You can also insert "display capture" to preview how your entire screen will appear in the recording, allowing for precise adjustments and enhancements before finalizing your content.
- Scenes Section: Scenes organize inputs from various sources, such as live streams, images, or other input sources. This feature allows you to switch between scenes during your recording or stream seamlessly.
- Audio and Video Sources: Audio and Video Sources: This section lists all audio and video devices used for capturing content. Here, you can easily monitor and manage devices like your microphone, webcam, and other input sources, including "audio input capture."
- Audio Mixer Box: Adjust audio settings for your recordings using the audio mixer. Fine-tune levels and settings to achieve the best audio quality for your content.
- Scene Transitions: Enhance your recordings with scene transitions, adding dynamic animations between scene changes. These transitions contribute to a polished and professional-looking recording or stream.
- Controls: You can access essential functions like starting or stopping recordings, selecting output modes, and adjusting recording settings. These controls streamline the recording process, providing easy access to key functionalities.
Setting Up The OBS
Once you have familiarized yourself with its interface, you can now modify the settings for OBS Studio. This process can be quite complicated, but we will guide you through this process so you can easily use this screen recorder.
1. Webcam
In OBS (Open Broadcaster Software), webcam settings refer to the configuration options available for adjusting the behavior and appearance of a connected webcam within the software. These settings typically include options to control aspects such as resolution, frame rate, exposure, brightness, contrast, white balance, and more. Suppose you're not utilizing a webcam or opting for multiple input sources beyond your selected video capture device. In that case, OBS Studio offers various alternative source types to enhance your recordings or streams:
- Game Capture: This source is tailored to capture specific games, which is ideal for streaming gaming content with precision.
- Browser: Opting for this source enables you to seamlessly stream or screen capture any content within your browser window using OBS Studio.
- Display Capture: This source lets you screen capture everything displayed on your monitor, offering versatility for various recording or streaming scenarios.
- Media: Utilize this source type to incorporate media files directly into your stream or recording. Supported file formats encompass MP3, WAV, MP4, MOV, AVI, GIF, and more, enabling diverse multimedia integration.
- Images: Enhance your video content by adding nearly any image format to your recording or stream using this input source, facilitating creative visual compositions.
Step 1: Access Video Capture Device
In the main OBS Studio window, locate the "Sources" panel at the bottom part of the screen. This panel lists all the sources you can add to your scene. In the "Sources" panel, click the "+" icon at the bottom left corner. This will open a menu with different types of sources you can add.
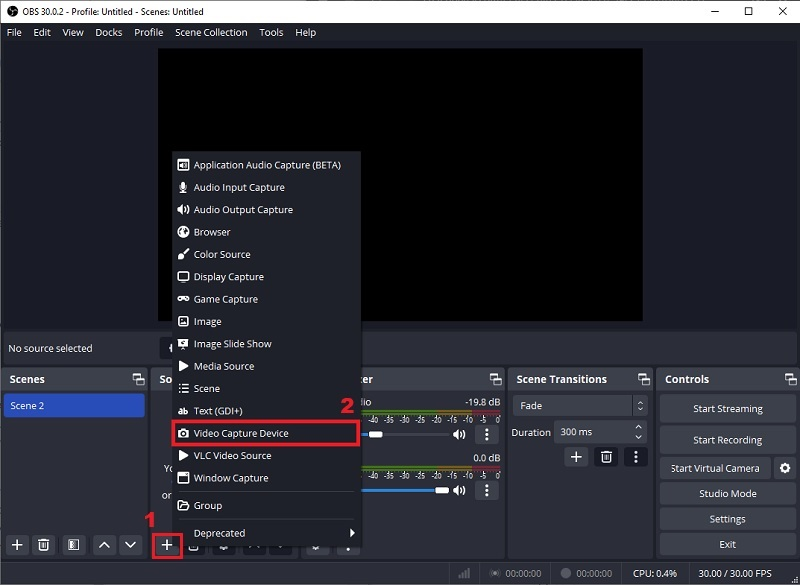
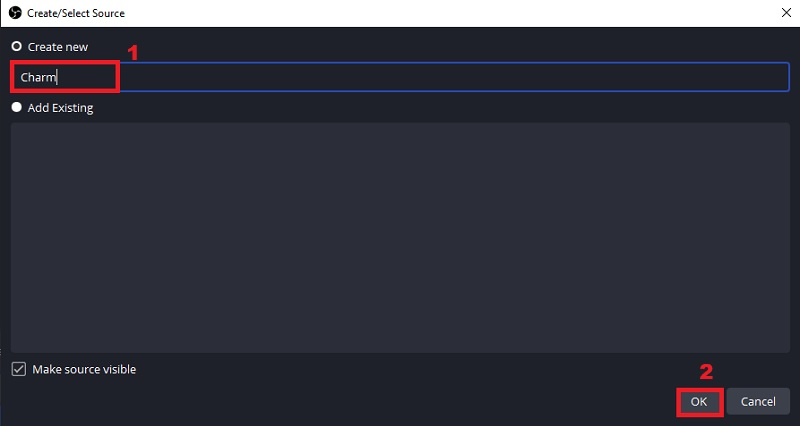
Step 2: Name Your Webcam
From the menu, select "Video Capture Device." This option allows you to add a webcam or other video capture devices to your scene. After selecting "Video Capture Device," a new window will appear. Here, you can name your webcam source. You can keep the default name or give it a descriptive name for easier identification. Click "OK" to proceed.
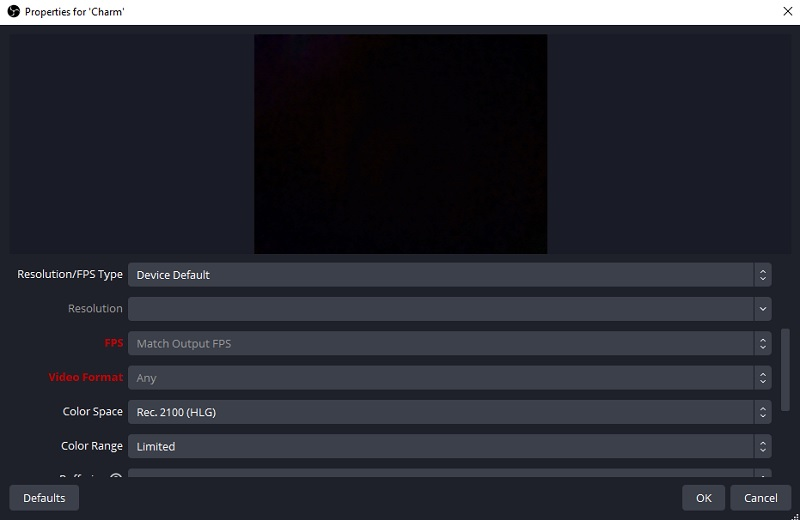
Step 3. Modify Webcam Settings
OBS Studio will then prompt you to configure your webcam settings. If multiple devices are connected, you can choose your webcam from the drop-down menu. You can modify the settings, such as resolution, frame rate, and video format.
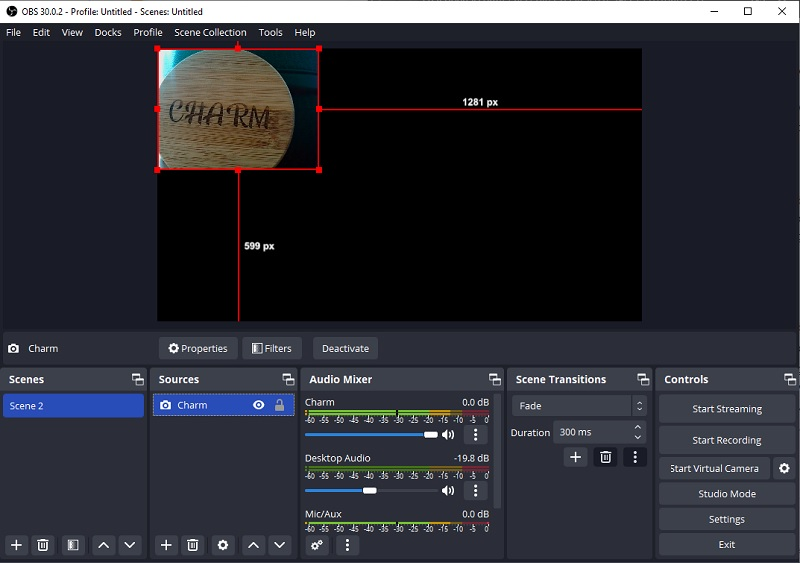
Step 4. Adjust the Camera Size
To see how your webcam looks within your scene, you can use the preview window in OBS Studio. Adjust the position and size of your webcam source until you're satisfied with the placement.
2. Audio Input Capture
Audio Input Capture in OBS (Open Broadcaster Software) is a source type that allows you to capture audio from an external input device/audio source, such as a microphone or line-in. This feature lets you include live audio recordings in your OBS streams or recordings. When you add this source to your OBS scene, you can select the specific audio input device you want to capture from. This could be your computer's built-in microphone, an external USB microphone, a headset microphone, or any other audio input device connected to your computer. To ensure proper recording audio in OBS Studio, selecting the appropriate audio inputs is crucial. Here's how:
- When configuring OBS Studio for audio recording, navigate to the "Sources" section and click the "+" icon to add a new source. From the list of available sources, select "Audio Input Capture" and click "OK" to proceed.
- Subsequently, a window will appear, prompting you to name your new audio input source. If desired, you can provide a descriptive name, then click "OK" to continue.
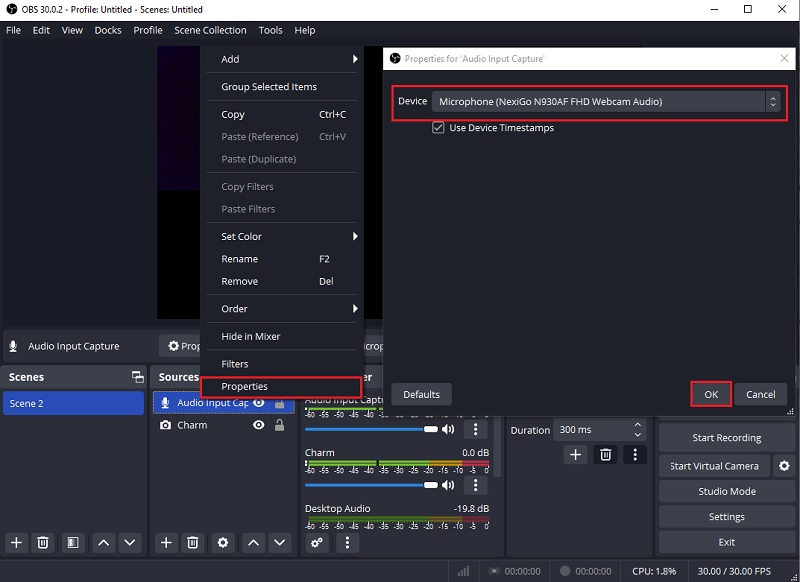
- Once the Audio Input Capture source is added to your scene, right-click it or click the gear icon and select "Properties." After that, you will see the "Device" option. Click on this menu to display a list of the audio input devices, then hit "OK" to confirm your settings and close the property window.
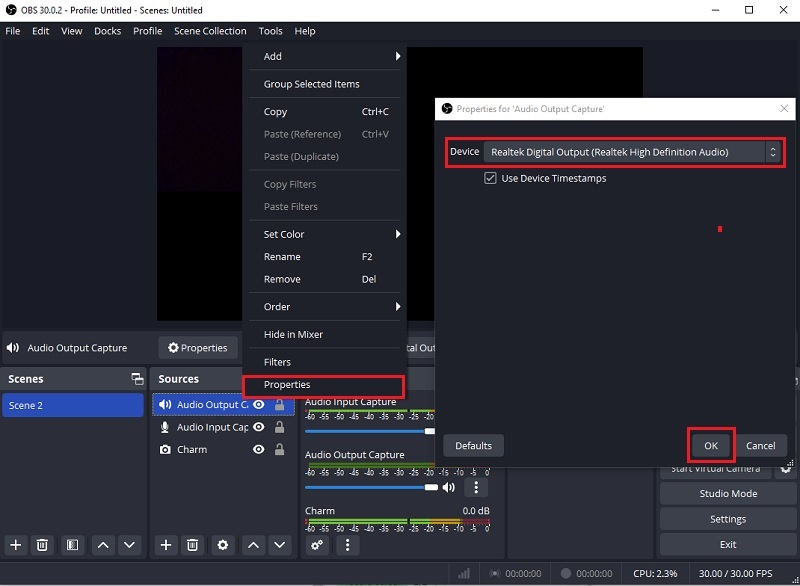
3. Audio Output Capture
Audio Output Capture in OBS is a source type that allows you to capture audio from your computer's audio output. Unlike Audio Input Capture, which captures audio devices from external input devices like microphones, this captures audio being played through your computer's speakers or headphones. This also includes desktop audio, specific applications, or video file. Here's a step-by-step guide to setting up this source in OBS Studio:
- Launch OBS Studio on your computer. Then, click the "+" symbol on the "Sources" section. Then, a menu will appear, select "Audio Output Capture" and click "OK."
- A new menu window will appear here. You can include a name for your Audio Output Capture device and hit "OK" to continue. This action will add your selection to the "Sources" section.
- Afterward, right-click on this source and select properties. Then, on the properties of this source, click the device you want to use and save the changes by clicking the "OK" button.
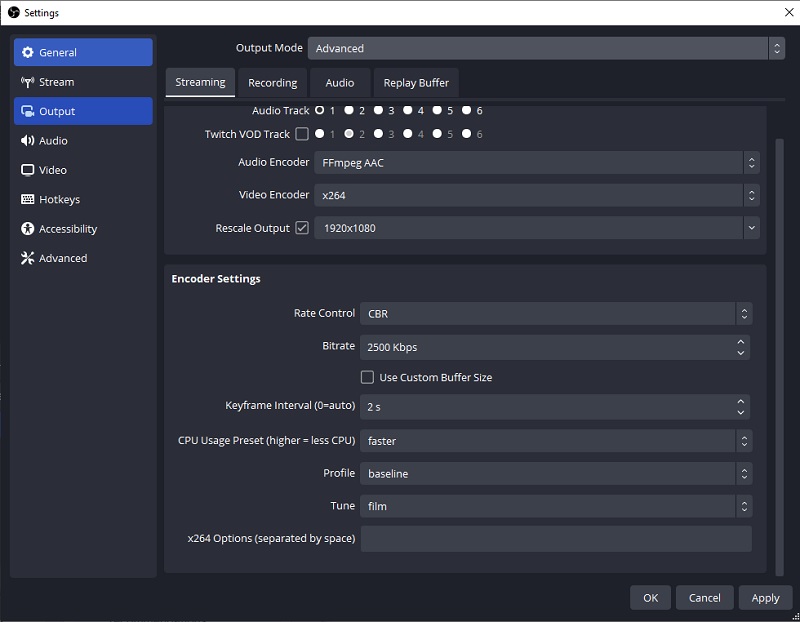
4. Output Settings
Once you've set up your hardware, it's important to tweak the output settings to ensure your recording or stream is of high quality. These settings include resolution, bitrate, and frame rate, which impact how your audience experiences your content. Opting for higher settings can improve quality but may lead to OBS lagging while recording for viewers with slower systems or internet connections. Therefore, it's essential to find a balance that delivers good quality without causing issues for your audience. Take the time to understand and select the appropriate frame rate and other settings for the best result. To strike a balance between high-quality streaming and accessibility, follow these steps to set the resolution, frame rate, and bitrate recording settings in OBS:
- Navigate to the settings window from the "Controls" section of the OBS recorder. Click the "Settings" and select the "Output" tab from the menu on the left side of the screen. Here, you can adjust settings such as the frame rate and both base and output resolutions to tailor the visual quality of your stream or recording.
- Click on the "Output" tab in the left menu. Adjust the video bitrate to your desired level. Depending on your hardware capabilities and preferences, you can also select the encoder between CPU and GPU by choosing one from the drop-down menu.
- You can also choose your "Recording Path" and select multiple audio tracks for OBS for screen recordings. When satisfied, you can save the changes by clicking the "OK" or "Apply" buttons.

How to Capture Screen with OBS
When you have set all the sources and your output settings, you start the OBS record desktop process. The process always begins by obtaining the OBS screen recording software; you can follow the instructions above. You can observe the steps below if you already have it on your computer.
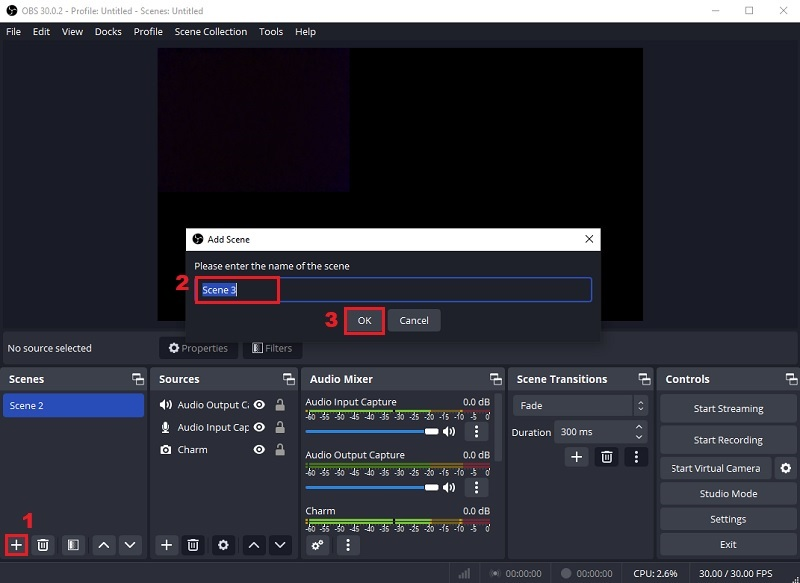
Step 1. Open the OBS Screen Recorder for PC
Open OBS Studio. Usually, upon opening the software, it will automatically create a Scene. If not, locate the "+" icon in the Scenes box at the bottom-left part of the screen, click on it to add a new Scene, and hit "OK."
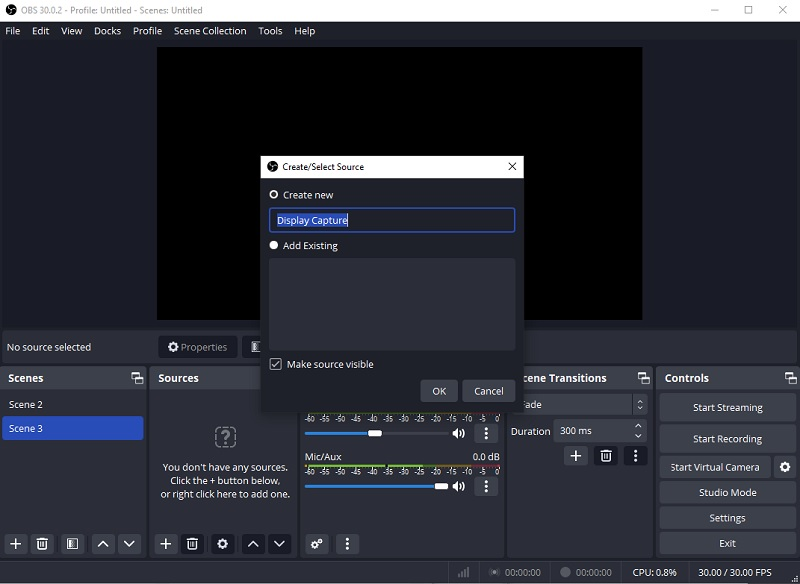
Step 2. Create New Title
Go to the Sources panel located adjacent to the Scenes panel and click on the "+" icon at the bottom of the panel. Then, select "Display Capture" from the options menu. A small pop-up window will emerge where you can add a title, then click "OK" to confirm your selection.
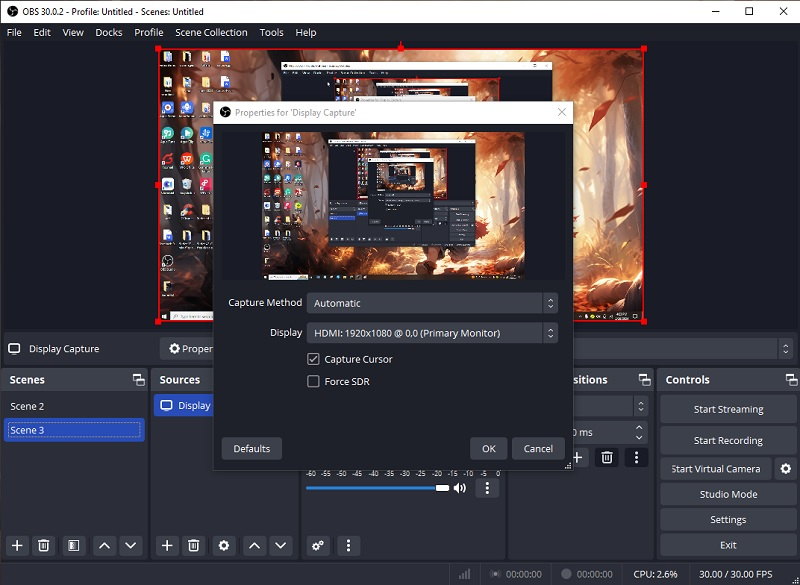
Step 3. Choose Video Capture Device
In the following pop-up window, you'll find options to choose your display and capture methods and a checkbox to decide whether you want to include your cursor in the recording. If you have multiple monitors, click the down arrow and select the correct display from the dropdown menu. Once you've made your selections, click "OK" to confirm.
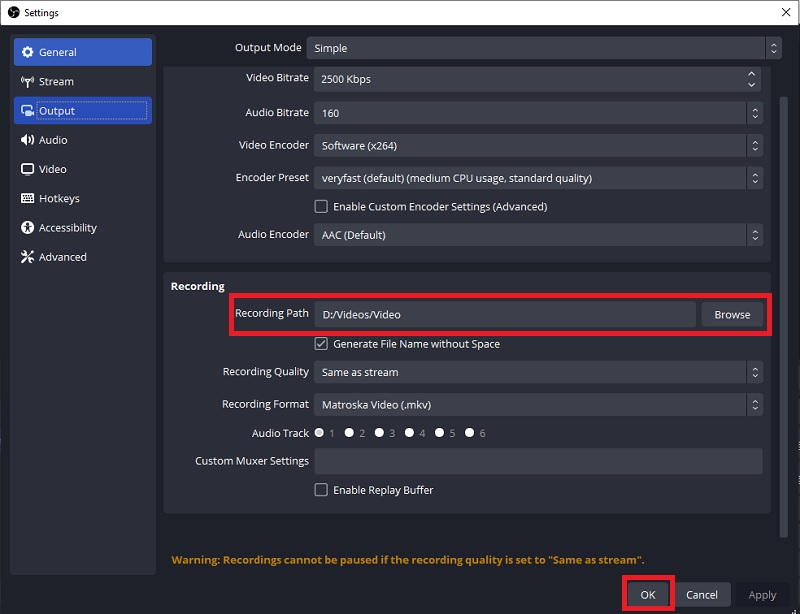
Step 4. Choose the Output Folder
Hit on "Settings," located at the bottom right part of your screen. Within the new window, navigate to the "Output" icon in the menu on the left-hand side. In the "Recording" section, set your destination file by selecting a location under "Recording Path." Click "Browse" to choose and confirm your desired destination.
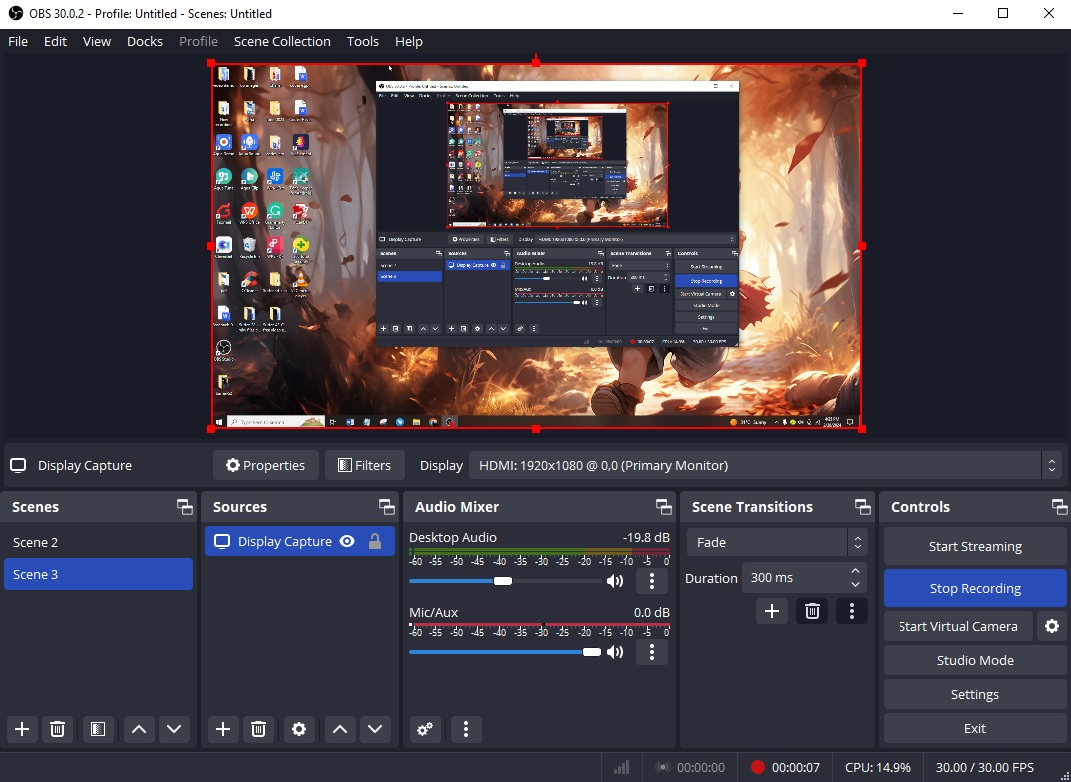
Step 5. Start Recording
After finalizing your settings, click the "Start Recording" button located on the OBS Studio recording screen. This button can be found at the lower right corner of your screen, positioned below the "Start Streaming" option. This action will start to record audio and your computer screen.
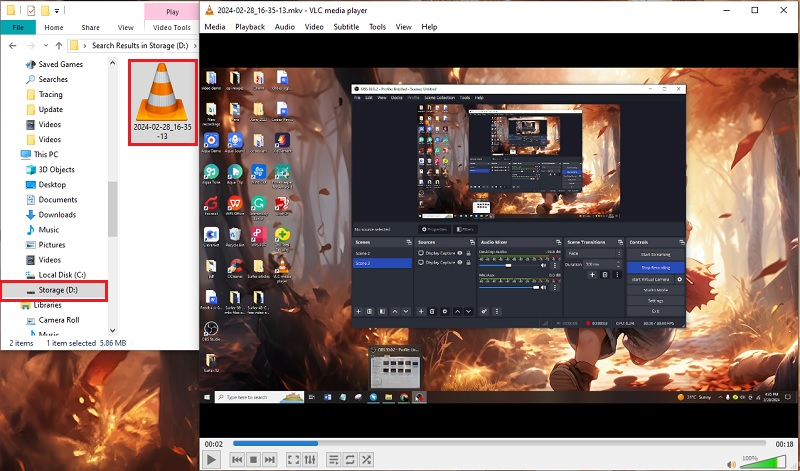
Step 6. Check the Video Recording Playback
When you are pleased with the recording, hit the "Stop Recording" button to keep the file on your computer. Then, you can locate the output folder, and double-clicking the video file will play it on your default media player.
Tips: Best OBS Settings
Determining the "best" OBS settings depends on several factors, including your computer's hardware specifications, the content you're streaming or recording, and your internet connection speed. However, here are some general guidelines to help you optimize your OBS recording settings for a balance of performance and quality:
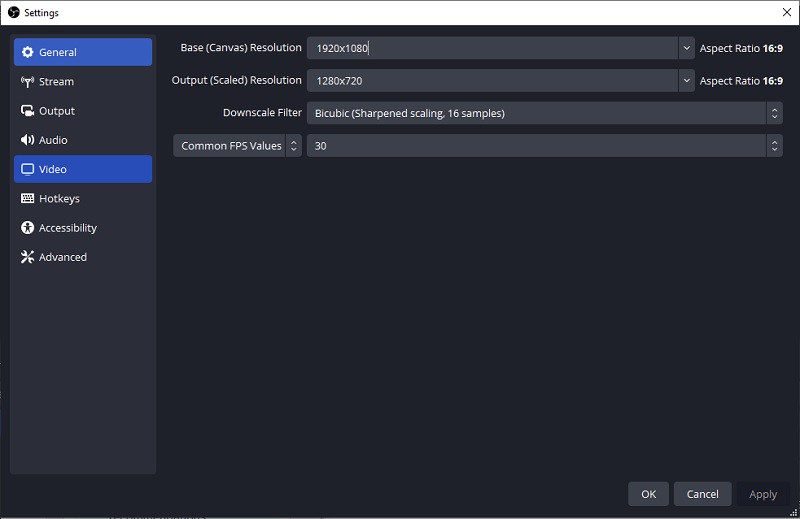
1. Video Settings Menu
- Base (Canvas) Resolution: Set this to your monitor's native resolution (1920x1080).
- Output (Scaled) Resolution: Choose a resolution appropriate for your streaming platform and audience. Common options include 1280x720 (720p) or 1920x1080 (1080p).
- Downscale Filter: Use the Lanczos or Bicubic filter for better image quality.
- FPS (Frames Per Second): 30fps is suitable for most streams, while 60fps provides smoother motion but requires more bandwidth.
2. Output Settings
- Encoder: Select "x264" if your CPU is powerful; otherwise, use hardware encoders like NVENC (NVIDIA GPUs) or AMD VCE (AMD GPUs).
- Bitrate: Set this according to your internet upload speed and streaming platform's recommendations. For example, 3000-6000 kbps for 720p at 30fps, or 4500-8000 kbps for 1080p at 60fps.
- Keyframe Interval: Use the default value of 2 seconds.
- CPU Usage Preset: Choose a preset that matches your CPU's capabilities. "Faster" offers better performance but lower quality, while "Slower" delivers higher quality but requires more CPU resources.
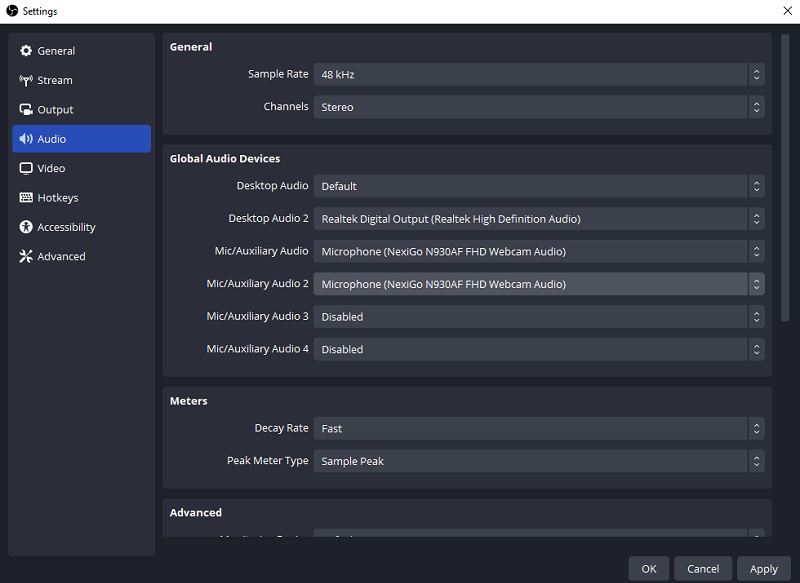
3. Audio Settings
- Sample Rate: Use 44.1kHz or 48kHz for standard audio quality.
- Channels: Set this to Stereo (2 channels) for most scenarios.
- Devices: Configure your microphone and audio source devices as needed.
Frequently Asked Questions
What are FFmpeg video filters, and how can I use them in OBS?
FFmpeg video filters are powerful tools that allow you to apply various effects and modifications to your video streams or recordings in OBS Studio. These filters can be used to adjust colors, add overlays, resize or crop video, etc. To use FFmpeg video filters in OBS, you can add them as part of your scene setup by clicking on the "+" icon in the Sources panel, selecting "Filter," and then choosing "FFmpeg video filter" from the dropdown menu.
Where can I find an OBS Studio Tutorial?
You can find tutorials for OBS Studio on various online platforms, including YouTube, forums, and OBS's official website. These tutorials cover multiple topics, from basic setup and configuration to advanced features and techniques. Additionally, OBS Studio itself includes built-in help documentation and tooltips to help users learn how to use the software effectively.
Conclusion
In conclusion, OBS Studio stands as a dynamic solution for screen recording needs, offering a plethora of features to cater to diverse user requirements. With its intuitive interface and customizable settings, users can seamlessly capture and share their digital experiences with precision and finesse. Whether you're a content creator, educator, or gamer, OBS Studio empowers you to produce professional-quality recordings with ease. By leveraging features like FFmpeg video filters, selecting various output modes, and incorporating multiple sources, OBS Studio provides a comprehensive solution for all your screen recording endeavors.