
- Obtain the YouTube audio recorder.
- Select the YouTube video with the audio you want to record and hit "Rec."
- Then, stop the recording and check the audio playback.

In the vast world of online content, YouTube has emerged as a powerhouse platform for creators to share their video content with a global audience. While visually captivating videos are important, audio quality plays an essential part in enhancing the overall viewer experience. High-quality audio can help engage viewers and ensure the video's message is effectively conveyed. This makes it necessary for creators to pay attention to effective audio recording techniques and tools. Luckily, tools like Audacity can help you achieve professional audio quality. It is a free, open-source audio editing tool renowned for its versatility and user-friendly interface. In this guide, we will delve how to effectively record YouTube with Audacity.
Overview of Audacity
Audacity is a free, adaptable audio recording and editing software that works on different operating systems. Its popularity spans across content creators, musicians, podcasters, and audio enthusiasts, thanks to its easy-to-use design and robust capabilities. With support for multiple audio formats, Audacity provides a toolkit for recording, editing, and improving audio content. Some of the essential features and tools of Audacity include:
- Audio Recording:It lets you record YouTube audio Audacity or capture audio from a microphone, line-in, or other input sources.
- Editing Tools:Cut, copy, paste, and delete audio segments. You can also use the envelope tool to adjust volume and add various effects.
- Effects:Audacity provides numerous built-in effects, such as equalization, noise reduction, amplification, and reverb.
- Multi-Track Editing:You can work with multiple audio tracks simultaneously, making it suitable for complex audio projects.
- Audio Analysis:Audacity includes tools like spectrogram views, beat finder, and silence finder to analyze your audio.
- Plug-in Support:You can extend Audacity's capabilities through third-party plug-ins.
- Export and Import:Save your audio projects in various audio format, including MP3, WAV, AIFF, and more. It also supports importing and exporting MIDI files.

How to Record Audio From YouTube with Audacity
Recording audio from YouTube with Audacity can become straightforward once you're familiar with the process. To record audio from YouTube using Audacity, you can utilize a "Stereo Mix" feature on your computer. This allows Audacity to capture the sound being played through your speakers. Make sure to enable Stereo Mix in your sound settings and choose it as the recording device in Audacity before starting the recording process. Here are the steps to guide you through recording YouTube audio using Audacity.
Step 1: Download and Install Audacity
If you don't already have the recording software installed on your computer, you must obtain and install it first. You can download Audacity for free from the official website. Then, follow the instructions provided to install Audacity on your computer. Once it is successfully installed, you can proceed to the next step.

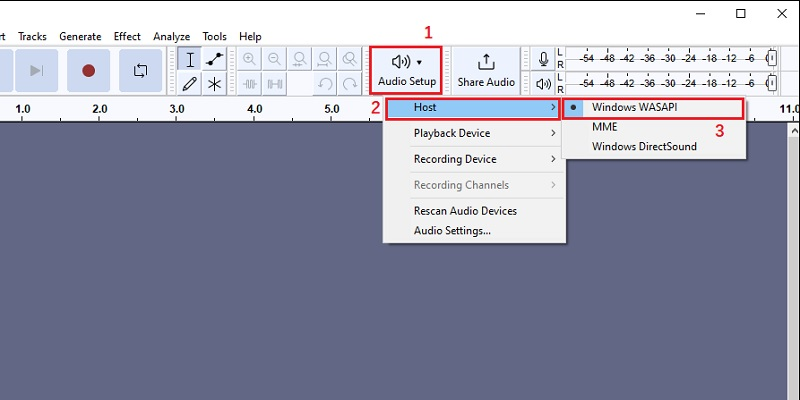
Step 2. Modify your Host
On Audacity's interface, locate the "Audio Steup" and click it. This will open the audio preferences menu, where you can change your host settings. Select "Windows WASAPI" as your host to enable recording computer audio, including the audio track from a YouTube video.
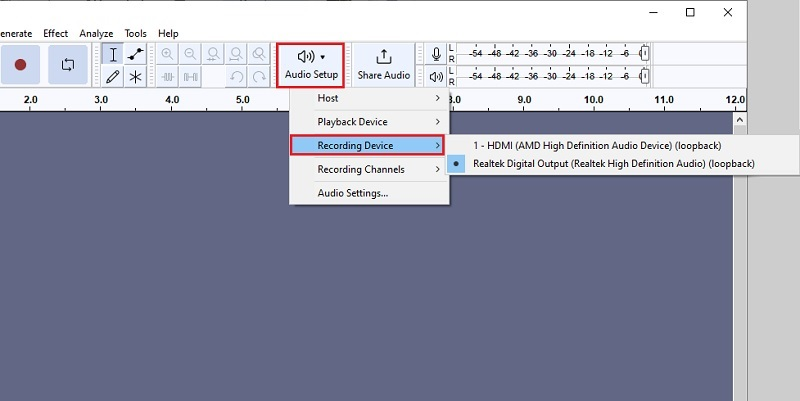
Step 3. Change Recording Device
Once you have changed the "Host," you must change the recording device to your primary output device. To do this, you have to go back to the "Audio Setup" and then select your computer's primary output device from the "Recording Device" dropdown menu.
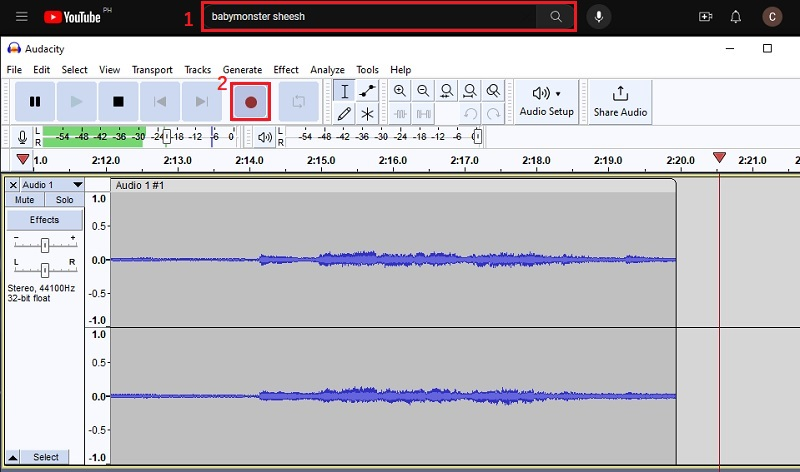
Step 4. Record YouTube Audio with Audacity
Next, on your web browser, open YouTube and search for the video or audio track you wish to record. Once you have found the desired video or audio track, click on it to start playing. Then, go back to the tool and hit the small red "Record" button to start recording from YouTube with Audacity.
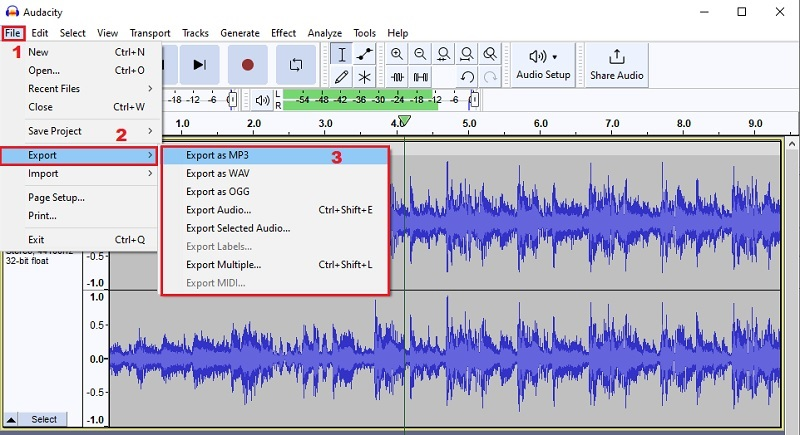
Step 5. Finish Recording YouTube Audio
When the YouTube streaming audio is done, hit the "Stop" button. Before you save the audio file, you can listen to it by hitting the "Play" button. This process will also help you to make sure that the YouTube audio file is recorded. To export/save the audio file, click "File" and hover over "Export," then you convert YouTube to MP3 Audacity or any other format.
Best Audacity Alternative to Record YouTube Audio and Videos
Recording audio from YouTube with Audacity is a convenient and effective method. Still, if you're looking for an alternative, the Aqua Demo software is one of the best options. This recording software can easily capture the audio coming from your computer. Besides, it can also capture the sound of your microphone, making it a flexible tool for recording audio from various sources. Besides, you can export or save the audio files in numerous formats, including MP3, WAV, FLAC, and others. It also offers various customization options, such as the audio bitrate and adjusting the volume level of the recorded audio. On top of that, you can also record live YouTube streams or videos with Aqua Demo, which allows you to record your favorite music videos for offline playback. Below are the steps to record YouTube audio.
Try it for Free
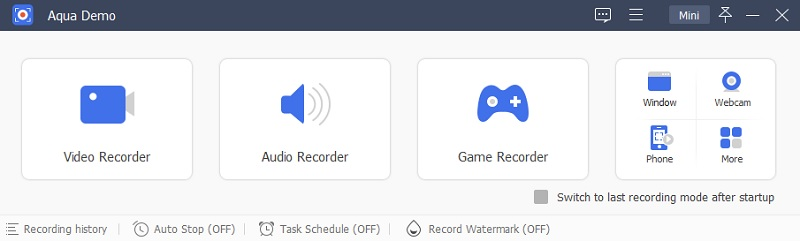
Step 1. Obtain and Install the YouTube Audio Recorder
The first step is to save and install the Aqua Demo software on your computer. You can hit the download button provided above this guide and follow the prompts to install the software. After that, you will see the YouTube audio recorder's interface.
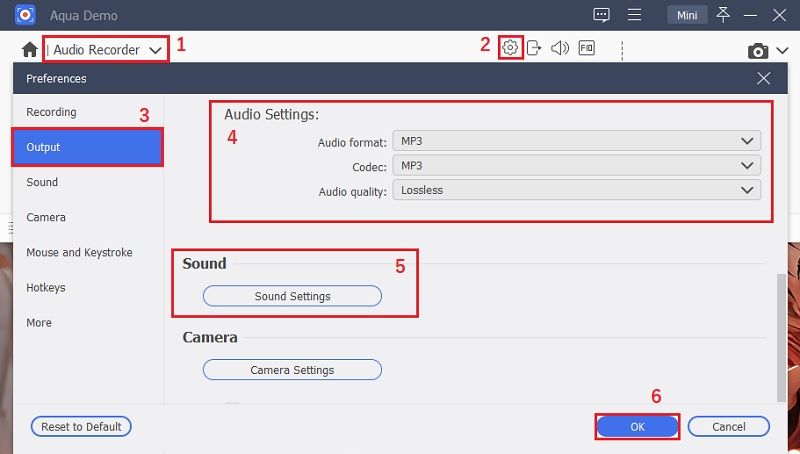
Step 2. Customize Your Audio Recordings
On the software's interface, click on the "Audio Recorder." Here, click the "Gear" option to access the "Preferences" or "Settings." Then, select the "Output" option. Under the "Audio Settings," choose the output format and quality. Afterward, scroll down to see the "Sound Settings." Then, you can adjust the audio volume of your YouTube audio recordings. Save the modifications by hitting the blue "OK" button.
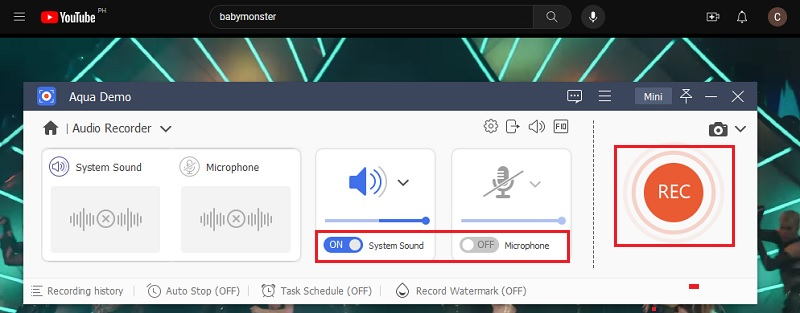
Step 3. Commence the Audio Recording Process
Select the YouTube video you wish to record audio from. This will require you to launch your browser and search for the desired video. When you have selected the video, return to the Aqua Demo and hit the "Record" button after you toggle the "System Sound." You can also toggle the button underneath the "Microphone" if you need to record the audio from your microphone.
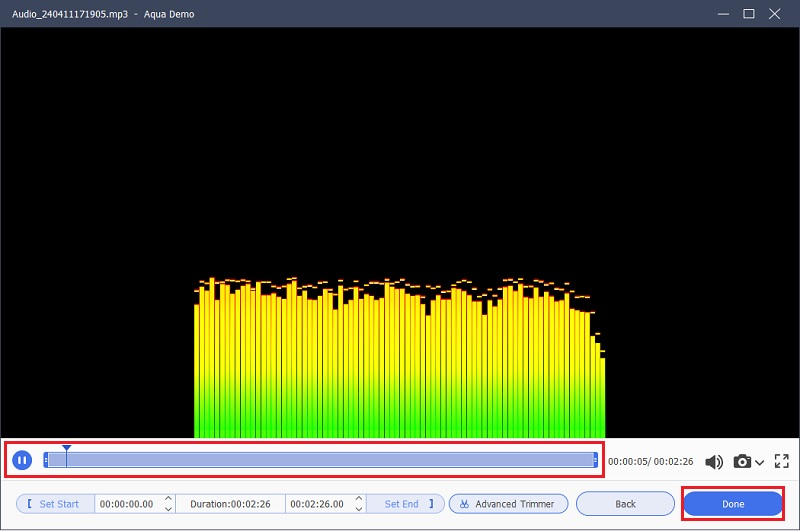
Step 4. Save the YouTube Audio File
After the YouTube video is done, click the "Stop" button to end the recording process. Subsequently, you will be moved into a preview window, where you can check and trim audio if necessary. Then, hit the "Done" button to store the YouTube audio file on your computer.
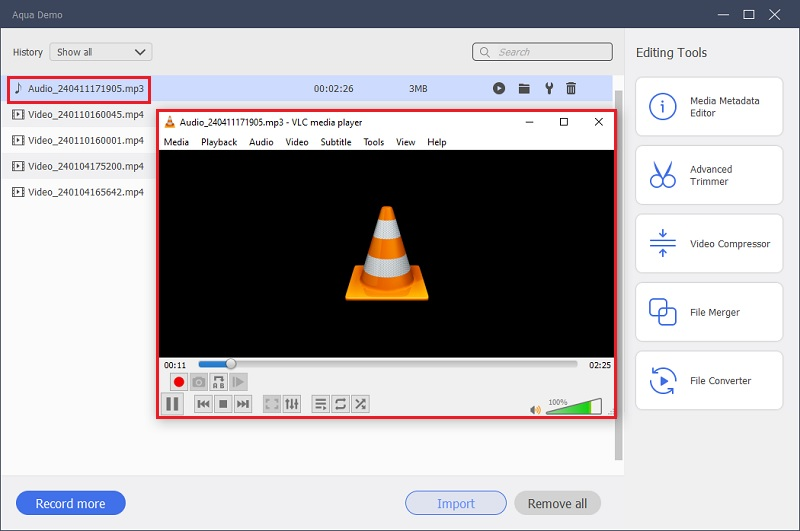
Step 5. Check the Audio Playback
Once you have saved the YouTube audio file, it is important to check the playback to ensure the recorded audio is clear and high-quality. The tool's "Recording History" tab shows the recorded audio and video files. Double-click on the recently recorded file to listen to the YouTube audio.
Tips: How to Edit Recorded YouTube Audio on Audacity
Once you use Audacity to record YouTube audio, you can further enhance and edit the recorded audio. It has a simple editing system that allows you to trim, adjust volume levels, and merge multiple MP3 audios. Here are the quick techniques you can follow to enhance your recorded YouTube audio using Audacity:
Trim Audio:
- Open Audacity and import the recorded YouTube audio file by clicking on "File" and then "Import." On the "Import" tab select audio to access the audio file you want to trim and click "Open."
- On Audacity's interface, locate the waveform of the recorded YouTube audio file. Then, using your mouse cursor, highlight the portion of the audio you want to trim. After selecting your desired portion, press the "Delete" key on your keyboard.
- You can repeat this process on any other parts of the clip that you need to trim. Then, play the audio file to confirm that the trimmed sections have been successfully removed. Lastly, export the trimmed audio.

Adjust Audio Volume:
- On the Audacity toolbar, locate the "File" icon in the upper left corner and click on it. From the dropdown menu, choose "Import" and access the audio files you want to adjust the volume.
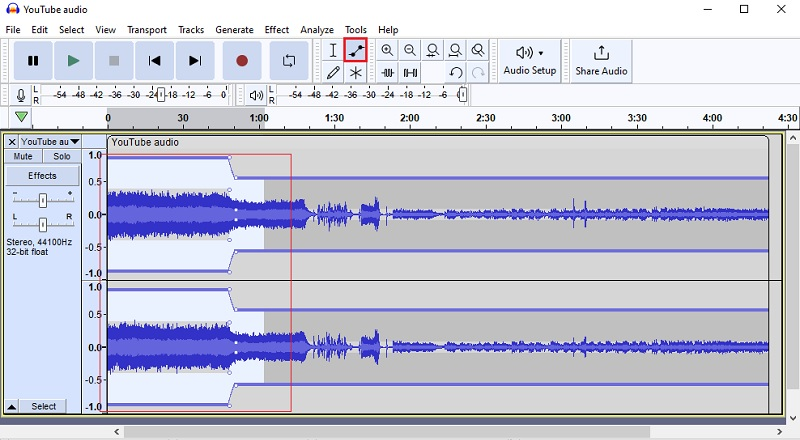
- Once the audio file from YouTube videos is imported, click the "Envelope Tool" from the toolbar. Now, you can adjust the volume by clicking and dragging the waveform up or down.
- Another handy feature is the ability to apply a fade effect swiftly using the envelope tool. Drag the tool left or right on the audio track to achieve the desired effect. Then, listen to the edited audio and export it once you're satisfied.
Merge Multiple Audio Track:
- Select the audio files you need to merge by clicking on each file while pressing the "Ctrl" key on your keyboard. Then, import them on the Audacity. Once imported, you can see multiple audio tracks on the interface.
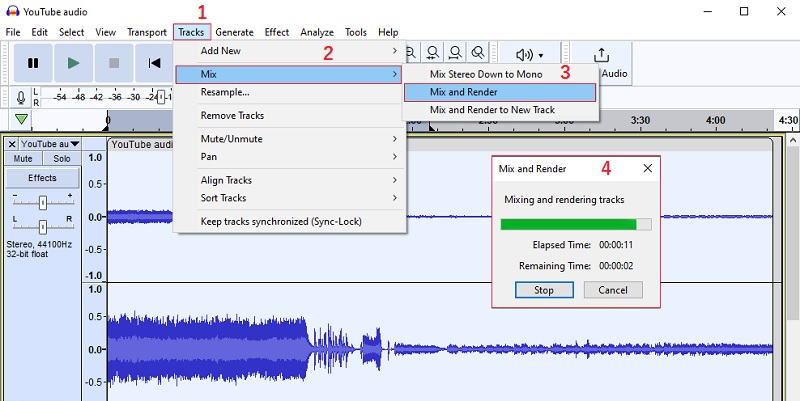
- Afterward, select each track, navigate to the software's toolbar, and click "Tracks." On this drop-down menu, select "Align Tracks" and "Align End to End." This action will align all your uploaded tracks in the mixer.
- By doing this, you can ensure that they play seamlessly, one after another. Click "Tracks" again, and this time choose "Mix" before hitting the "Mix and Render" button. This will combine all the selected audio tracks into a single track.
Frequently Asked Questions
How do I enable Stereo Mix on my computer?
Enabling Stereo Mix varies depending on your operating system. Generally, you can access it through your PC's sound settings. In your computer's taskbar, right-click on the "Speaker" icon, select "Recording devices," then right-click in the window and make sure "Show Disabled Devices" and "Show Disconnected Devices" are checked. If Stereo Mix appears, right-click on it and select "Enable."

Can Audacity record audio directly from YouTube without a Stereo Mix?
Audacity typically relies on the Stereo Mix feature to record audio playing on your computer, including YouTube videos. However, suppose Stereo Mix is not available or doesn't work on your system. In that case, you can look for an alternative methods, such as using a virtual audio cable or downloading the audio separately and importing it into Audacity.
Why can't I find the recording tab or Stereo Mix in my sound settings?
If you cannot find the recording tab or Stereo Mix in your sound settings, it may be because they are hidden or disabled. Right-click in the sound settings window and check "Show Disabled Devices" and "Show Disconnected Devices" to reveal hidden options such as Stereo Mix.
Conclusion
In conclusion, learning how Audacity record YouTube audio opens doors to enhancing your content's quality. Audacity's simple interface and powerful features make it a go-to tool for creators. By following the steps outlined in this guide, you can effortlessly record audio from YouTube Audacity. From adjusting volume levels to merging tracks, Audacity offers ample tools for customization. So, dive into this Audacity tutorial, and start elevating your YouTube recordings with professional-grade audio quality today.