
- Get Aqua Demo's file installer and go through the instructions to install it on your computer.
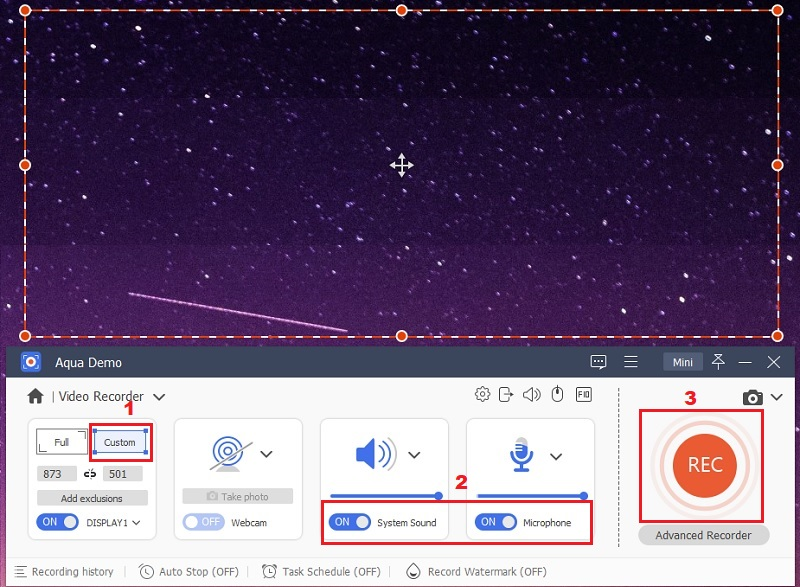
- Enable the system sound and hit the Start button.
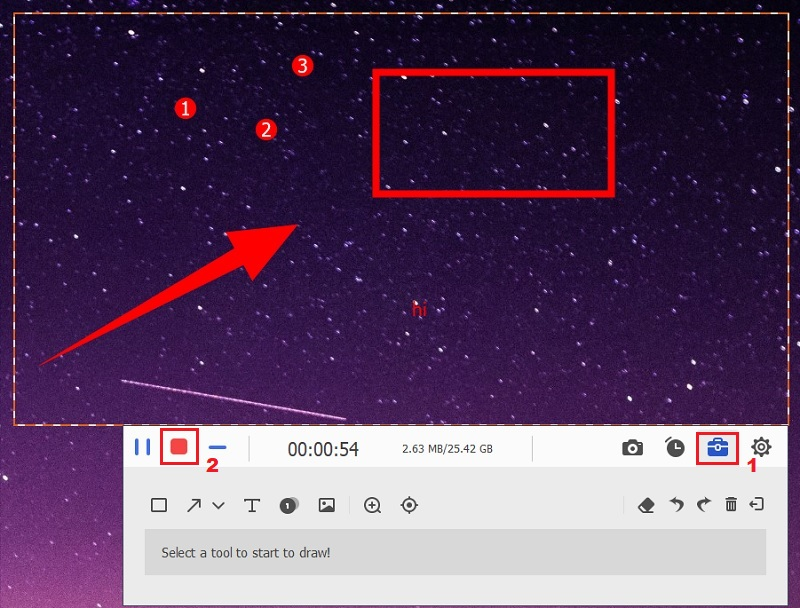
- Stop the recording and save the video.
VLC is an adaptable media player software that many users may not realize can also record screen activity. With this media player, you can effortlessly capture what's happening on your computer screen. Whether you want to make tutorials, demonstrate software functionalities, or capture videos, it offers a simple solution. By leveraging its screen recording feature, you can easily save videos of your screen activities in your desired format. This capability makes VLC not just a playback tool but also a handy utility for content creators and educators. VLC's intuitive interface and straightforward settings make it accessible to users of all levels, even those without extensive technical knowledge. So, if you're looking for a hassle-free way to record your screen, this is a reliable option. In this article, we'll explore how you can effectively record screen using VLC, opening up a world of possibilities for sharing and preserving your digital experiences.
What is VLC?
VLC, short for VideoLAN Client, is a popular software that lets you play videos and music on your computer. It's like a versatile media player that supports many different types of files, from movies to music tracks. VLC is known for being easy to use and for playing almost any kind of media file you throw. It's free to download and has no annoying ads or pop-ups. Plus, VLC is available for various operating systems like Windows, Mac, and Linux so that you can use it on any computer. Additionally, it has a screen recording function, which means users can use VLC to capture what is happening on their screen.

How To Access VLC Record Button
VLC Media Player is an across-the-board multimedia player that can do more than play media files. Many users are unaware that VLC offers a screen recording feature, as it's not prominently advertised, and the record button is often hidden within the user interface. However, you can easily enable this element/feature to screen capture video by following the steps below:
Step 1: Install VLC Media Player
Suppose you don't already have the VideoLAN Client installed on your desktop. In that case, you can download this multimedia player for free from the VLC website. Once you have downloaded it, follow the installation prompts to install it on your computer system. Then, the VLC media player will automatically save on your computer with the latest version.
Step 2: Enable Record Button
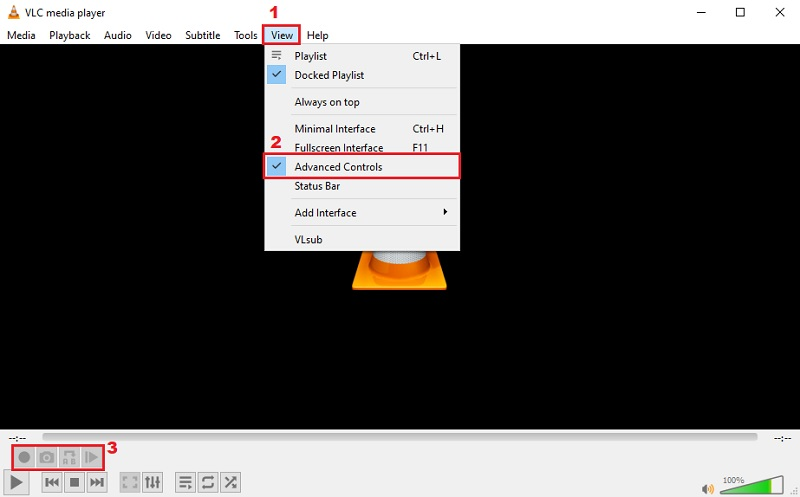
The record button is not visible by default in the VLC media player interface. To access it, you need to enable the advanced controls. Click on the "View" menu at the top of the VLC window. Find and click on the "Advanced Controls" options in the drop-down menu. This action will enable additional controls, including the record or capture button.
How to Screen Capture Video With VLC
The VLC media player screen recording process is straightforward, provided you adjust the settings accurately. This multimedia player presents numerous useful features for video recording. For instance, you have the flexibility to customize the frame rate of your VLC screen recording. Opting for a frame rate between 10 to 15 per second (fps) is advisable, especially if you're not capturing fast-moving objects on your screen. Moreover, VLC Player offers the convenience of selecting suitable video and audio formats before recording. This eliminates the need to convert the recordings afterward, saving you valuable time and effort in post-production tasks. These capabilities allow you to record video, music, or desktop activities with a VLC media player. Here are the steps to record a desktop using a VLC media player.
Step 1. Access Media Menu
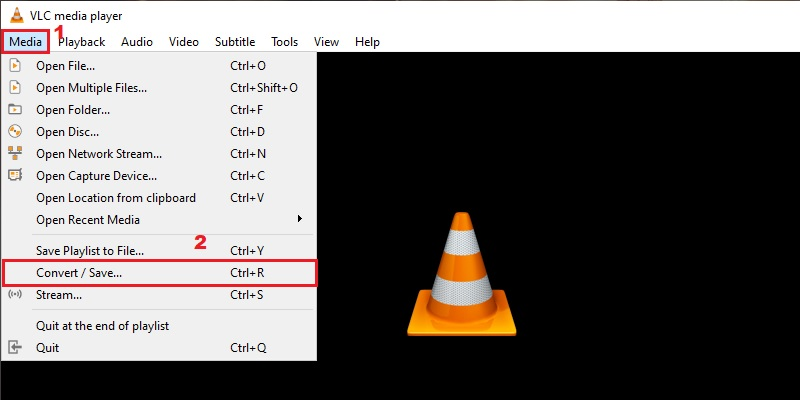
To begin, open the VLC Media Player application. From the top toolbar, you'll find several options. Click "Media" and choose "Convert/Save..." from the menu. You can also choose "Open Capture Device" to open this option.
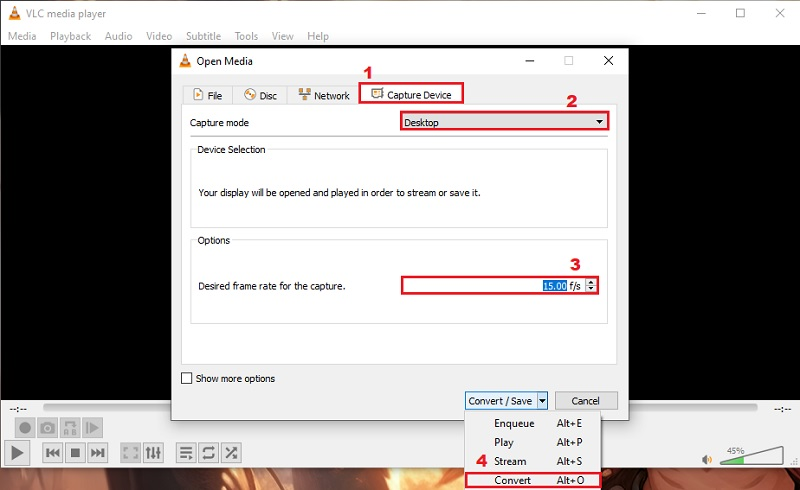
Step 2. Open Capture Device
A new menu option will appear on your screen once you click the "Convert/Save..." option. From here, open the "Capture Device" tab. Then, under the "Capture mode" dropdown menu, choose "Desktop." This action will allow you to record the desktop using VLC. You can also adjust the frame rate for your VLC screen capture. After that, select "Convert/Save" followed by "Convert" to proceed to a new window.
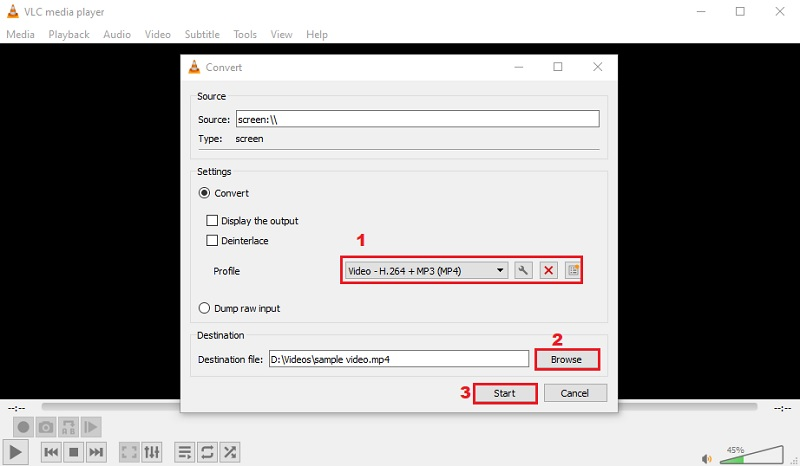
Step 3. Start Recording Screen
Before you start the VLC Player screen recording, you must continue to complete the settings for the VLC screen recorder. Proceed by selecting the output video format within the "Profile" section. From the menu, opt for MP4. Afterward, click the "Browse" button adjacent to the "Destination file" to designate the save path. Finally, initiate the recording process by clicking the "Start" button within the VLC Player.
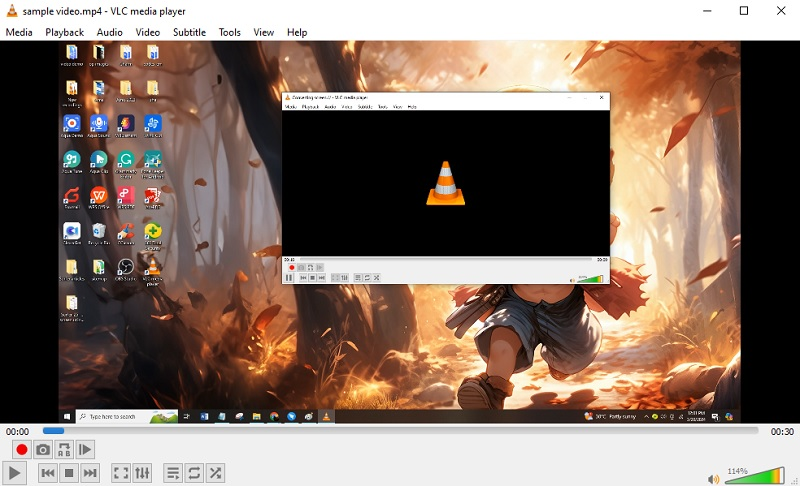
Step 4. Preview the Video Playback
Once satisfied with your screen recording, you can hit the "Stop" button, represented by a square icon, to finish the recording. Then, to check the video file, you can browse to your target folder and double-click it to open the file on your VLC media player.
How to Capture Streaming Video Using VLC
Capturing streaming video using VLC Media Player is a useful feature that allows you to keep online videos for offline streaming or archiving purposes. You can also use this feature to record the screen with a VLC media player if you are a streamer. With this, you can review your live stream to make improvements or share highlights with your audience. Additionally, the VLC record screen capabilities lets you capture video in its original quality, providing a great recording experience. Here are the quick tips you can follow to record a stream with VLC media player:
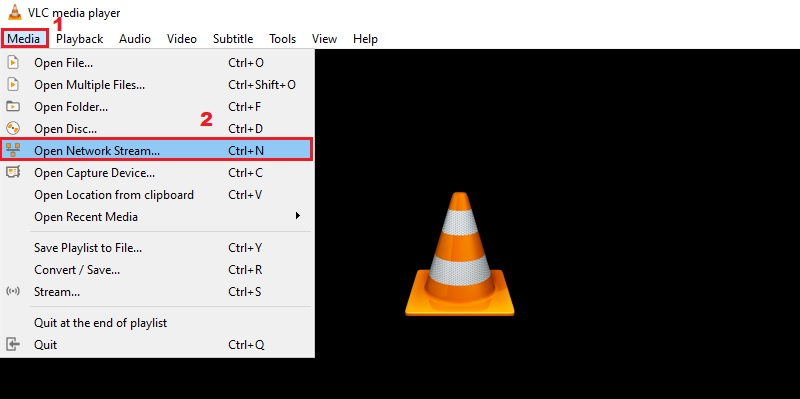
Step 1. Open Network Stream
On your VLC media player interface, navigate to the "Media" menu. Then, scroll down and choose "Open Network Stream" from the options provided. A new window menu will appear after that.
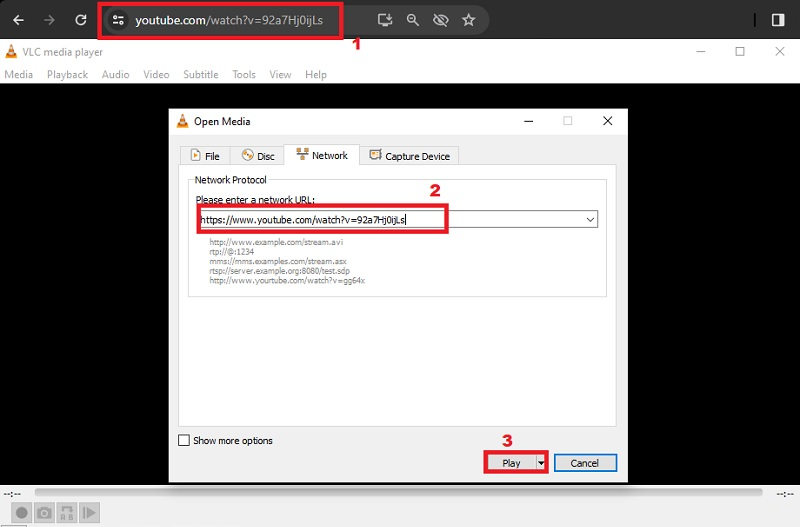
Step 2. Copy the Stream URL
Launch your preferred browser and locate the streaming video you wish to capture. Copy the URL of the stream. Afterward, return to VLC Media Player and paste the copied stream URL into the "Please Enter a Network URL" box. Once the stream URL is entered, click the "Play" button within the menu to play the stream on the vlc player.
Step 3. Initiate the Recording
To record the stream with VLC click the "Record" icon. Then, to conclude the recording, click the "Record" icon again, which is presented with a small gray square. VLC will automatically save the recorded streaming video on your designated video file folder.

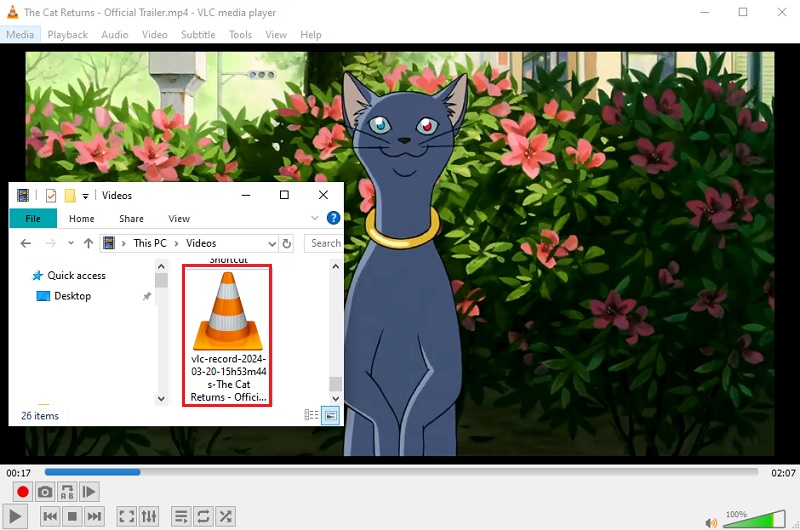
Step 4. Locate Your Recording
Navigate to VLC's default destination folder to find your recorded videos. Alternatively, you can specify a custom save location within VLC's settings. After that, right-click on the video clip and hit the play button to view the video playback.
VLC Screen Recorder Limitations
Although VLC Media Player offers a straightforward method for screen recording, users can encounter several limitations and challenges with this feature. These include:
- Absence of Audio Capture: VLC can not capture audio while recording the screen, making it challenging to create comprehensive video recordings. Users may need to explore alternative screen recording software options, such as those that offer VLC record screen with audio functionality.
- Lack of Support for Partial Screen Recording: VLC does not support recording specific screen regions, limiting users who require selective recording capabilities. It only supports capturing the entire screen.
- Lack of Editing Tools: VLC lacks essential video editing features such as trimming, cutting, and basic editing functionalities, hindering users' ability to refine their recorded content.
- No Webcam Integration: Users cannot record the screen simultaneously with webcam footage using VLC, limiting the versatility of screen recording applications.

Best Alternative Screen Recorder for VLC
Suppose you are trying to record a video with a VLC media player. However, you still need to capture the audio from your screen recording. In that line, you need versatile screen recorders that can simultaneously record audio and video. AceThinker Aqua Demo is one of the most reliable screen recorders you can utilize. It enables users to record both the system sound and microphone, making it ideal for creating tutorials or presentations. This no lag screen recorder lets users select their preferred capture window or full screen mode. Furthermore, this screen recorder offers different video formats and quality options, ensuring you can customize your recordings. You can also include the mouse pointer or screen mouse image in your video recordings. Another noteworthy feature of this tool is that you can highlight the important details in your video by using its annotation tools. These annotation tools allow you to draw, add text, and highlight areas on the screen while recording. Below are the detailed instructions on screen recording using Aqua Demo.
Try it for Free
Step 1: Download the Screen Recorder
Access your web browser on your computer and go to AceThinker Aqua Demo's main page. Alternatively, you can use the download button above. Then, go through the on-screen instructions prompted for the installation. The screen recorder will launch after that.
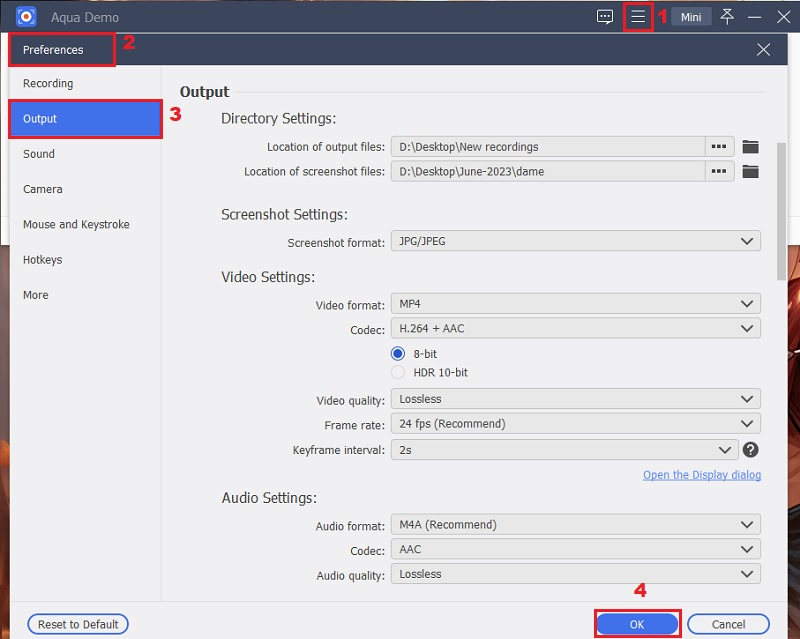
Step 2. Modify the Tool's Settings
On the screen recorder's interface, click the "Three Horizontal" icon and hit "Preferences" from the options to access the recording settings. Afterward, navigate to the "Output" tab. Here, you can select your desired frame rate, video format, quality, and more. When you are all set, hit "OK" to keep the modifications you made.
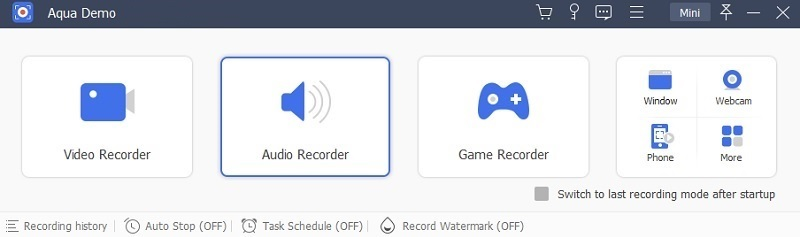
Step 3. Commence the Recording
Before you proceed with capturing video, ensure you have connected your audio input or source so you can record video clips with the sound. Then, on the tool's interface, hit the "Video Recorder" and select your preferred capture window. Subsequently, enable the system audio or sound and microphone sound, then hit the "Rec" icon to record the screen.
Step 4. Stop Recording and Save the Video Capture
While recording screens, you can use the annotation tools to add text, arrows, and shapes. This will give details to your recorded video. When you finish the screen recording, hit the "Stop" icon. This action will let the tool open a new window where you can review your captured videos. To keep the video on your computer, click the "Done" button.
Step 5. Preview the Video Clip
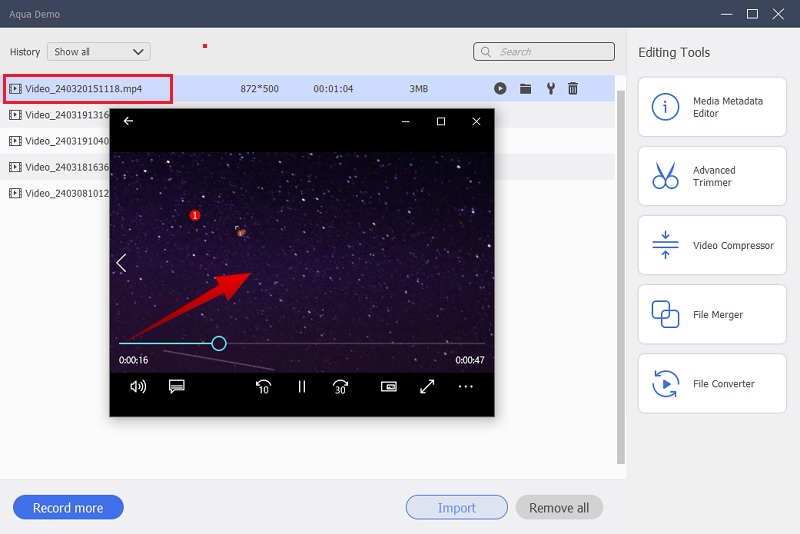
When you hit the "Done" button, you will be moved to the "Recording History" folder of the tool. Here, you can preview the video recordings by double-clicking the recently recorded video. The video quality of the recording file will be based on what you have set before capturing your screen.
Frequently Asked Questions
How can I capture specific parts of my screen with VLC?
Unfortunately, VLC does not support selective screen recording. However, you can adjust the capture area by resizing the VLC window or adjusting your desktop resolution before recording.

Is VLC the best option for recording screen videos?
While VLC is a versatile media player, it may not be the most feature-rich option for screen recording. Consider exploring dedicated screen recording software like Aqua Demo that offers advanced features such as audio capture, selective screen recording, and built-in editing tools for a more comprehensive recording experience.
Can I use VLC to record my screen and webcam simultaneously?
Unfortunately, VLC does not support simultaneous recording of the screen and webcam. You may need to use separate software or consider alternative screen recording solutions that offer integrated webcam support.
Conclusion
In conclusion, while VLC offers basic screen recording functionality, it can only meet some users' needs due to its limitations, including the inability to capture audio alongside screen recordings and the lack of selective screen recording support. Exploring dedicated screen recording software like AceThinker Aqua Demo is advisable for those seeking more comprehensive screen recording solutions. Its ability to screen record with audio, user-friendly interface, and cutting-edge features make it a good alternative to VLC.