
- Download the AceThinker Aqua Demo
- Launch the tool and recod your gameplay
- Finalize the recording and then save

As people grow, they experience new things, from learning how to walk to knowing how to drive. The more people experience and get used to things, the more mundane they get. It is only natural that adults crave new experiences. Fortunately, virtual reality was created and is growing ever so popular. When a person uses VR, they experience a new world. This New World offers great scenery, music, sounds, and more; it is as if it is real. The sensations VR delivers are why it is so popular in the gaming industry. The more the users feel, the more immersed they are in. One of the b biggest names in VR products is the Oculus Quest 2. Oculus Quest 2 offers 1920p per eye and is powered by the Qualcomm Snapdragon XR2 chip. Oculus users often bond and experience new feelings. Capturing memories and exciting events is a great time capsule you can look back at. Read more below to read a comprehensive guide on how to record oculus quest 2 gameplay
2 Easy Steps on Using the Oculus Quest 2 Screen Recorder
If you plan to use this feature as your default Quest 2 Screen Recorder, you may want to know its limits. Sharing your files to a platform can compress your videos. You have to do or follow a guide to get the highest quality when sharing. If that is too much, you can opt for a screen recorder. You have to do tedious steps to share a video capture with no compression. Having an inaccessible sharing system is a big limiting factor to Quest 2’s ability to record. Users can share, screen record, Cast, and screenshot with the Oculus Quest 2. You can record your Quest 2 moments to share online. Read below for a quick guide on how to record on oculus quest 2.
Step 1 Open the Quest Menu
Click the “Oculus” icon on your right controller to open the Quest Menu. Once the Quest Menu pops up, find and click the “Share” icon.
Step 2 Find the “Record Video” icon
Then, click the “Record Video” icon to start your screen recordings. You can configure video settings on the “Camera”section. To find the camera section on the systems tab.
Record your Oculus Gameplay with Great Quality
Try other screen recorders if the Quest 2 s does not meet your standards. Before you select a screen recorder, you must know the qualities of a good one. A good screen recorder allows you to record with high quality and in high FPS. Frames per Second, or FPS, is the measurement of rendering frames. In short, the higher, the better. AceThinker Aqua Demo possesses all the qualities of a good recorder. You can record your gameplay up to 4k UHD. Its FPS selection ranges from 5fps to 60fps. High quality videos are also available to go with your FPS selection. Record at HD to UHD quality. Save your files on different file formats: GIF, MP4, WMV and more. Aqua Demo has a “Game Recorder” feature for capturing your gameplay. Read below to see how to record your Quest 2 gameplay using the AceThinker Aqua Demo.
Try it for Free
Step 1 Download the AceThinker Aqua Demo
Use the download link below or search AceThinker Aqua Demo on the search bar. Once on the site, click the download button and complete the installation process.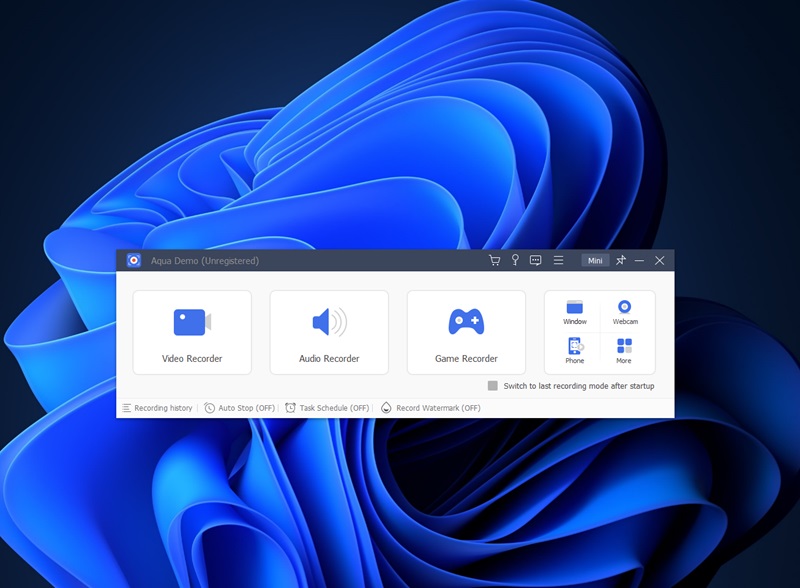
Step 2 Log in on Oculus Casting
Open a browser and search for oculus.com/casting. Once there, Log-in your meta account. Before casting, your computer and Quest 2 device must be in the same Wi-Fi network.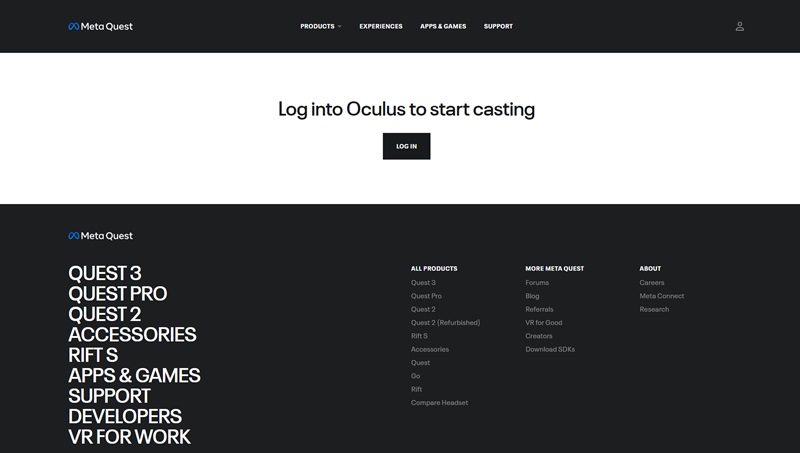
Step 3 Cast your Oculus Quest 2 and Adjust Settings
Click the “Oculus” icon on your right controller to open the main menu. Then go to Share, select Cast, next is to choose Computer, and click “Next.” It may take a couple of seconds to connect. If you want to adjust or tweak the video, click the “Oculus” icon on your right controller and go to “Camera.” Here, you can adapt Image stabilization, reset experimental settings, and more. Important video features such as FPS, Video Compression, and more are also located here.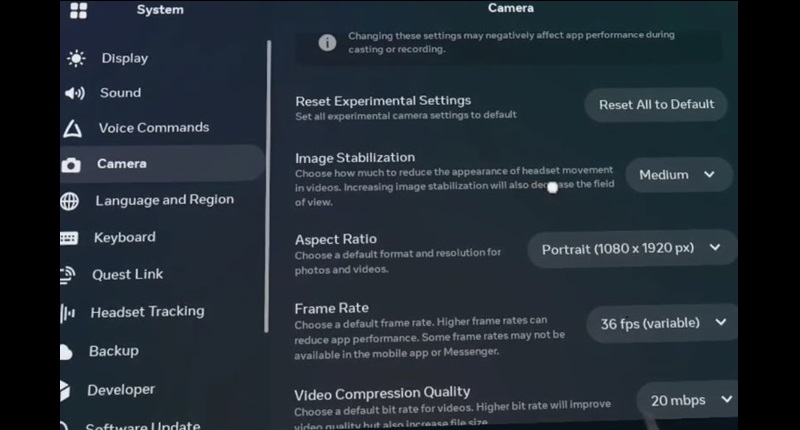
Step 4 Record with Aqua Demo
If you are ready to record, open your Aqua Demo app. Select the “Game Recorder” icon, then select the Oculus casting tab. If you want to adjust video quality, FPS, and more, click the “Setting” Icon.
Step 5 Check your Video Files
After recording, you can click the “Recording History”. Once opened, you can immediately double-click your file to extend it using a media player. You can also convert, compress, and trim your file if needed.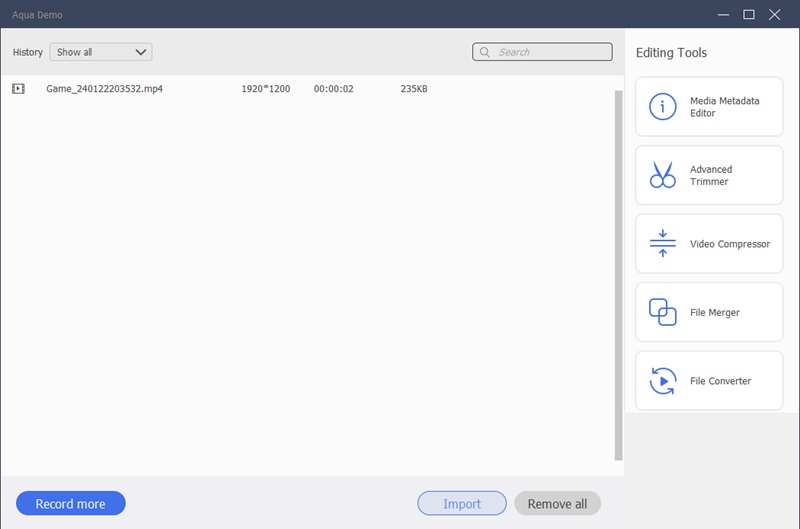
Frequently Asked Questions
How do I enable screen recording on Oculus?
Open up your Quest 2 device and click the “Oculus” icon. From there, go to “Share” and choose “Record Video”. The share tab also allows users to take a screenshot and Cast.

What are the best settings for recording VR gameplay?
The best setting is recording in 1080p, 30-60 fps, with a 20mbps compression rate. Users of video-sharing platforms usually don’t actively request or mind 1080p. If your Computer or other devices can take UHD recordings, go for it; remember that you need a high upload speed.
How do I share my Oculus Quest 2 screen recording on social media?
You can connect your Quest device to a computer to share videos without compression. Connect your device with a USB-C-to-USB-A adapter and find the disk in File Manager. Then, save the videos to the “Video Shots” folder. You can now share your saved videos.
What are some creative ways to use Oculus screen recording outside of gaming?
Quest owners can look up interactive animations or videos. Interactive videos allow viewers to interact with the characters, much like talking to people in real life. If you are into sports, it can be a great sparring partner; think of it as advanced shadow boxing.
Conclusion
Sharing memories and experiences is what the internet is all about. Communicating your feelings with friends and peers is a great way to build bonds. A great experience creates a great conversation. No matter how short or long your video is, it holds much meaning. Be sure to capture your moments with yourself or with others. To be able to witness a fantastical world inside of your home is so freeing. The article talked about ways on how to screen record on oculus quest 2 and some extra tips. We hope our article helped you with your VR adventures. If you think we’ve missed a step, comment below.