 The video has become integral to our daily lives, from entertainment to communication. As a result, it's not uncommon to encounter videos we don't want to listen to. Moreover, there are also some benefits you can get from muting your video. One of the benefits you can get is avoiding distraction and focusing solely on the visual aspects of the video. Whether you want to watch a music video without sound or avoid interruptions during a meeting by muting your Zoom recording, knowing how to mute a video is a skill everyone should possess. However, can you mute part of a video? Yes, it's possible to mute part of a video using various video editing software tools. So keep reading this post to know more.
Tips to Consider Before Muting Videos
1. Preparing Your Video
Before you begin muting your video, it is essential to prepare it properly. This includes ensuring the video has good quality, properly framed, and well-lit. Also, you must ensure that the video aligns with your intended message or story.
2. Checking the Video Format and Resolution
Next, it is essential to check the video format and resolution. Ensure the video is in a widely supported format, such as MP4 or AVI. It is also essential to ensure the video resolution is appropriate for the platform you intend to share. By following these steps, you can ensure that your muted video will be of high quality and effectively convey the intended message.
3. Backing up Your Original Video
Before you begin muting your video, the last process is to back up the original video. By backing up the original video, you ensure you have a copy if anything goes wrong during the muting process. By following these processes, you can be confident that your muted video will meet the necessary quality standards and effectively convey your intended message.
Mute Video in Windows/Mac
AceThinker Wind Cut is a professional video editor that lets you create stunning and unique videos for any purpose. It offers many basic editing features and visual effects, including trimming, cropping, merging, adding effects, filters, transitions, and more. Additionally, it also allows users to edit the audio, remove background music, audio detach, and even mute video. With these features, you can quickly silence your video or remove the sounds or unwanted noise from your video. Moreover, one of the best things about this program is that it enables users to choose their preferred quality and format.
Try it for Free
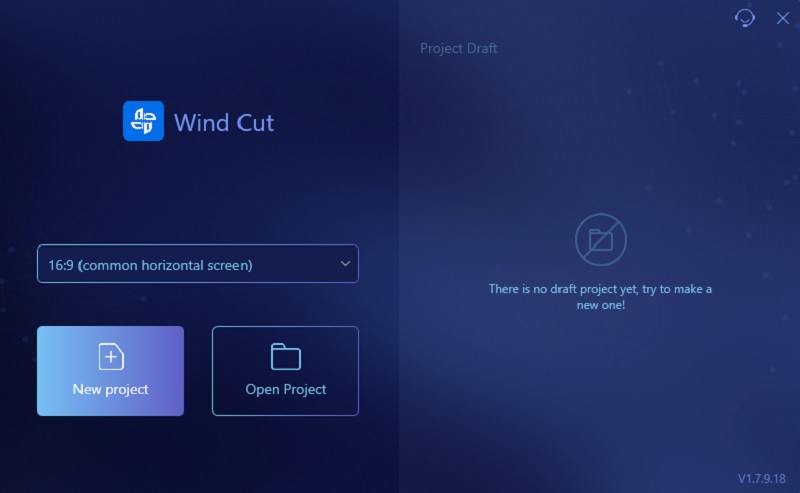
2.1 Opening the Video Editor
Downloading the AceThinker Wind Cut should be your first priority. While waiting for the program to download, click the installer above. Subsequently, click on the downloaded file and follow all of the instructions to ensure a successful software installation. Then launch the application and have a look around.
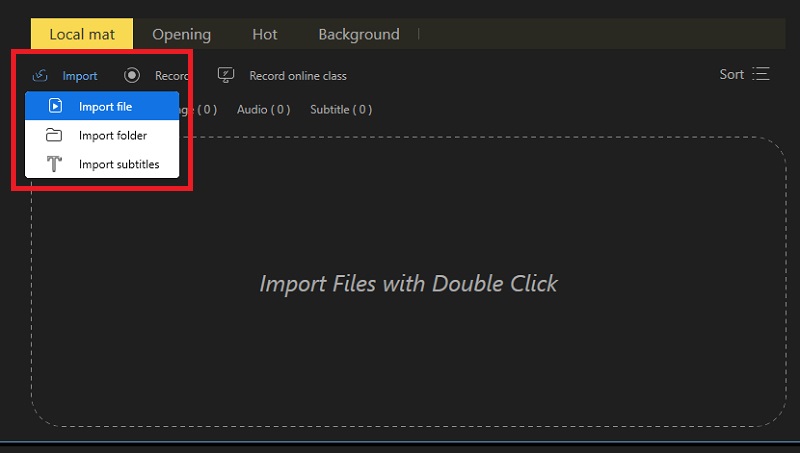
2.2 Importing Your Video
Tap the "Import" tab and choose the "Import File" option to upload the video you wish to mute. Your files then appear on your screen. Double-click the video to add it to the application when you've located it in one of your files. To begin the muting procedure, drop the video onto the editing timeline.
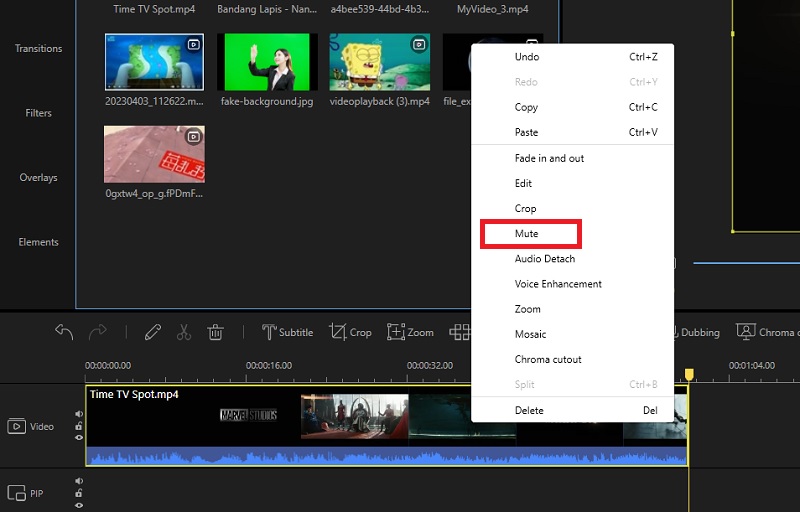
2.3 Removing the Audio Track
With this software, muting a video is very easy. Right-click on the video, and you can see all the options. Tap the "Mute" option, and the video will automatically be muted. You can play the video on the "Media Preview" to see if the video is already muted. Also, if you want to add music to your video, expand your reading here.
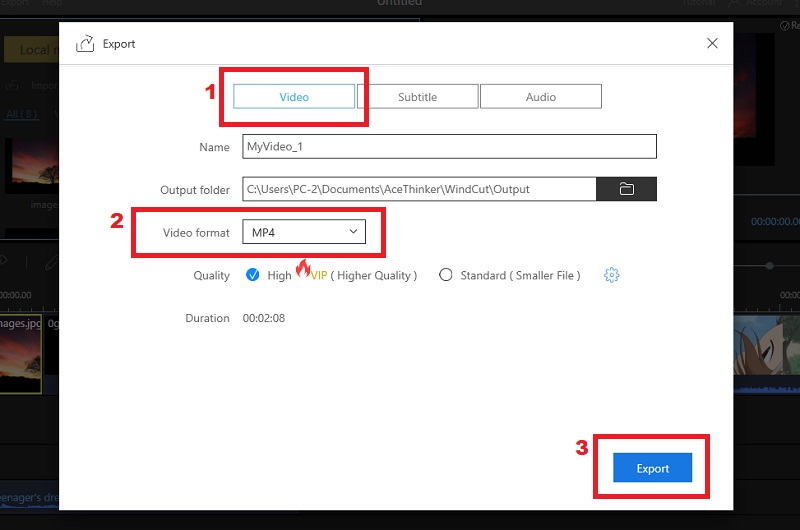
2.4 Save the Muted Video
To save the high-quality video, click the "Export" button beside the toolbar. Then, another window will appear on your screen, where you can rename the file, choose an output folder, and select your preferred quality and video format. Lastly, hit the "Export" button again to save it to your computer.
Other Way to Mute Video in Windows 10
Are you looking for a way to take your video editing skills to the next level? Look no further than third-party video editors. Regardless of your level of experience, third-party video editors offer various tools and features to create high-quality videos. These editors allow for advanced visual effects and color grading. Moreover, many video editors have an "Audio Removal" feature that allows you to easily remove background noise or unwanted sounds and mute video sound in your footage. But which one is right for you? See the chosen video editor below if it's suitable for you.
3.1 Choosing a Video Editor that Supports Audio Removal
The software we choose that has an "Audio Removal" feature is Minitool MovieMaker. It offers a wide range of audio editing options such as split audio, trim audio, changing audio speed, reversing audio, and deleting audio. Moreover, it also supports the most popular audio and video formats like MP4, MKV, AVI, MP3, MOV, etc. Additionally, it enables users to export videos with a watermark in 1080p quality.
3.2 Importing Your Video
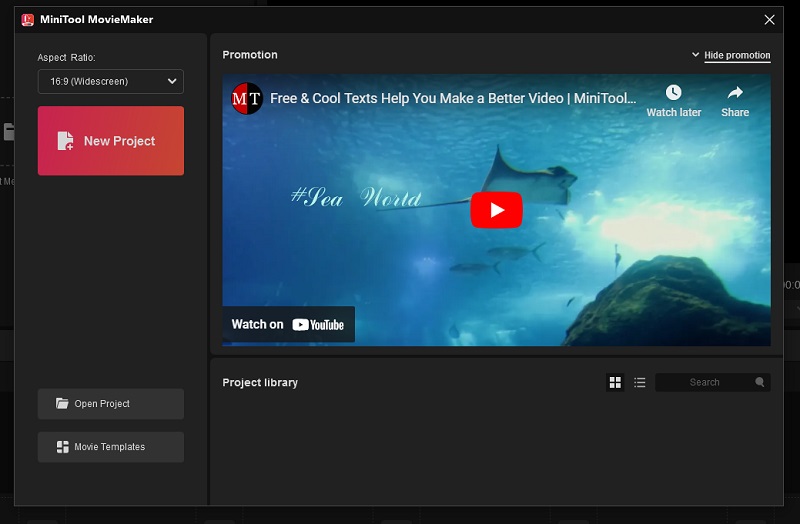
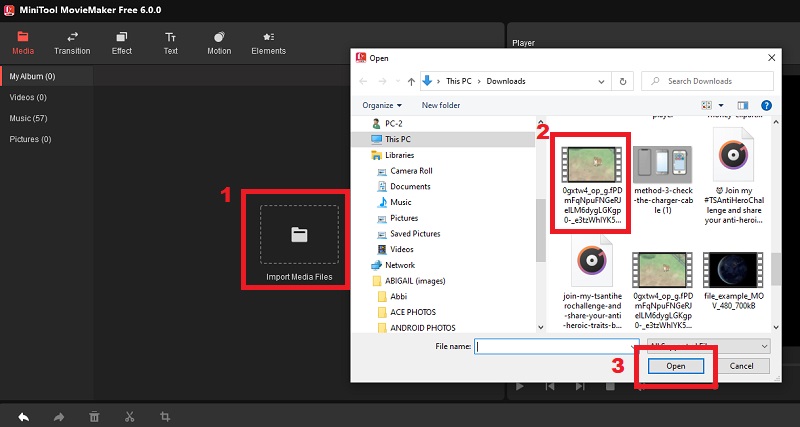
Click the "New Project" button to enter the main interface in the software interface. Next, on the "Media" tab, click the "Import Media files" option to appear your files on your screen. Then, locate the video you want to mute. Once you find it, tap on it and hit the "Open" button to import it into the program. Afterward, drag the video onto the editing timeline and start muting the video.
3.3 Removing the Audio Track
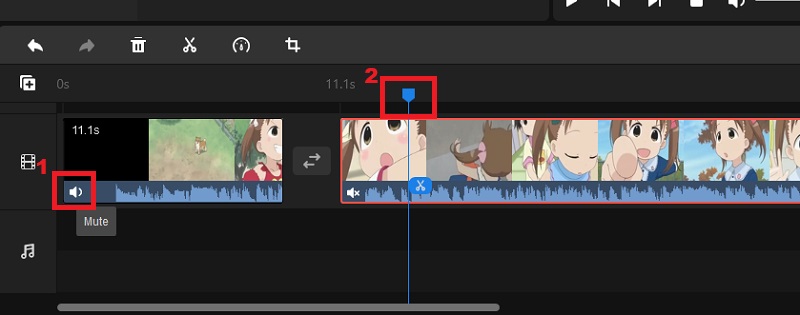
Mute a video in this tool is so easy. All you need to do is to tap the "Volume" icon on the lower part of the video. And that's it! Your video is already muted. Also, if you want to mute part of the video, you can split the video first, drag the blue line on the part you want to mute, and click the "Scissor" icon to split the video. Then, tap the "Volume" icon again to the clip you want to mute. You can play the video on their media player to see if the muting process is successful.
3.4 Saving Your Edited Video
To save the muted video, click the "Export" button above the media player. The export window will appear on your screen, where you can rename the file, choose your preferred format, and select the output folder. There are two tabs you can see: the PC and the device. If you are using a computer or laptop, choose the "PC" option; if you use your phone, select the "Device" option. Lastly, hit the "Export" button again to save the video.

Mute Video with Online Solution
Online audio removers have become a popular tool for content creators and individuals who need to remove background music or unwanted sounds from their videos. These tools provide a quick and easy solution to an otherwise time-consuming task, allowing users to focus on other aspects of video production. Additionally, you don't need to install any software on your computer, and it is cost-effective because most online video editors are free to use. However, it is essential to note that the effectiveness of these tools can vary depending on factors such as the audio quality and how embedded it is in the video. As such, it is essential to choose a reputable and reliable online audio remover that provides high-quality results without compromising the overall quality of the video.
4.1 Choosing a Reliable Online Audio Remover
If you want the best online audio remover, we recommend using the AceThinker Free Mute Video Online. This online tool is compatible with different devices and supports the most popular browsers, including Google Chrome, Internet Explorer, Mozilla Firefox, and Microsoft Edge. You can use these tools to remove a voice, audio track, background music, or any unwanted sound from your video. Moreover, this is perfect for you if you want to save time muting your video! Because this tool has High-Speed File Processing where you can mute your videos in just a minute. It also supports the most popular video and audio formats like MOV, MP4, MP3, AVI, WebM, etc.

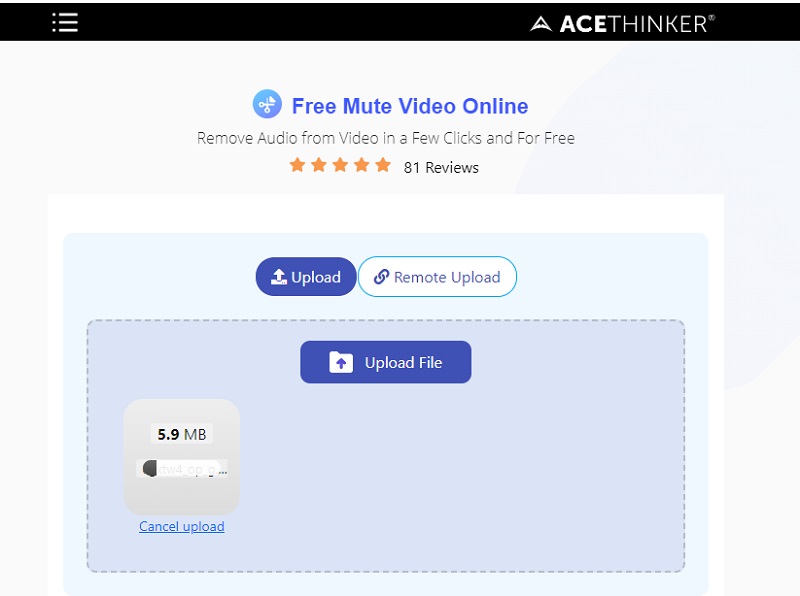
4.2 Uploading Your Video
Once you open the online audio remover on your browser, you can see the "Upload File" button in its interface. Click on it, and your files will appear on your screen. Locate your video and double-click on it to add it to the tool. Another way to import a video on the tool is to drag it directly to its interface. Then, wait until the online tool analyzes the video.
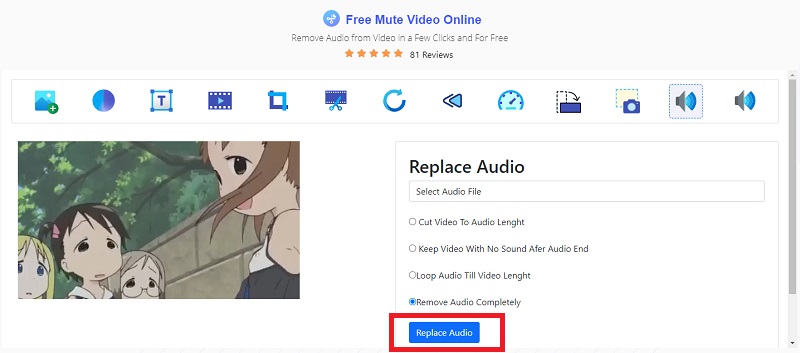
4.3 Removing the Audio Track
Once the online tool analyzes the video, you can see different options below the video. You can "Replace Audio"; just tap the "Select Audio File" button to see available audio. There are four options where you choose how you want to mute your video:
- Cut video to the audio length
- Keep video with no sound after the audio end
- Loop audio till video length
- Remove audio completely
Choose one of the four options you want to use. Next, click the "Replace Audio" button to start muting your video. Wait until the muting process is done.
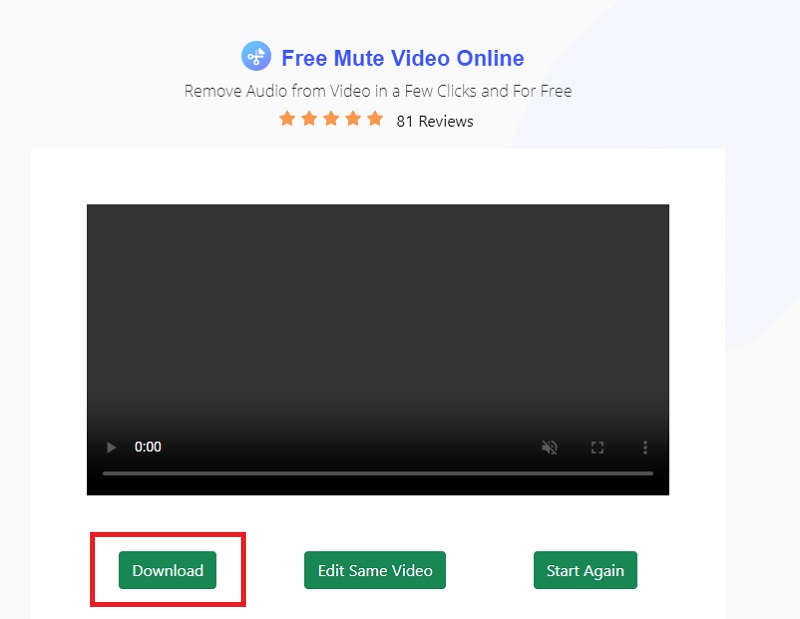
4.4 Downloading Your Edited Video
Once the muting process is done, you can see the muted video on your screen. Then, there are three buttons below it: The download button, edit the same video and start again. Click the "Download" button, and the video will automatically download. Lastly, go to your files and open the download folder, and watch the muted video.
Issues in Removing Audio from Video
Removing audio from video is a common task for many people. It can be removing unwanted noise, muting video, or replacing the original audio with new audio. However, despite being a seemingly straightforward task, there are several common issues that can arise when removing audio from a video.
- One common issue is the loss of synchronization between the audio and video components. It can occur if they are not aligned adequately before removal.
- Another issue is the loss of contextual information that may be conveyed through audio. It makes the video less informative or difficult to understand.
- Removing audio from a video can also affect the video's overall quality if not done correctly.
- Some tools or software used to remove audio from the video may be unable to handle specific file formats or codecs. It may lead to compatibility issues and potential loss of video quality. Using reliable software to handle different video file formats and codecs is important to avoid these issues.
- Muting your video can result in an unnatural listening experience for viewers and may detract from the overall viewing experience.
Fix Audio Syncing Issues
Audio syncing issues can be frustrating and ruin the viewing experience of any video. Fortunately, there are methods to fix these issues.
- Adjusting the playback rate is a straightforward method to address audio syncing issues. This can quickly be done on most modern video players by accessing the settings menu and adjusting the playback speed.
- Another method is using video editing software to adjust the audio and video tracks manually. This can be a more time-consuming process, but it allows for precise adjustments and can produce high-quality results.
- Additionally, there are specialized software programs available for syncing audio and video. These programs use advanced algorithms to automatically analyze and match audio and video tracks. However, in some cases, syncing issues can also be because of hardware or software compatibility problems.