
 When it comes to post-production in filmmaking, there are two terms that are often used in video editing but have distinct differences in color grading and color correction. Color grading and color correction are both essential parts of post-production that focus on improving the visual appeal of a film or video. However, understanding these two processes' differences is crucial to make sure that the final product achieves the desired artistic and technical standards. Keep reading this post to learn more about color grading color correction differences, and how to do it in the video editor.
Color Correction vs. Color Grading
1.1 What is Color Correction?
Color correction is a post-production process that involves adjusting the colors of an image or video to ensure that it looks aesthetically pleasing, natural, and consistent. If you are involved in any post-production work, whether for films or photographs, color correction should always be part of your workflow, and this is not just about aesthetics. Accurate color correction can significantly impact the final product's overall quality and make it more appealing to viewers and clients. In addition, color correction can help improve the accuracy of images captured underwater.

1.2 Common Problems Addressed in Color Correction
Color correction is a vital aspect of the post-processing workflow in digital photography and videography. It helps to correct any color imbalances and inconsistencies that may be present in an image or video. The most common problems addressed in color correction include white balance, exposure, and contrast issues.
- White Balance is a common problem that color correction addresses. It involves removing any color tint effects that may be present in an image, ensuring that white objects appear white and other colors appear natural. An improper white balance can shift the color in the image toward blue or orange so that the whites appear tinted and the colors are off.
- Exposure issues are another common problem addressed in color correction. These issues include correcting overexposed or underexposed parts of an image to ensure that the details are visible and the overall brightness is consistent throughout the image. In general, if you want to ensure everything is at a proper brightness. You can set the appropriate exposure based on people's faces.
- Contrast is also another problem addressed in color correction. Sometimes images can have low contrast, making them look dull and lifeless, and high contrast images appear sharper and more detailed. Adjusting contrast generally comes down to working with the brightest and darkest parts of the picture.
1.3 Techniques Used in Color Correction
There are several techniques used in color correction, each serving a specific purpose.
- Curves
Curves help with precise color correction and grading in digital photography and video. Using curves, you can add points to drag colors to change midtones, shadows, and highlights more precisely. Additionally, curves allow for non-destructive color adjustments that can be fine-tuned at any point in the editing process. - Levels
Level adjustment helps to correct the brightness and contrast of the video. It is done by adjusting the black-and-white points and mid-tones to improve the quality of the video. Keep adjusting the levels until you find the exact balance of brightness and contrast to achieve the desired result. - Saturation
Saturation adjustment changes the intensity of colors in an image or video. A highly saturated color has a lot of pure colors and very little gray, while a desaturated color will have mostly gray and minimal pure color. The best choice between the two is the high saturated because the color will look more vibrant and dynamic.
1.4 What is Color Grading?
Color Grading is a technique in video editing, and it's done after color correction. During video color grading, the colors in a video are adjusted to create a specific look or mood. Usually, this involves adjusting the brightness, saturation, contrast, and hue of the different parts of the video to make it more visually appealing, convey a particular tone, or fit the genre. But remember that this process is optional only, especially if the video is meant to be as realistic as possible.
1.5 Techniques Used in Color Grading
There are several color grading tips and techniques that can be applied to post-production video editing.
- Color Wheel: A color wheel is a fundamental tool used in video editing, consisting of three primary colors (red, green, and blue) and their respective complementary hues (yellow, magenta, and cyan). The color wheels usually come in three to four wheels. One wheel will control the darkest part of the clip, while another is called "Lift," which contains the middle part of the clip, and the third is known as "Gamma," which adjusts the brighter portions of the clip. Sometimes there is a fourth wheel, the "Offset" wheel, which collectively controls all of the clip's areas.
- HSL Controls (Hue, Saturation, and Lightness): HSL controls allow for fine-tuning of specific colors in the video. It is usually done when you want to change the color of a particular object or when you need to balance out any imbalance in the saturation and lightness levels of different colors. For example, a color with high saturation and high lightness appears very bright, and a color with low saturation and low lightness appears very close to black. So keep playing with them until you find the proper balance.
- LUTs (Look Up Tables): LUTs are pre-made filters that can be applied to a video clip with just one click. These can be used for color correction or creative purposes to adjust the overall tone of the video. Luts is also what filmmakers use in the camera to have some excellent grades and effects in their videos. However, some video editors prefer not to use LUTs as they can be too generic and may not provide the desired effect on every situation.
AceThinker WindCut
AceThinker Wind Cut is video editing software to add creativity and originality to your videos. It has a tool called "Color Correction," which lets users change the video's contrast, saturation, brightness, tone, highlight, and shadow. Additionally, it contains a ton of capabilities, like the ability to edit videos with tools like trimming, splitting, filtering, cropping, and more. Moreover, it also has other features like speed control, adding a music background, adding a logo and watermark, and more. Anyway, see the guide below on adjusting the colors of the video.
Try it for Free
Step 1 Install the Software
Before proceeding to the color grading and color correction tutorial, we need to download the video editor we use. Get the AceThinker Wind Cut on its official website or click the download button above. Afterward, click on the downloaded file and pass all the prompts appearing on your screen to install it successfully. Next, launch the software and explore it to familiarize yourself with the navigation and functions.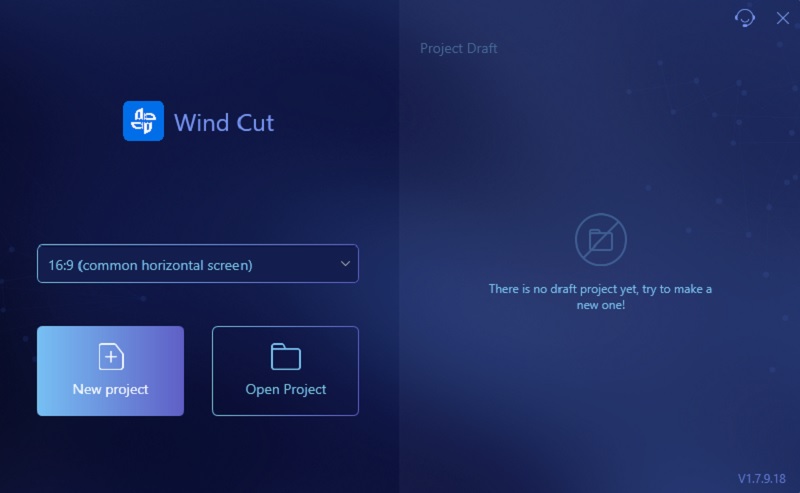
Step 2 Upload the Video
In the next step, click the "Import" tab and select the "Import File" option. Locate the video on your files, and once you find it, double-click on it to add it to the program. Then, drag the video to the editing timeline or tap the "+" icon on the video thumbnail to add it to the editing timeline. Once the video is in the timeline, you can start editing the video.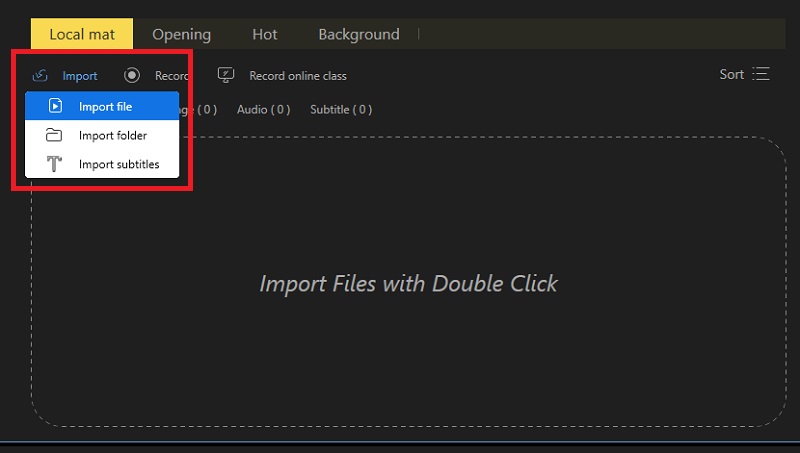
Step 3 Do the Color Correction and Grading
To start adjusting the video's color, click on the added video. Then, on the toolbar, tap the "color correction" icon. Afterward, another window pops out on the upper of the toolbar, where you can adjust the contrast, saturation, brightness, etc. Play on the slider of each option until you reach the proper color. Then, click the "Ok" button to save the changes.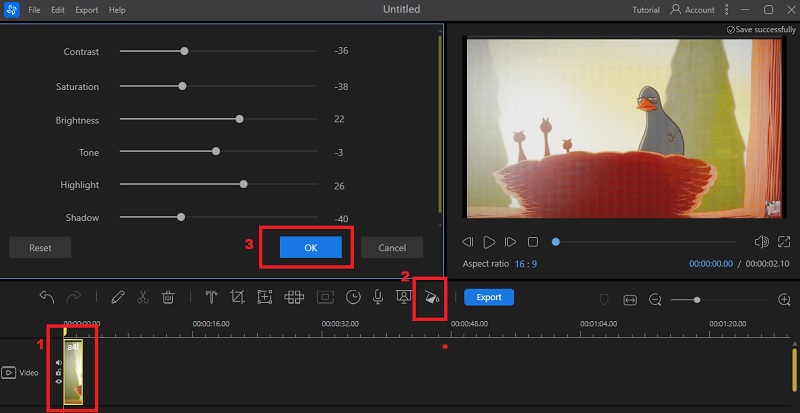
Step 4 Export the Edited Video
Before saving it, preview it in the "Real Time Preview Window." Once satisfied with the outcome, tap the "Export" button beside the toolbar. Then, a window will appear on your screen where you can edit the video name, choose an output folder, and choose a video format and quality. Lastly, hit the "Export" button again to save it to your computer.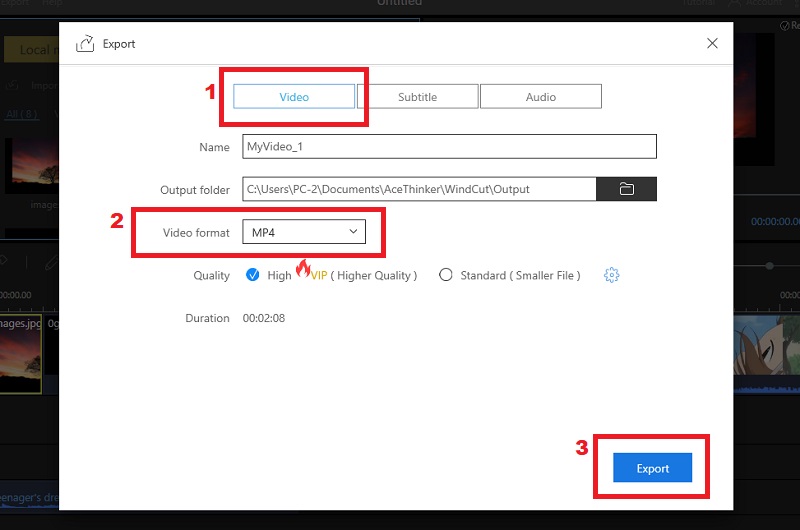
2.2 Best Practices for Color Grading vs Correction Workflow
Color grading and correction are essential processes in video production that involve manipulating the colors of a video to achieve a desired look or match different shots. It is important to follow certain best practices to ensure an efficient and effective color grading or correction workflow.
- The first best practice is using professional color grading and correction software such as DaVinci Resolve, AceThinker Wind Cut, Adobe Premiere Pro, or Final Cut Pro. These programs offer tools such as color wheels, curves, and scopes for targeted and precise corrections to help achieve the desired look.
- Next is to use a calibrated monitor to ensure the correct exposure and color balance. It will help achieve color grading or correction consistency across different shots and devices.
- Another best practice for color grading and correction workflow is prioritizing the order of operations by starting with primary correction, followed by secondary corrections such as matching shots and color grading. It involves adjusting the basic elements such as white balance, exposure, and contrast to ensure a neutral starting point for color grading.
Where You Can Use the Effects
- Color Correction/Grading for Film
Color is essential to visual storytelling, influencing how the audience perceives a film's mood and atmosphere. This is why color grading and correction are crucial in film production. Color Grading and correction are the processes by which color in film footage is adjusted to enhance or modify its visual effect. The color grading process involves carefully tweaking the color palette of a film to achieve a desired appearance that compliments its mood and atmosphere. On the other hand, color correction is primarily concerned with fixing any technical issues or imbalances in a color that occurred during filming, such as improper white balance or color temperature.

- Color Correction/Grading for TV
Color grading and color correction are crucial aspects of video post-production in television. Through color grading and correction processes, the visual appearance of a TV show can be transformed from its raw footage to a compelling final product that meets industry standards and captures viewers' attention. Color grading involves changing the colors and tones of a video to enhance its visual appearance. In contrast, color correction focuses on correcting any inconsistencies or color inaccuracies that may have arisen during filming.
