
 VLC Media Player is a famous software for its versatility in various media formats. However, it's not just for watching videos; it also offers tools for basic editing tasks, like cutting videos. Video cutting is a handy feature that allows users to trim unwanted parts from their videos quickly and easily. With VLC, you can precisely select the sections of a video you want to keep and discard the rest. This could be useful for removing commercials from recorded TV shows, trimming irrelevant video parts, or shortening a lengthy clip. The process of cutting a video with VLC is straightforward and doesn't require any advanced technical skills. Following a few simple steps, users can efficiently edit their videos without specialized editing software. In this guide, we'll explore how VLC cut video effortlessly, providing you with the tools to make your videos more concise and engaging.
Features of VLC Media Player
VLC Media Player is a software that lets you play videos and listen to music on your computer. It's like a supercharged DVD player for your digital files. Here are some of its features:
- Plays Almost Anything: VLC can play almost any type of media file you throw at it, whether it's a video, audio file or even a streaming service.
- Simple Interface: Its interface is easy to use, so you don't need to be a tech whiz to use it.
- Free to Use: VLC is free to download and use without hidden fees or subscriptions.
- Customizable: You can change how VLC looks and works with different skins and settings to suit your preferences.
- Cross-Platform: It works on many different operating systems, such as Windows, macOS, and Linux, so you can use it on any computer.
- Basic Editing Tools: VLC offers basic editing tools, such as cutting, cropping and VLC merge videos, which can be handy for simple tasks without using separate software.

How to Trim Videos Using VLC Media Player?
VLC is a versatile tool that plays various video formats and can cut videos. However, the process of trimming videos differs from how the video editor can do. Here, we will use the VLC Record feature to trim a video using VLC. In the following sections, you will see step-by-step instructions on how to trim videos on Windows and Mac VLC Media Player.
Method 1. Trim Video With VLC on Windows
To trim videos in VLC Windows, follow these steps:
Step 1. Add a Video File on the Player
If you don't have the software yet, download it before we start cutting a video using VLC. Once installed, open the VLC player on your Windows PC. Next, click "Media" in the menu bar and select "Open File" to add the video file you want to trim. Alternatively, you can directly drag the video onto the player.

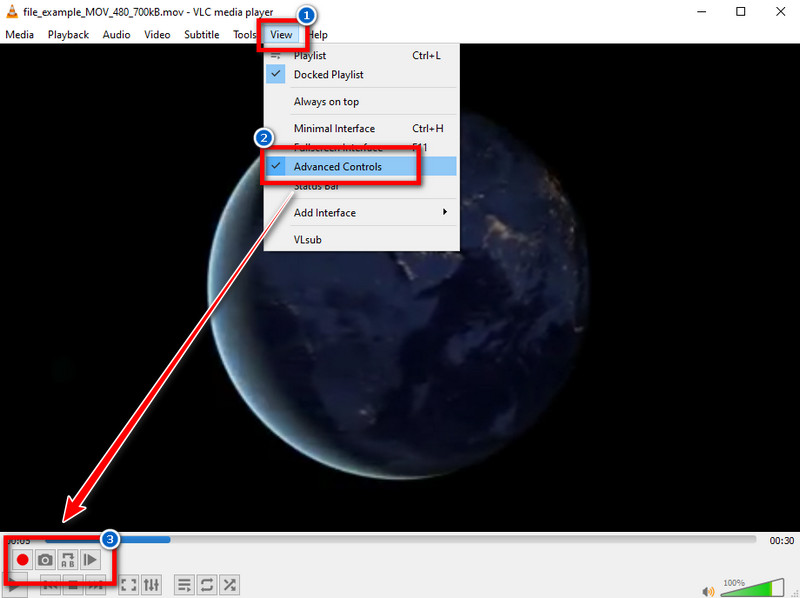
Step 2. View Advanced Controls Menu
To start cutting the video, you need to switch on the editing controls. Click the View menu bar and click Advanced Controls. You will now see additional buttons in the VLC player interface. Next, start playing the video and pause where you want to start the trimming.
Step 3. Start Trimming the Video
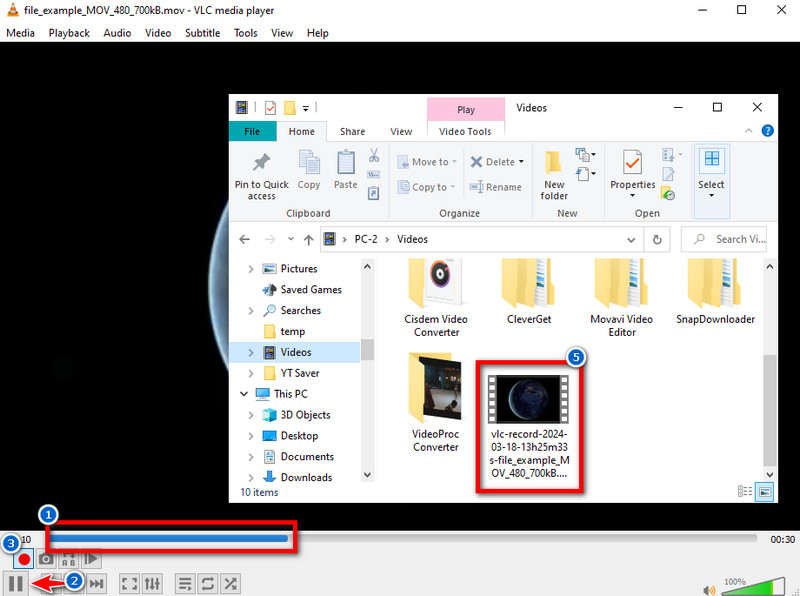
Click "Record" button and tap the playback to play the video again to record the trimmed portion. You can also use the Frame by Frame button to precisely select the start and end points of the trim. Once you reach the desired end point of the trim, click the red record button to stop the recording. This will generate a new trimmed video file in your designated folder.
Method 2. Cut a Video Using VLC Mac
To make short clips from a video using VLC on Mac operating system, follow these steps:
Step 1. Import the Video in VLC
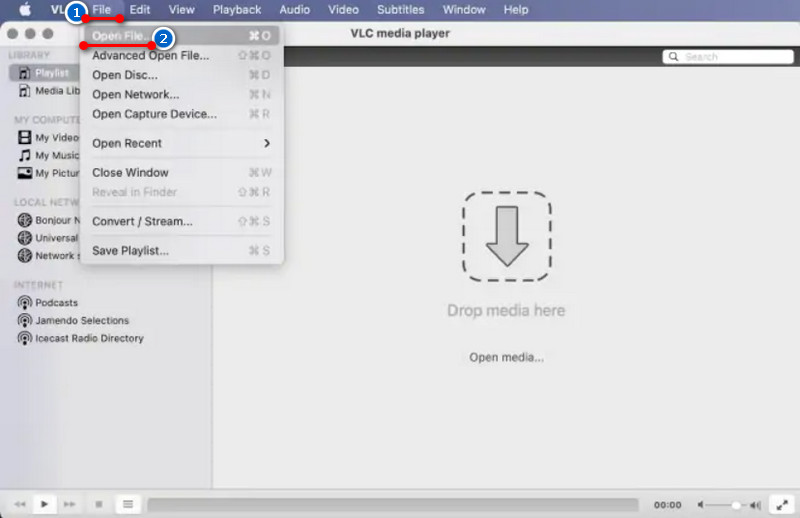
First, launch the media player on your Mac and click "File" in the menu bar. Then, select the Open File option and find the video clip you want to crop video length VLC. Alternatively, you can find the video in your Videos folder and simply drag it onto the VLC Media Player interface.
Step 2. Cut video using VLC
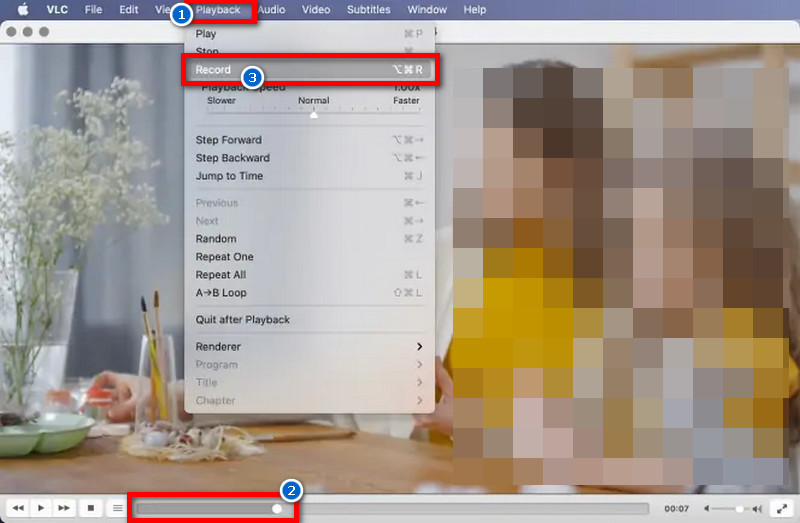
Once the video is imported, click the play button and find the starting point where you want to start recording. Then, navigate to the "Playback" menu and select "Record" to enable recording mode. Now, once you reach the ending point of the desired trimmed video clip, click the recording button to stop recording.
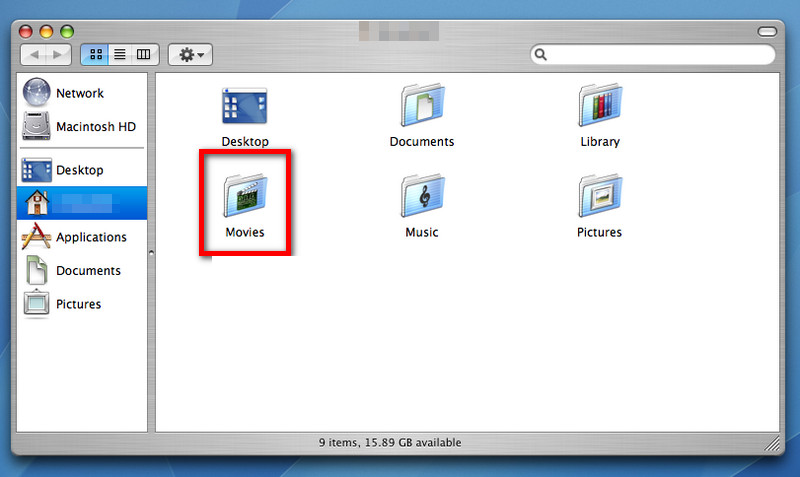
Step 3. Find the Trimmed Video Clip
Go to your Mac's file folders and navigate to your record directory, which is the Movies folder. You will find the trimmed video clip you recorded using VLC on your Mac. You can also change the default videos folder or create a new folder. Simply go to the Input/Codecs option in the Preferences menu.
Bonus Tip: Best Way to Cut Videos - AceThinker Wind Cut
Suppose you're looking for a more user-friendly and efficient way to trim and edit videos. In that case, you can try using AceThinker Wind Cut. This software is the only solution for quick and precise video trimming. It allows you to easily cut videos without losing quality. Also, it provides various editing options, such as cropping, merging, and adding effects, making it ahead from VLC. Aside from that, AceThinker Wind Cut can also be your YouTube trimmer and editor, allowing you to trim your videos before uploading them to your YouTube channel. This reliable software will also enable you to export your trimmed videos in different formats, making them compatible with various devices and platforms. It includes AVI, MP4, MP3, WMV, WEBM, and many more. Whether you want to cut video tutorial or split videos for social media, AceThinker Wind Cut is an efficient solution for all your video trimming needs. To learn how to trim videos using this video editing software, follow these steps:
Try it for Free
Step 1. Install the Video Editor
To install AceThinker Wind Cut video editing software, visit the main website or click the download button above. Choose the appropriate installation file for your Windows or Mac computer. Once installed, launch the software to begin trimming your videos.

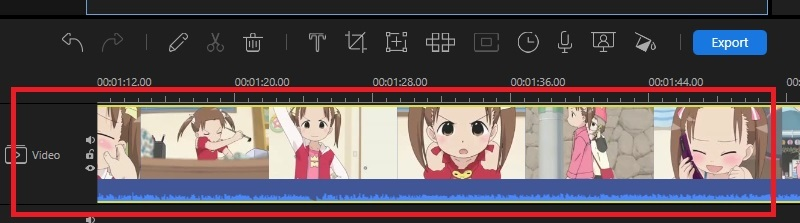
Step 2. Add the Video to the Timeline
Create a new project using the tool and import a file. Click the Import file button, then find a clip in your video files that you want to trim. Once the video is imported, drag it to the timeline for editing.
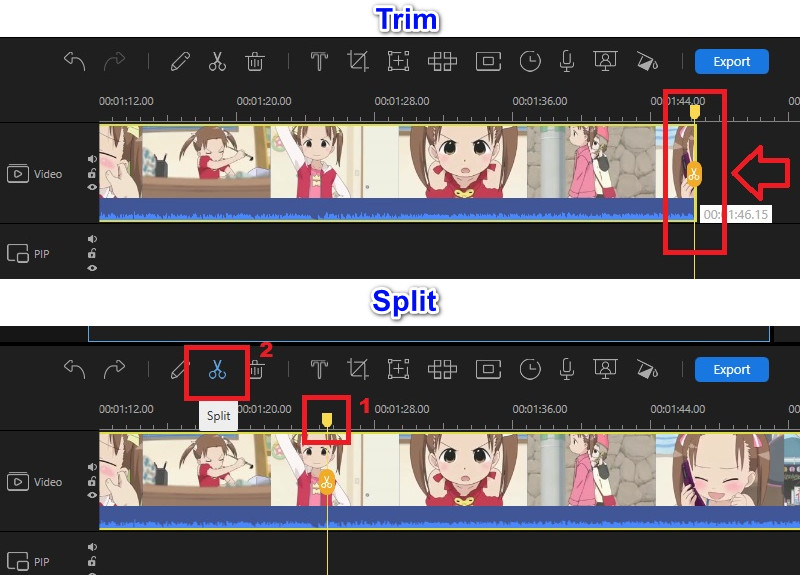
Step 3. Trim the Video Clip
Next, if you need to remove the starting or ending part of the video clip, place your mouse over the edges of the clip in the timeline. Then, simply drag the edges inward to trim off the unwanted portions. However, suppose you want to cut a clip in the middle part of the video. In that case, you must use the split function to split the video before removing the unnecessary parts. This can be done by placing the playhead at the desired point in the timeline and clicking on the "Split" button.
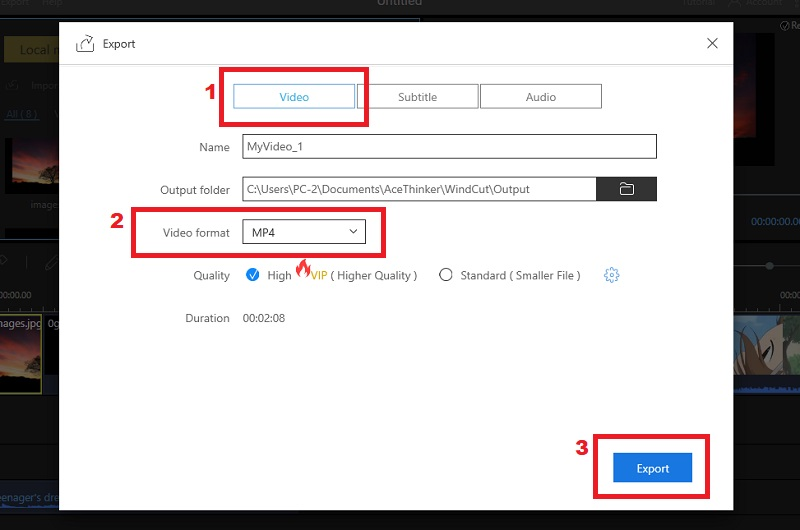
Step 4. Export the Trimmed Video
Once you are done trimming your video, click the Export button to save it. A new window will then open, where you can choose the output format, video quality, and destination folder for your cut video. Afterward, hit the Export button in the new window to finish the export process. Finally, locate the video in its saved destination folder, and you are ready to share it with your friends.
Frequently Asked Questions
Can VLC edit the video?
VLC is primarily a media player, not a video editor. Although it has some basic editing features, such as cutting, cropping, and rotating videos, it is not designed for advanced video editing. For more complex editing tasks, specialized video editing software is recommended.

How do I resize a video in VLC?
To resize a video in VLC, go to the "Tools" menu bar and select "Effects and Filters." Then, click the "Video Effects" tab and choose the "Crop" option. You can adjust the video's size by entering the desired width and height values. You can also drag the crop box to resize the video manually.
Where can you find the trimmed videos in VLC?
Trimming a video in VLC saves the trimmed version as a new file in the same directory as the original video. The trimmed version will have the same name as the original video, but "trimmed" will be added at the end. Suppose you're not sure where your trimmed videos are saved. In that case, you can check the directory where the original video is located.
Conclusion
The cut video on VLC Media Player is a versatile, user-friendly feature for trimming videos. Unlike video editing, cutting videos in VLC involves recording a specific part of the video for trimming. It is a simple and convenient solution for those who want to cut videos quickly without complex editing software. The trimming feature of VLC is a convenient option for those looking for a simple and quick way to trim videos without installing additional software. However, for more complex video editing needs like adding video effects or transitions, it is recommended to use dedicated video editing software like AceThinker Wind Cut.