
 Rotating photos on an iPhone is useful for many reasons. It helps fix images that were taken sideways, improves the overall look of a picture, and prepares it for sharing or printing. Sometimes, a simple rotation can make a big difference in how a photo looks. The good news is that iPhones make this process very easy; you don't need any third-party apps to do it. In this article, you'll learn several simple methods to rotate a photo on your iPhone, whether you want to use the Photos app, the Camera app, or even the built-in editing tools. You'll also understand the difference between portrait and landscape orientations and how each one affects the photo's layout. As you continue reading, expect clear, step-by-step methods to rotate photo on iPhone and get perfect results every time.
Understanding How Photo Orientation Works on iPhone
Photo orientation refers to the way a picture is positioned, either vertically (portrait) or horizontally (landscape). Portrait orientation means the photo is taller than it is wide. On the other hand, landscape orientation means the picture is wider than it is tall.
When you take a photo using your iPhone, it automatically saves information about how you were holding the device. This information is called EXIF data, and it tells the phone whether the picture should appear in portrait (tall) or landscape (wide) mode. Because of this, your iPhone can display photos the right way without you needing to adjust them manually.
However, sometimes photos may look sideways or upside down when you open them on other devices. This happens because not all devices or apps read the EXIF data the same way. As a result, the image might not rotate correctly outside your iPhone. Therefore, manually rotating your photo before sharing ensures it always appears properly, regardless of where you view it.

How to Rotate a Picture on iPhone using the Photos App
Your iPhone has a built-in image viewer called Photos App. This application allows users to organize, edit, and share their media, making it a central hub for all their image-related needs. That said, you can easily change photo orientation on iPhone in a few taps. This helps correct orientation mistakes that occur when the phone’s detected position doesn’t match the actual photo orientation. When you rotate an image in the Photos app, you can turn it 90 degrees at a time with each tap of the rotate button. If needed, you can tap multiple times to rotate the photo 180 or 270 degrees, depending on how you want it to appear. This simple feature helps you get the perfect alignment before saving or sharing your image. Here are the steps you can follow:
Step 1 Access Your Photo
Begin by unlocking your iPhone; you can enter your passcode, use Face ID, or use Touch ID. From here, open the Photos app from your iPhone's home screen. Once you have accessed it, search for the image you want to rotate. Then, click the picture to open it in full-screen view.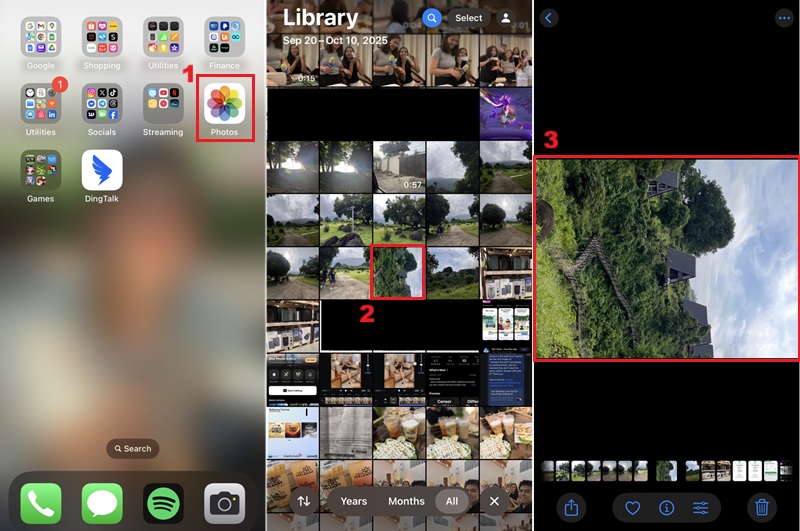
Step 2 Rotate the Image
After opening the desired image, tap the "Edit" button located at the lowermost right corner of your screen. Then, locate the crop icon, which resembles a square with two intersecting arrows, and tap it. This action will reveal the editing tools, including the rotation function. Next, tap the rotate icon to rotate the image 90 degrees clockwise with each tap incrementally. Then, tap "Done" to save your rotated image.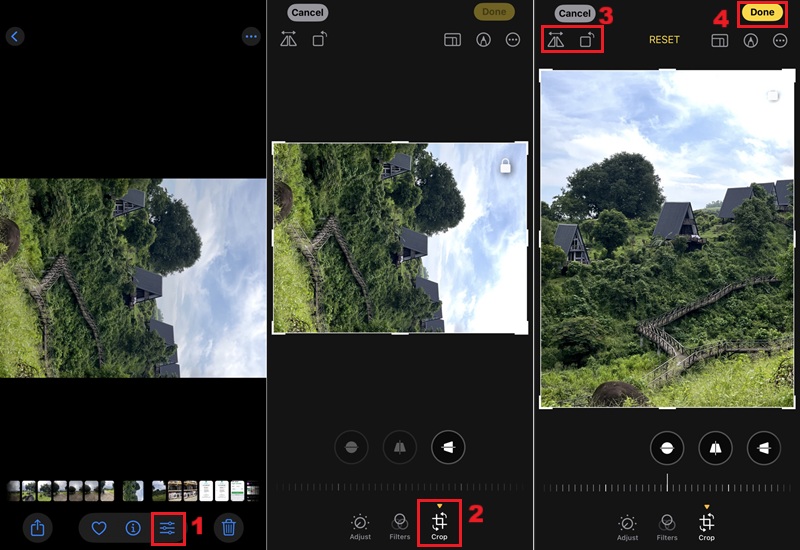
Alternative Method to Rotate a Photo on iPhone
Although you can manually rotate photos in the iPhone's built-in Photos app, it zooms in and crops the image to fit the new aspect ratio. If you need more advanced editing or want to change photo to landscape on iPhone, you can explore these methods. For instance, third-party applications often provide more granular control over rotation angles. In that line, let's explore more tools to ensure your images are perfectly aligned.
1. Photoshop Express
If you prefer a streamlined approach for quick adjustments, you can use the Adobe Photoshop Express. This application offers intuitive tools for precise image editing, including rotation capabilities. With this feature, you can rotate your images to any arbitrary angle, providing greater flexibility than the fixed 90-degree angle found in the Photos app. Furthermore, Photoshop Express allows for fine-tuning the rotation axis, which is particularly useful for correcting perspective distortions in document captures. Besides, it will enable you to easily flip images horizontally or vertically, allowing you to correct orientation errors. It will also help you to unblur pictures in Photoshop and enhance overall image clarity. Here's how you can utilize Photoshop Express to change photo orientation on iPhone.
Step 1 Download and Login to Photoshop Express
First, download the Photoshop Express app from the App Store. After installation, open the app and log in with your Adobe ID or create a new account. Once logged in, grant the app permission to access your photos, which will allow you to select the image you wish to edit.
Step 2 Access the Photo and Editing Tools
Navigate to the photo you want to change the orientation of. Then, tap the image to open it within the editor, revealing a toolbar at the bottom of the screen. Afterward, tap on the "Crop" button and press the "Rotate" option. This will open a slider that permits you to adjust the rotation angle precisely, or you can choose one of the preset 90-degree rotations. Once done, tap the "Save" icon and export the image to your camera by clicking the "Save" option again.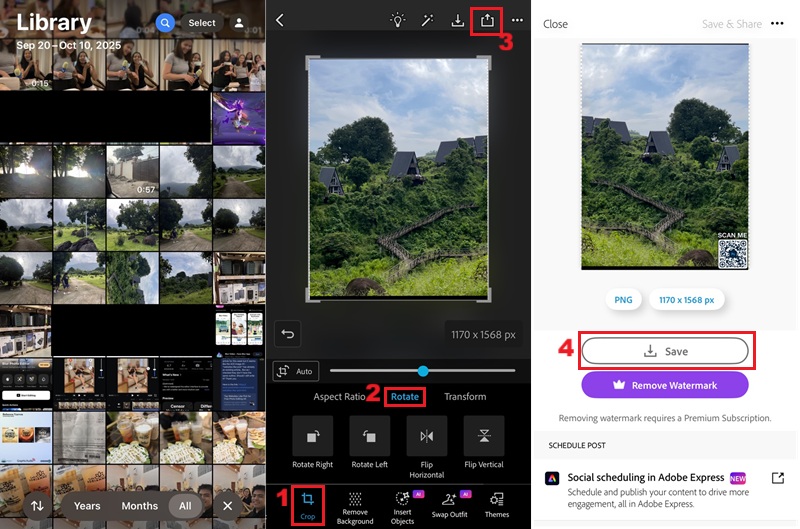
2. Snapseed
Another option you can use to rotate photo on iPhone is Snapseed. It is a comprehensive image editing application developed by Google that allows you to change the orientation of your photos with advanced precision. With this tool, users can manually adjust the rotation angle, offering a level of control. It’s especially helpful for images that look a bit crooked, letting you make small adjustments instead of just turning them in 90-degree steps like most basic editors do. Additionally, this photo editing app also has a Perspective tool that helps fix tilted or slanted images. This feature is especially valuable when taking pictures of documents, as the phone’s angle can cause them to appear uneven. It corrects the shape so your photo looks straight and clear. You can also use the Healing feature of the tool to remove date from pictures and enhance the overall aesthetic of your images.
Step 1 Download and Launch Snapseed
The first step is to download the Snapseed application. On your App Store, search for Snapseed and tap "Get" to commence the download and installation procedure. Once installed, launch the application and permit it to access your device's photo library.
Step 2 Access Perspective
Afterward, tap the "+" icon to import the photo you wish to edit. Tap the image you want to edit and press the "Done" option on the top right corner of your screen. Then, select the "Tools" option from the bottom menu, followed by the "Perspective" feature.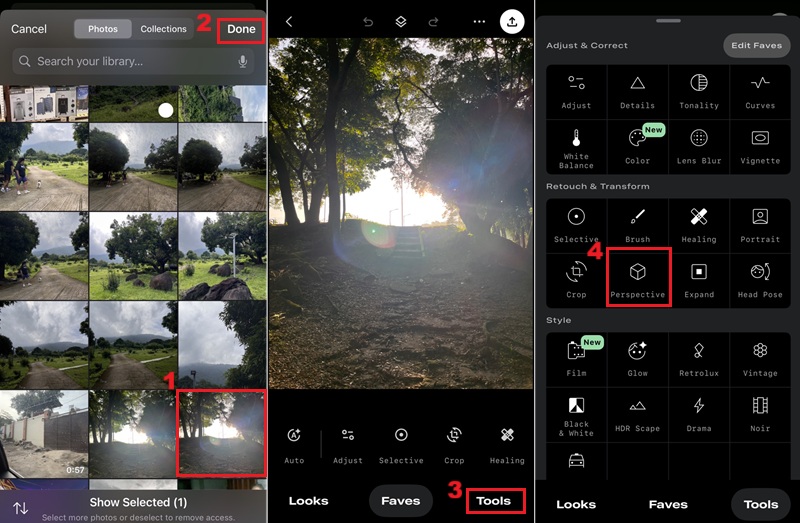
Step 3 Rotate the Image
Within the Perspective tool, you can manually adjust the rotation angle by dragging the image with your fingers. You can also tilt, scale, or freely adjust the image by tapping the "Free" option. Additionally, you don't have to worry about losing parts of your image, as it intelligently fills the empty spaces. Once done, tap the check icon to confirm the adjustment and then proceed to save your edited image.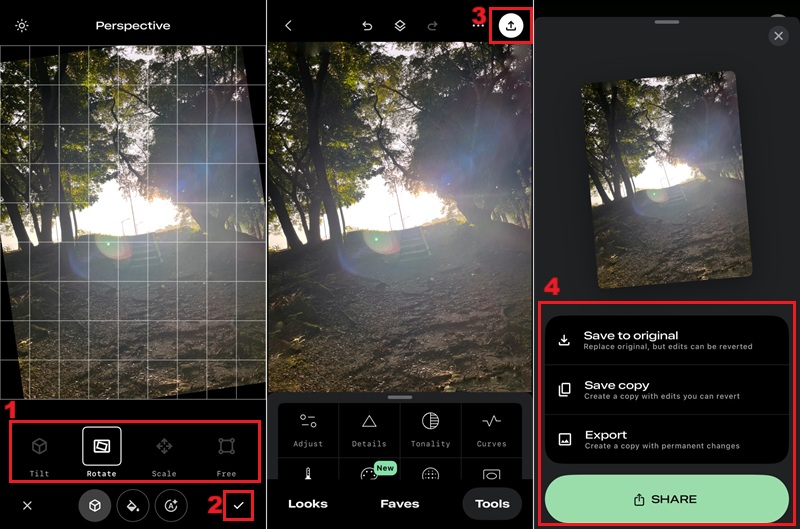
Rotate Photos on iPhone in Batch
If you need to rotate many photos at once, you can use the Shortcuts app on your iPhone. This app lets you create an automation that rotates multiple images at once, saving time and effort. This feature is particularly helpful for photographers or anyone managing a large number of images. It keeps your photo collection neat, consistent, and ready for sharing or organizing. When it comes to the number of photos you need to rotate with this application, it can handle small (5-6 images) batches as well as large(15-20 images) collections. However, ensure you have enough storage space on your device to accommodate the processed images. Here are the step-by-step instructions for utilizing the Shortcuts app to perform batch rotations efficiently.
Step 1 Create New Shortcut
Start by finding the Shortcuts app on your iPhone and opening it. If you don't have it installed, you can download it from the App Store, as it is a free first-party application from Apple. Within the app, tap the "+" icon on the upper right corner of the screen to create a new shortcut. Then, click the "New Shortcut" to access the rename option and provide a descriptive name.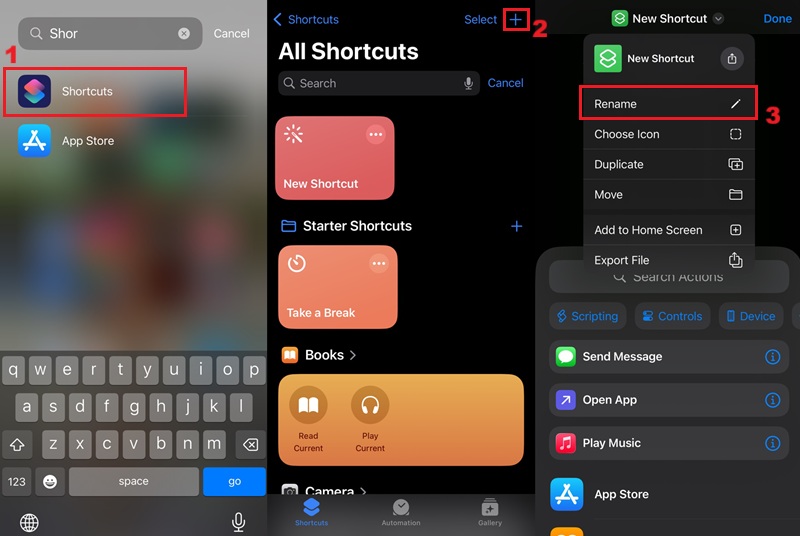
Step 2 Add Actions to the Shortcut
Once you have renamed the shortcut, tap on the "Search Actions" search bar. Here, you can search for the Photos app and scroll down to find the "Select Photos" action. Tap on it and enable the "Select Multiple" option to allow you to pick multiple photos at once. Next, add another action by searching for "Rotate Image" and specifying the desired degrees of rotation.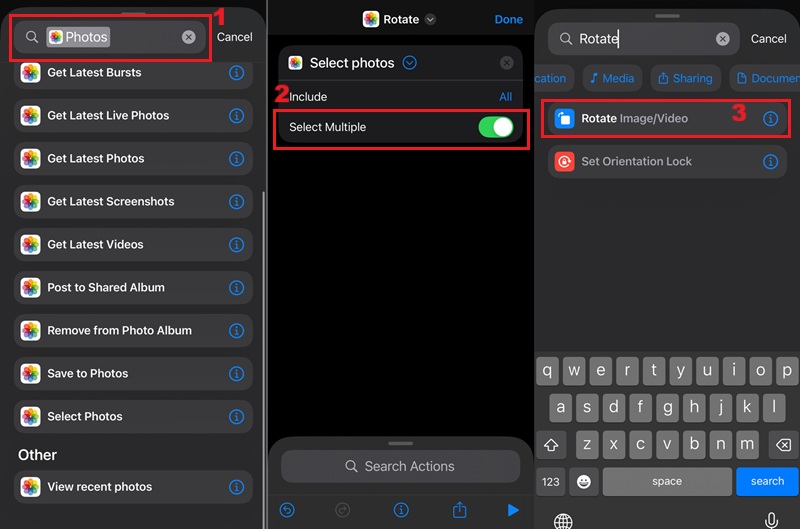
Step 3 Save and Run the Shortcut
After that, tap the "Search Action" again to search for "Save to Photos", which will store the rotated images directly into your photo library. Then, tap the "Done" option to save the shortcut you created. Finally, execute the shortcut by tapping on its icon in the Shortcuts app, selecting the image you want to rotate, and tapping the "Add" option. Then, it will automatically process and save the image on your iPhone.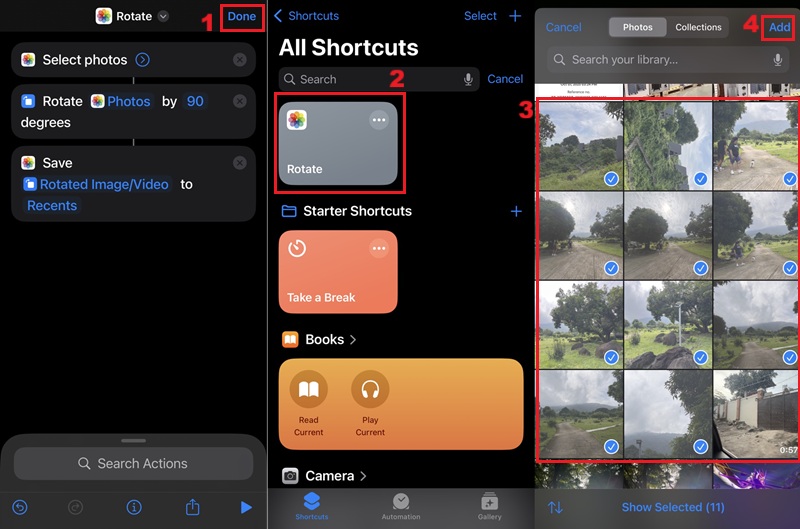
Bonus Tips: Make your Images More Appealing
Beyond basic rotation, you can enhance your photos with simple editing tools. For example, the AceThinker AI Image Generator and Editor offers many advanced features to improve your iPhone images. With it, you can clean up photos, remove unwanted stickers or backgrounds, and enhance image quality by upscaling. In addition, it also lets you compress images to reduce file size without compromising the grade/quality of your image. In that line, we will show you how you can use the image compressor and upscaler of the online tool.
Compress Image Tool
This feature of the AceThinker AI Image Generator and Editor optimizes image file sizes. It makes them manageable and efficient for storage, sharing, and faster loading on web platforms. It enables you to select the compression quality, allowing you to balance between file size reduction and visual fidelity. Besides, it supports a wide array of image formats, such as JPG, PNG, and WebP. It also supports up to 10MB file size for each uploaded image, allowing you to process high-resolution images. Moreover, it is accessible on multiple browsers like Safari, Chrome, and more, so you can reduce the photo size on your iPhone. Below are the steps required to utilize this image compression tool effectively.
Step 1 Access the Compress Image Tool
On your preferred web browser, go to the AceThinker Ai Image Generator and Editor. From the main interface of the online image editor tool, click the "More" option to uncover additional functionalities. Then, select "Compress Image" from the tools presented.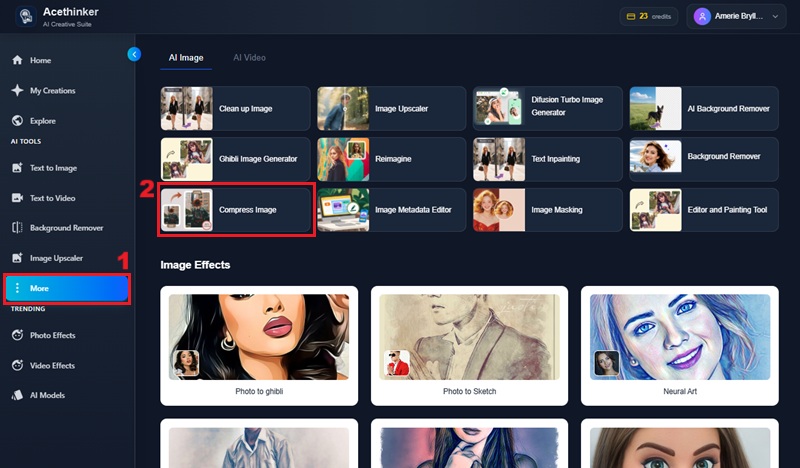
Step 2 Upload Image
Once you are on the Compress Image page, click the "Drop your images here" option. Then, select the image you want to compress, and hit "Open." Alternatively, you can drag and drop the photo into the designated area to initiate the upload process.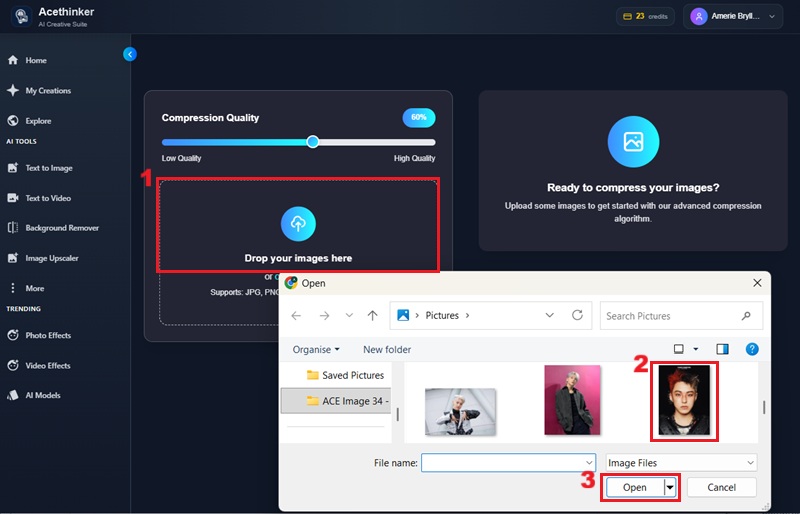
Step 3 Compress the Image
After the photo is uploaded, the online tool automatically compresses your image. You can modify the compression level to achieve your preferred balance between file size and image quality. Once you are satisfied with the compression, click the "Download" option under the image you compressed to save it on your device.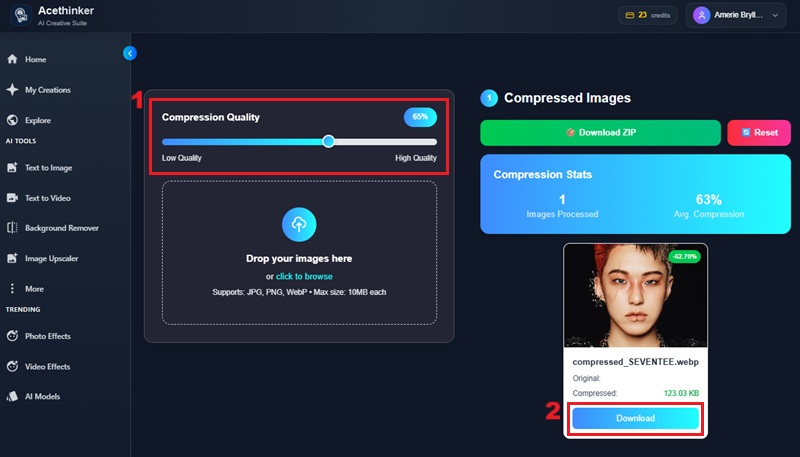
Image Upscaler
Another option to make your rotated image more visually appealing is to utilize an image upscaler, which employs artificial intelligence to enhance resolution. This feature of the tool is ideal for enlarging images without pixelation, making them suitable for high-quality prints or detailed digital displays. With the upscaling factor of the tool such as 2X, 3X or 4X, you can significantly improve the clarity and sharpness of your photographs. Apart from that, the process is simple and intuitive, allowing you to enhance your images with this tool easily. You can go through the guide below to upscale your pictures with this online tool.
Step 1 Launch the Image Upscaler
Navigate to the AceThinker Ai Image Generator and Editor website. From here, pick the "Image Upscaler" option on the left panel of the online image editor tool. Then, it will direct you to the main interface of the image upscaler.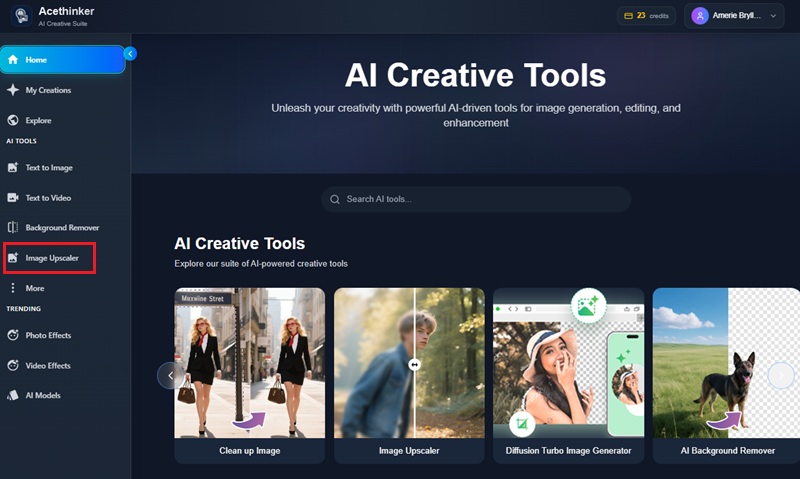
Step 2 Open the Image
To begin the upscaling process, click the "Upload Image" option. Afterward, your file explorer will open, allowing you to select the desired photograph from your device for enhancement. Once you've chosen the image you need to enhance, click the "Open" option.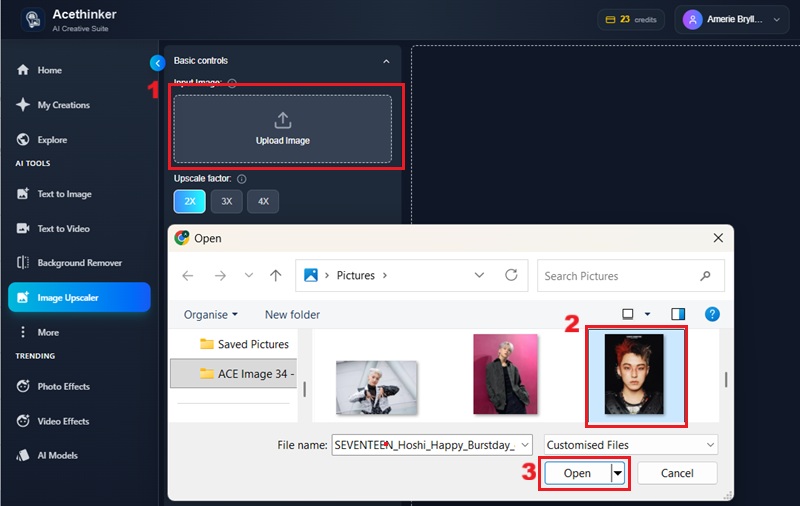
Step 3 Upscale Image
Once the image is uploaded, you will see it on the interface of the tool. From here, select your desired upscaling factor and choose the image format you want. Once all set, hit the "Upscale Image" option to initiate the AI-driven enhancement process. After that, hit the "Download Image" option beneath the image you have upscaled.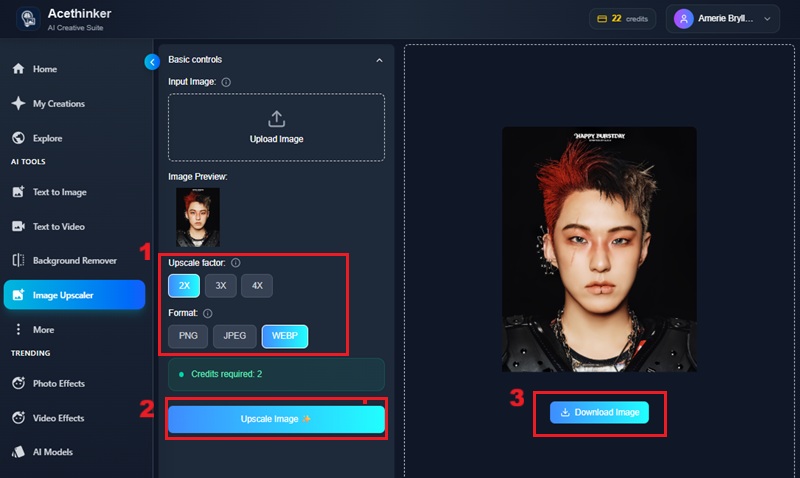
Frequently Asked Questions
Can I rotate a picture in my camera roll?
Yes, images within your camera roll can be directly rotated using the built-in editing features of the Photos app on your iPhone. With this application, you can effectively crop, rotate, flip, or alter the size of your photos.

Where can I find the rotated image on my iPhone?
You can find your rotated images stored directly in the Photos app on your iPhone. You can access the Recent album to locate the most recently modified or added images. Alternatively, you can browse through the “All Photos” section to find them chronologically.
Is there a way to batch process image rotations on an iPhone?
Yes, with the Shortcuts app, you can create a custom workflow to batch-rotate multiple images on your iPhone. This method allows you to streamline the process of applying the same rotation to several photos simultaneously.
Wrapping Up
Rotating photos on your iPhone is quick and easy, thanks to the different built-in tools available. You can use the Photos app, Shortcuts app, or third-party editors like Photoshop Express and Snapseed. These tools help you fix orientation issues and make your pictures look just right. These methods not only correct sideways or upside-down photos but also help improve the overall composition of your images. Furthermore, using batch rotation through the Shortcuts app saves time, especially when managing multiple photos. In short, iPhones offer flexible and convenient ways to rotate and refine your images, ensuring they’re always ready to view, share, or print perfectly.
| Tool | Rotation Control | Best For | Extra Features |
|---|---|---|---|
| Photos App | 90° per tap | Everyday users who want quick fixes | Crop, flip, basic edits |
| Photoshop Express | Any custom angle (slider) | Users needing precise rotation or professional touch | Fine-tune rotation axis, flip, enhance clarity, unblur |
| Snapseed | Manual free rotation | Users editing photos or documents needing alignment | Perspective correction, healing tool, skew fix |
| Shortcuts App | Custom degree (set by user) | Photographers or users handling many images | Batch rotation, automation, save to Photos |