
 The glare in photographs is a bright, washed-out spot or reflection that is formed when light is reflected on smooth surfaces like glass, metal, or water. It is usually brought about by direct sunlight, extreme indoor light, or intense camera flash. These bright spots are capable of concealing critical details or even color distortion and lower image contrast, making the subject seem flat or dull. As an example, when a portrait is taken close to a bright window, it will result in the face of the individual appearing dark as the window glare takes over the entire picture. Here, we will discuss why glare occurs and how it may be avoided when shooting by modifying the angle, employing filters, or regulating the amount of light. We will also take you through the process of eliminating glare later with the help of a trusted photo-editing software. The point-by-point guidelines will assist you in reviving details, natural color, and image balance. At the end, you will understand how you can remove glare from photo and leave your photos clear and with a professional appearance at all times.
What Causes Glare in Photos?
A. Common Sources of Glare
Glare in photos occurs when light reflects off shiny surfaces or enters the lens at certain angles, resulting in bright spots or washed-out areas. Understanding these common sources can help in both prevention and correction:
Glass Surfaces: Windows, eyeglasses, or display cases can reflect light directly into the lens. These reflections often cause unwanted highlights or obscured details, especially when shooting indoors with artificial lighting or outdoors with direct sunlight.
Water: Pools, lakes, or even puddles can mirror sunlight, causing reflections. Capturing images near water bodies, especially during midday, can result in significant glare, washing out colors and details.
Metal Objects: Polished metals or chrome surfaces often bounce light back into the camera. Items like car surfaces, jewelry, or kitchen appliances can produce strong reflections, leading to glare in photos.
Glossy Paper or Screens: Magazines, photographs, or digital screens can produce glare under direct light. When photographing documents, artwork, or electronic displays, the glossy finish can reflect light, creating distracting spots.
Ceiling or Overhead Lights: Light fixtures positioned above can cast reflections onto subjects or surfaces. In indoor settings, overhead lighting can illuminate reflective surfaces, leading to glare that diminishes image quality.
B. How to Avoid Glare While Shooting
To minimize glare during photography, adjust your shooting techniques and equipment settings. Begin by shooting during the golden hour, shortly after sunrise or before sunset, when sunlight is softer and less likely to cause harsh reflections. Additionally, using a polarizing filter can effectively reduce reflections from non-metallic surfaces like water and glass by blocking polarized light, enhancing color saturation and contrast. When positioning yourself, aim to shoot at angles that avoid direct reflections from overhead lights or windows. For instance, tilting your camera slightly or changing your position can help bypass glare hotspots. Employing a lens hood is another practical measure; it blocks stray light from entering the lens, reducing the chances of flare and glare. Lastly, adjusting your camera's settings, such as lowering the ISO, narrowing the aperture, or shortening the exposure time, can help control the amount of light entering the lens, further minimizing glare effects.

Best Method to Remove Glare from Picture
AceThinker PicWish is a great tool for how to remove glare from photo in a fast and easy way without losing the quality of the image. The high-quality AI-enabled Remove Object feature can perfectly spot and remove glare without interfering with the details in the background. The software is best at maintaining sharpness, texture, and natural tones so that your edited image appears clean and natural. PicWish is a professional-level tool with minimum manual effort and can be used by beginner and experienced editors. It works effectively even on such complicated surfaces as reflections on glass, shiny surfaces, or bright light spots. The application also allows you to save your edited photos in common formats like JPG and PNG, which do not change their original resolution and sharpness. AceThinker PicWish is an intelligent, reliable, and easy-to-use method of eliminating glare and improving the overall quality of your pictures, which makes it a reliable, fast, and convenient option.
Try it for Free
Step 1 Download and Launch PicWish
Visit the official PicWish website and download the desktop version compatible with your operating system (Windows or macOS). After the download has been made, proceed with the installation instructions. Once it is installed, one should open the PicWish application and start to remove glare objects.
Step 2 Add the Photo With Glare
In the main interface, the tool option of removing objects can be selected. Click on "Upload File" to import the image that you wish to edit. You have the option of either dragging and dropping the image file or navigating to find and select the image file on your computer. Next, to add the photo, click "Start" to open the photo in the editing workspace.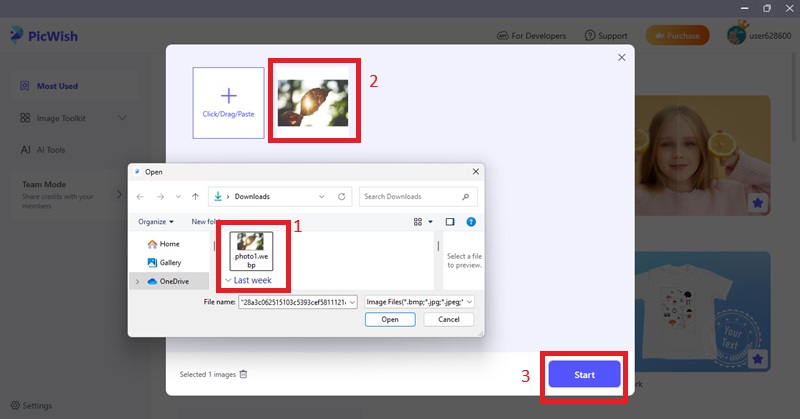
Step 3 Brush Over the Glare
Select the Brush Tool to be able to select carefully. Use the adjustment of the brush when necessary to have better control, in particular with smaller or non-uniform glare spots. Wipe the glare regions of the photo using a brush. With bigger or geometric glare spots, you can also use the Marquee or Lasso Tool. After marking the area, hit the button "Remove Now" and allow the AI to handle the correction. The tool will automatically fill in the chosen area with the use of surrounding textures and colors.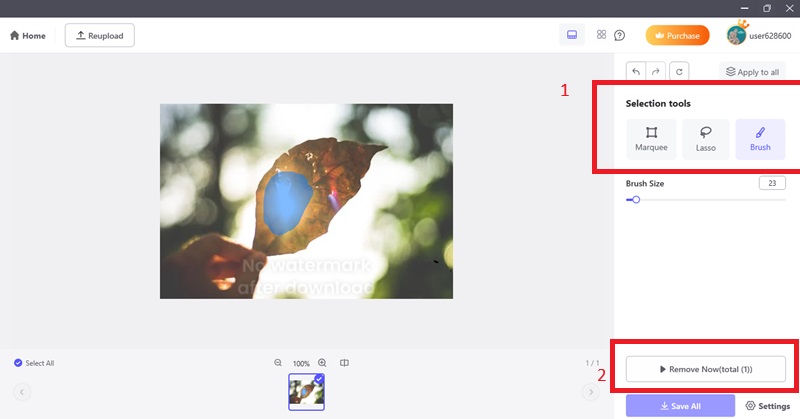
Step 4 Save the Edited Photo
Once the glare is removed and you are happy with the outcome, press the Save All button. Select the type of file (JPG or PNG) and the folder that you want on your device. The result of your photo editing will be a saved image that is without the distraction of the glare and with the correct quality of the image.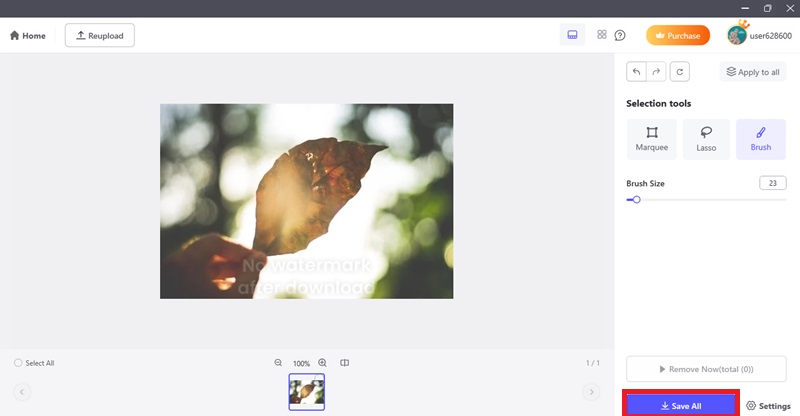
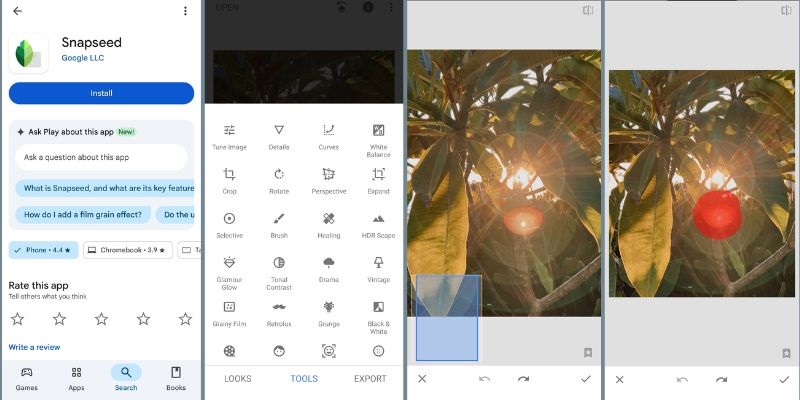
How to Remove Glare Using Snapseed
Snapseedis a free and professional-grade mobile photo editing app developed by Google. It is designed to offer high-level control over photo enhancements right from your phone. If you're wondering how to remove light glare from photo, Snapseed doesn’t have a built-in "glare removal" button, but it combines several intelligent tools, such as Healing, Selective Adjust, and Brush, that can help reduce the effects of glare and enhance photo clarity. The Healing tool is ideal for removing small reflective spots by blending them with surrounding pixels. In contrast, the Selective tool allows precise adjustment of brightness, contrast, and saturation in specific areas affected by light. The Brush tool, with options such as Exposure or Dodge & Burn, enables targeted light correction across glare-heavy areas. Snapseed's purpose is to provide users with intuitive yet powerful editing capabilities, helping them restore balance, detail, and natural tones in their photos without needing a desktop editor or complex software.
- To begin, download and install Snapseed from the Google Play Store or Apple App Store. Once installed, open the app and tap the large "+" icon to upload the photo with glare from your phone's gallery. The image will load into the main editing workspace.
- Next, tap on "Tools" at the bottom of the screen and select the "Healing" option. Zoom into the glare-affected areas using two fingers, then gently swipe your finger across the glare. Snapseed will intelligently fill the marked spot with surrounding pixels, blending it in naturally. If the result isn't perfect, you can tap "Undo" and try again with a more precise touch.
- Once satisfied with the edit, tap the check icon at the bottom right. Choose "Export" to overwrite the original image or "Save a copy" to keep both versions. Snapseed preserves the resolution and quality of the photo, making your final result glare-free and visually natural.
How to Get Rid of Glare in Photos with Photoshop
Adobe Photoshop is a professional image editing software renowned for its accuracy, manipulation, and adaptability. It works especially well when it comes to complex glare problems that may not be easily resolved with basic or mobile tools. Photoshop offers a set of superior options, including Clone Stamp, Healing Brush, Content-Aware Fill, and Adjustment Layers, all of which enable the performer to make corrections on a finer level without adversely affecting the quality of the image. Clone Stamp and Healing Brush tools are best used to replace areas covered with glare manually with clean textures of the rest of the image. In the meantime, Content-Aware Fill is an intelligent reflection remover that analyses and reassembles the chosen region with similar components. Adjustment Layers and Layer Masks provide users with complete tonal balance, exposure, and contrast capabilities, particularly in overexposed or bright areas. Photoshop is most suitable for users who require professional pixel-level editing to recreate significant image details lost due to glare.
- First, open Adobe Photoshop and import your picture into the file by clicking on the file and then selecting the "Open" button. After the photo is open, duplicate the original layer by right-clicking on it in the "Layers" panel and selecting the "Duplicate Layer" option. This allows editing without altering the original.
- The second step is to pick the "Clone Stamp Tool" in the toolbar. Enlarge the region of glare to work more accurately. Press and hold the Alt key, and then you will be able to see a specific part of an image where you want to clone. Then place your cursor on top of the glare and start stroking it lightly to cover it. Move slowly on the work and frequently change the areas to make the texture appear natural.
- When you are finished with the cloning and the glare is covered smoothly, go to the File menu and select "Export" or "Save As" to save your edited photo without glare in the format of your choice. This procedure requires time, but it provides clean and detailed images, particularly when using textured surfaces or features on the face that are covered by glare.

AI-Powered Online Tool for Glare Removal
Numerous AI-based online applications can remove glare in a fast and convenient manner without the need to install software. One of the most popular is Imgkit, a browser-based tool that uses AI with speed and precision. It features an automatic glare removal tool powered by deep learning algorithms that detect and eliminate glare or reflections without the need for manual editing. By analyzing neighboring pixels, Imgkits fills in glare spots smoothly and naturally, resulting in a seamless, noiseless image. The tool supports high-resolution photos while preserving original quality, making it suitable for both professional use and quick fixes. Since it is a fully web-based solution, Imgkits requires no installation and works on any device, including smartphones and tablets, delivering results within seconds. Its combination of speed, accuracy, and ease of use makes Imgkits one of the best options for anyone looking for a simple yet effective way to remove glare from photo online.
- To get started, open your web browser and go to the Imgkits website. No download or installation is needed. Once there, click on the "Upload Image" button and select the photo affected by glare from your device. Imgkits supports common image formats like JPEG and PNG, and can handle high-resolution photos without quality loss.
- After uploading, the AI-powered glare removal process will start automatically. The tool analyzes the image, detects glare spots or reflections, and intelligently removes them by matching surrounding textures and colors. This usually takes just a few seconds, depending on your image size and internet speed.
- Once the process is complete, you will see a side-by-side comparison of the original and the glare-free image. Review the result carefully, and if you are satisfied, click the "Download" button to save the edited photo back to your device. Imgkits preserves the sharpness and natural look of the photo, providing a clean, glare-free image with minimal effort.

FAQs
What is the cause of glare in photos, and why is it so hard to eliminate?
Strong lights that reflect on a glossy surface, such as glass, water, metal, or screens, cause glare. It tends to create bright spots or washed-out regions, damaging the image information. It is challenging to eliminate because glare typically overexposes a portion of the image, thereby losing or deforming the original pixel data, and sophisticated tools are required to rebuild the section intuitively.

Is it possible to eliminate glare in a photo without compromising image quality?
It can be done, and glare can be eliminated without dulling the image quality by applying resolution and texture-preserving tools. Intelligent software such as AceThinker PicWish is AI-powered, and it works on the idea of matching neighboring pixels to fill in the glare spots, so you can remove sun glare from photo areas and adjust the image to its original appearance without losing sharpness and clarity.
Should it be fixed in editing or avoided when taking the photo?
Glare can be reduced by editing, but it is always best to avoid it on the photo shoot when possible. Glare can be reduced by using such techniques as changing the shooting angle, not being in direct light sources, or putting on a polarizing filter. However, in cases where glare cannot be avoided, editing tools can serve as a good contingency measure.
Conclusion
Removing glare from photos doesn't have a one-size-fits-all solution; different tools work better depending on the type and severity of the glare. In case of short-term solutions, particularly when on the fly, mobile applications are efficient and quick. The online tools powered by AI offer automatic glare elimination with minimal effort, making them suitable for casual users looking to remove reflection from photo collections easily. Desktop programs provide more accurate control and professional-level output when more intricate edits are required. Simpler tools are often better to start with, and more advanced tools can be explored as needed. To enhance your skills in editing and knowledge of glare correction, you should practice on different photos with varying lighting conditions. The more you practice, the more you will master the restoration of the natural images, free of glare, without losing the quality of the original images.