VLC Media Player has been the go-to choice for millions because it's free, works on almost any device, and plays virtually any video format without needing extra downloads. Whether on Windows, Mac, or Linux, VLC handles video playback effectively. But as more of us move toward watching content in 4K, the experience isn't always as smooth as we expect. While VLC supports 4K playback, many users experience issues like freezing, audio delays, or choppy visuals. These issues can turn what should be a stunning, high-quality experience into something frustrating and barely watchable. Even powerful systems can struggle if VLC isn't set up properly or the file format isn't fully supported.
Before diving into fixes and workarounds, let's start with the real question most users have when this happens: can VLC play 4K videos the way it should? This guide breaks down everything you need to know to play 4K video in VLC without frustrating interruptions or cryptic error messages.
Can VLC Play 4K Videos?
Yes, VLC Media Player can play 4K videos. As a highly capable open-source media player, VLC supports various video formats and resolutions — including 4K and even 8K, without requiring additional plugins. Its internal decoding engine can handle advanced video codecs such as H.264 and H.265 (HEVC), commonly used in 4K content. However, smooth playback doesn't solely depend on VLC's capabilities. Your system hardware, video file type, and specific software settings can greatly influence the viewing experience. For example, an older CPU or an underutilized GPU might result in slow rendering or lag, even if VLC technically "supports" the file.
While VLC is certainly capable of playing 4K content, real-world performance may still face challenges. If you want to avoid any lag or stuttering, like in this article, you'll find detailed tips in the following sections to help you fix VLC Media Player and achieve smooth playback of your 4K videos

Common Issues with 4K Playback in VLC
Lagging and Stuttering: One of the most reported problems with 4K playback in VLC is video lag or stuttering. This usually happens when the media player struggles to keep up with the high bitrate and frame rate of 4K content. Playback can become choppy and unwatchable if your system doesn't have a powerful GPU or enough RAM or if VLC isn't configured to use hardware acceleration.
Error Messages: VLC might throw up messages like "File reading failed" or "VLC can't recognize the input's format" when it encounters a 4K file that it doesn't fully support. These errors often stem from unsupported codecs, corrupted files, or incomplete downloads. Without the proper decoder or if the video is encoded with a newer standard like H.265/HEVC, VLC may refuse to open the file or crash entirely.
Audio Out of Sync: Another frustrating issue is when the audio and video go out of sync, especially with large, high-resolution files. This can happen when VLC is overwhelmed trying to decode both streams in real-time. A delay in video stream processing often causes the audio to continue normally, creating a disjointed and distracting experience.
VLC Freezing or Crashing: Sometimes, VLC doesn't just lag — it completely freezes or crashes while attempting to play a 4K file. This behavior is commonly caused by a lack of system memory or conflicts between VLC's settings and the video's encoding. In particular, playback of ultra-high-bitrate content on underpowered devices can push VLC past its limits, forcing the app to shut down unexpectedly.

Eight Methods to Play on VLC without Any Errors
Many users experience stuttering or choppy visuals while trying to play 4K videos in VLC. 4K playback is resource-intensive, and even though VLC is a powerful media player, it needs the right settings and system support to perform well. If you’re trying to fix VLC Media Player for better performance, the key is to make targeted adjustments rather than random changes. Below are eight tested methods that can help you achieve smoother 4K playback in VLC.
Method 1. Compress and Convert 4K Video Files
If you experience lag with demanding formats like MKV or HEVC, converting them to a more compatible format can help. VidElement is a standout tool for this task. It supports a wide range of video formats, including MP4, MOV, AVI, and MKV, and is known for maintaining excellent video quality during conversion. Unlike many converters that degrade clarity, VidElement preserves the sharpness, color accuracy, and detail of the original 4K file. It’s powered by Blu-Hyper acceleration, which uses Intel, NVIDIA, AMD, and NVENC GPUs to speed up the process without overloading your system. Beyond conversion, it also includes helpful editing features like trimming, cropping, subtitle support, and visual effects. To use it, simply load your 4K file, select MP4 (H.264) as the output, enable GPU acceleration, and start the conversion. The result is a lighter, smoother video that plays seamlessly in VLC.
Try it for Free
Step 1 Download and Install VidElement
To begin improving your 4K playback in VLC, download VidElement on your computer. Pick the version that matches your computer system, then run the installer and follow the prompts to complete the setup. Once installed, open the application—this is the first step toward converting heavy 4K files into smoother, VLC-friendly formats.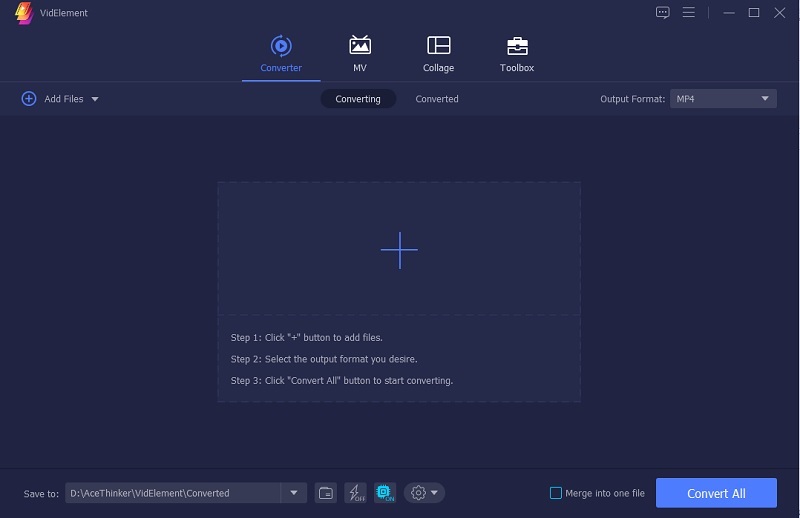
Step 2 Import the Video File
After launching the software, click the "Add Files" button or the plus icon in the center to load your 4K video. Navigate through your folders to select the video lagging or causing issues in VLC. Once added, the video will appear in the main interface and be ready for configuration and format adjustments.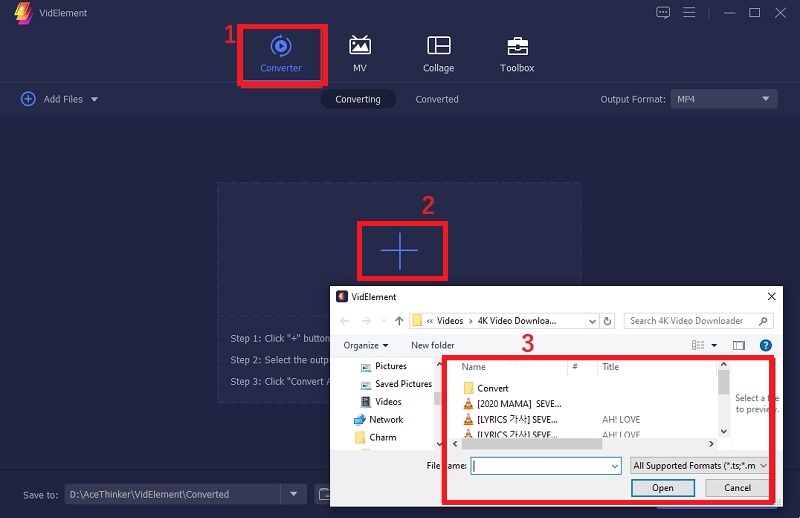
Step 3 Choose your Output Preference
Look to the right side of the loaded video and click on the "Output Format" menu. From here, choose a playback-optimized format like MP4 (H.264) and set the resolution to either retain 4K or downgrade to 1080p for better performance, depending on your needs. Don't forget to enable GPU acceleration from the settings for faster conversion.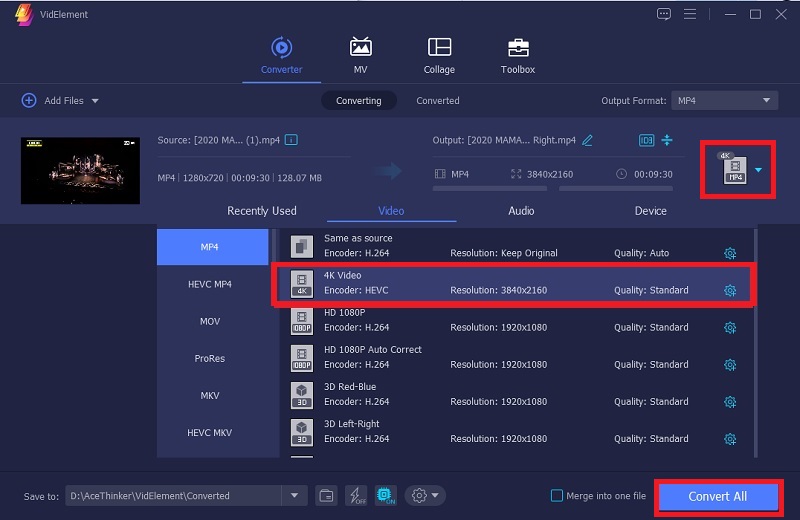
Step 4 Start Conversion and Save the File
Click "Convert All" to begin processing your video with the new settings. VidElement will handle the file efficiently while preserving its quality, and once it's done, the output folder will automatically open. From there, you can test the new version directly in VLC—it's now optimized for smoother, more stable 4K playback without stutters or delays.
Method 2. Update Graphics Card Drivers
Your system's graphics card (GPU) plays a major role in decoding and displaying high-resolution video like 4K. If your drivers are outdated or corrupted, VLC might not be able to properly leverage your GPU for hardware acceleration, causing performance issues such as lag, screen tearing, or outright crashes. Updating the drivers ensures compatibility with newer codecs, better resource management, and more stable 4K playback. Both integrated and dedicated GPUs benefit from frequent driver updates. NVIDIA, AMD, and Intel all release regular driver updates that improve multimedia support. It's especially important to update drivers if you've recently updated your operating system, installed a new game, or started experiencing video glitches in VLC or other players.
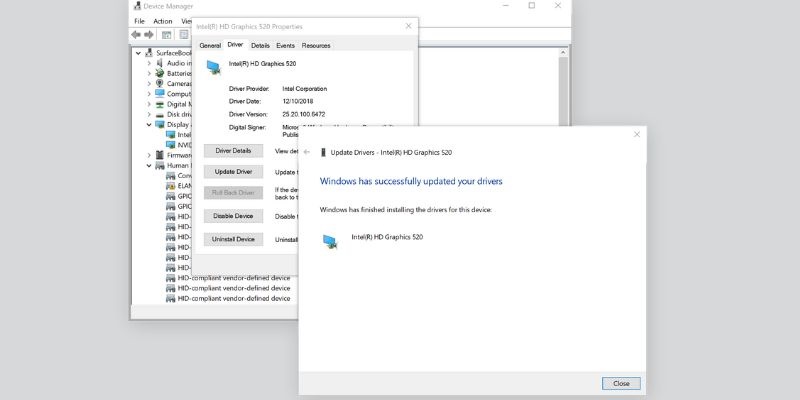
- Open Device Manager (Windows) or About This Mac > Displays (macOS) to check your GPU model. Expand Display adapters on Windows to see the name and manufacturer.
- Use their auto-detection tool or search manually for your GPU's latest driver version. Make sure to select the correct OS version before downloading the installer. Install the driver following the on-screen instructions and restart your system afterward.
- Open VLC and play your 4K video again to see the improved performance. With updated drivers, VLC will better utilize GPU decoding and reduce CPU usage.
Method 3. Update VLC to the Newest Version
It might sound simple, but many playback problems in VLC are caused by using outdated software. Each VLC update brings critical bug fixes, improved support for modern video codecs (like AV1 or HEVC), and better hardware compatibility. Some older versions of VLC may struggle to decode new video file formats or fail to use available system resources fully. Updating VLC is necessary if you're experiencing problems with 4K videos. Newer builds also provide better multi-threading and optimized memory usage, directly affecting high-resolution playback. Staying on the latest version ensures that VLC can take advantage of your GPU, system RAM, and CPU enhancements, which are especially important as 4K becomes the norm.
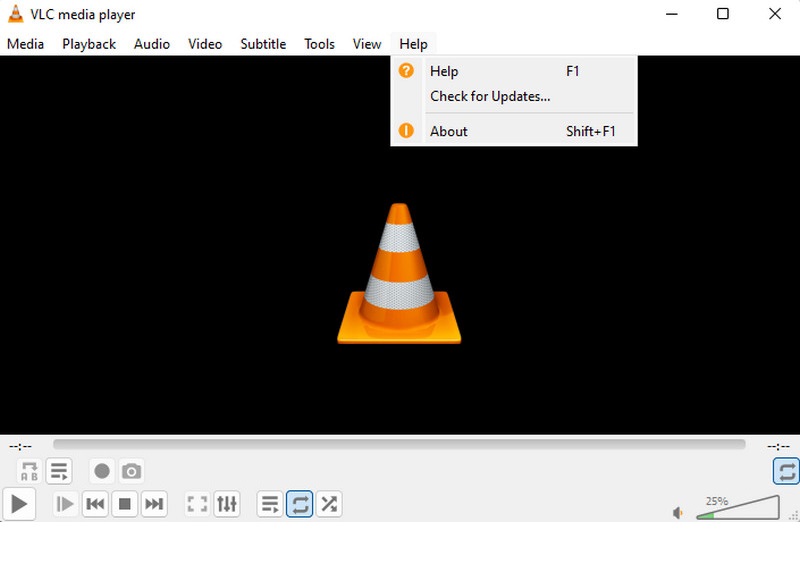
- Keeping VLC Media Player updated to the latest version is important to ensure it runs 4K videos without lag. Begin by opening VLC Media Player, then navigate to the Help menu at the top and select Check for Updates. If you're on a Mac, click on VLC in the menu bar and choose Check for Updates from the dropdown. VLC will automatically search for available updates and notify you if a new version is ready to install.
- If an update is available, click Yes to begin downloading and installing. The installer will safely replace the older version while preserving your preferences and settings. The update usually takes just a few minutes to complete.
- After the installation, restart VLC and reopen your 4K video to check the playback. Updated versions often come with improved decoding, better performance with modern GPUs, and fewer compatibility issues—making this a simple yet effective step for smoother 4K viewing.
Method 4. Change the Hardware-Accelerated Decoding Setting
VLC supports hardware-accelerated decoding, which offloads video decoding tasks to your GPU instead of your CPU. This often improves playback—especially with computationally heavy 4K videos. However, if you find a 4K video not playing smoothly in VLC, hardware acceleration could be part of the issue. On some systems, enabling it may lead to instability, green screens, broken frames, or unexpected crashes. That’s why it's important to test different settings and choose the one that suits your hardware. VLC allows you to enable, disable, or manually select a specific acceleration method depending on your GPU and operating system. For relatively modern systems, enabling it with the appropriate API—such as DXVA2 for Windows or VideoToolbox for macOS—typically delivers smoother results. But if issues persist, disabling hardware acceleration might actually stabilize playback and improve your viewing experience.
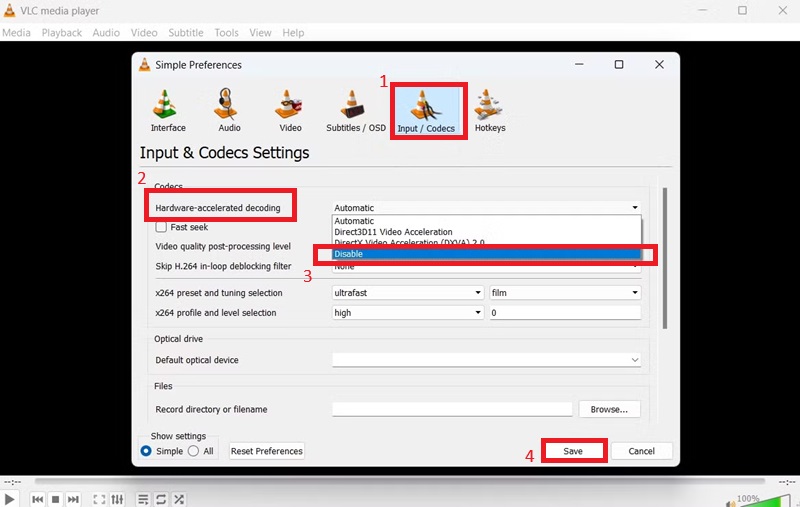
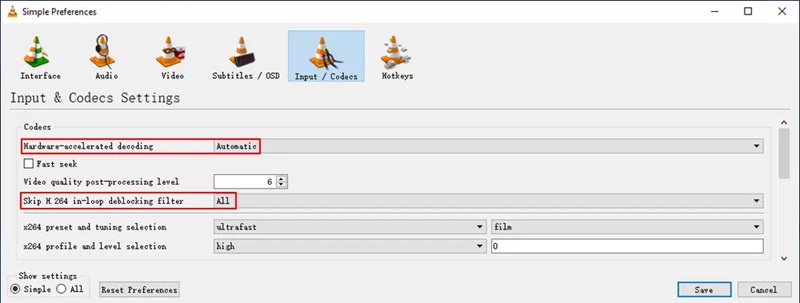
- Open VLC Media Player, select Preferences, then go to the Tools menu. In the Preferences window, click on the Input/Codecs tab. Look for the setting labeled Hardware-accelerated decoding in the list of options. This is often set to Automatic by default, which may not always provide the best performance for 4K videos.
- To fine-tune this, use the dropdown menu to select a specific acceleration method. If you've experienced glitches or instability with hardware acceleration, you can set it to Disable for better stability. Remember that these settings' performance can vary depending on your GPU and its drivers.
- After selecting your preferred setting, click Save to apply the changes. Restart VLC for the settings to take effect. Finally, test the same 4K video file to see if the playback performance has improved. Experiment with the different options to determine which provides the smoothest and most stable experience on your system.
Method 5. Change Output Settings in VLC
The output module in VLC determines how video is rendered to your screen. If this module isn't well-suited to your system's graphics configuration, it can result in visual tearing, black screens, choppy frames, or slow rendering—especially with large 4K files. VLC offers a range of output options like Direct3D, OpenGL, DirectX, and others. The default setting ("Automatic") works for most, but switching to a specific output module may drastically improve playback on systems with certain graphics cards or drivers. This adjustment doesn't affect the file; it changes how VLC displays the video. Finding the right output setting can optimize rendering and fix many playback issues without additional tools or conversions.
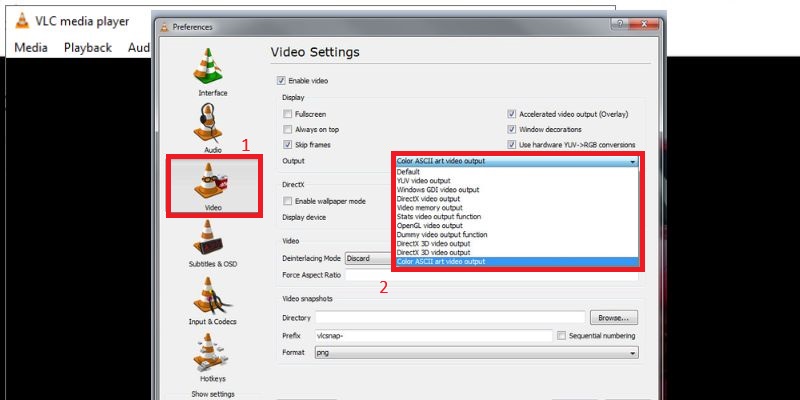
- Open VLC Media Player, navigate to the “Tools” menu and select Preferences. Once you're in the “Preferences” window, switch to the Video tab. Ensure that the "Enable video" checkbox is checked, which is essential for the video output settings to be applied correctly. If this option is unchecked, VLC will not display any video.
- Next, scroll down to find the “Output” dropdown menu within the “Video” section. This is where you can select an output method to improve video rendering. Windows users should choose Direct3D or DirectX for optimal performance, as these often provide better results with 4K videos.
- After selecting the appropriate output method, click “Save” to apply the changes. Exit VLC completely and restart it to ensure the new settings take effect. Once you've reopened VLC, try playing your 4K video again and observe whether there's an improvement in playback smoothness. If you're still experiencing issues such as VLC not playing 4K content properly, you can revisit the settings and test different output modules to see which one offers better compatibility with your system. Adjusting the output method can often resolve hidden hardware or rendering conflicts that interfere with 4K playback.
Method 6. Change Skip H.264 In-Loop Deblocking Filter
The in-loop deblocking filter in H.264 enhances visual quality by smoothing out blocky edges during playback. However, this comes at a high processing cost, which can affect 4K performance—especially on older CPUs. VLC allows users to reduce or skip this filter to lower the decoding load. Doing so may slightly degrade image clarity but results in faster and smoother playback on resource-limited systems. This setting is particularly useful for users who experience frame drops or lag during fast-motion scenes. It won't affect your video file—how VLC renders it in real-time.
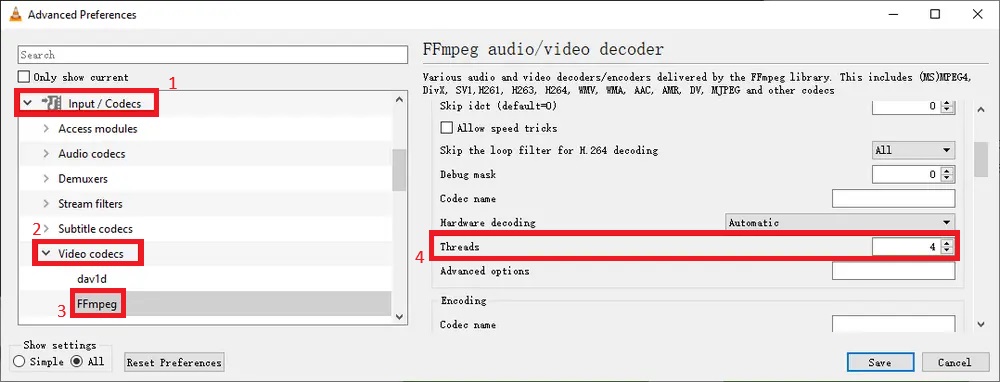
- Open VLC Media Player, go to the Tools menu and select Preferences. At the bottom left of the Preferences window, click on All to enable advanced settings, which will unlock a wider range of customization options for playback and performance.
- Next, in the expanded settings menu, navigate to Input/Codecs and then select Video Codecs, followed by FFmpeg. Within this section, you will find an option called "Skip the loop filter for H.264 decoding." This setting is designed to bypass certain video filters that could consume unnecessary processing power, especially when playing high-resolution videos like 4K.
- Click on the dropdown menu next to this option and select All to skip the loop filter completely during H.264 decoding. If you're looking for a middle ground between performance and visual quality, you can opt for Non-key or Non-ref. These options will skip fewer filters, balancing performance with a slightly better image quality. Skipping the loop filter helps reduce CPU load, making the playback smoother, especially for demanding 4K files.
- After selecting your preferred option, click Save to confirm the changes. Close VLC Media Player completely and then reopen it to ensure the settings take effect. Once reopened, play your 4K video and assess whether playback performance has improved noticeably. If the visual quality drops too much, you can go back into the settings and try a less aggressive filter-skipping option for a better balance between smooth playback and video quality.
Method 7. Increase the Threads Number in VLC
Modern CPUs come with multiple cores and threads, but VLC might not utilize them efficiently by default. Increasing the thread count for video decoding allows VLC to distribute the processing load across multiple CPU threads, making it more capable of handling the demands of 4K playback. This setting is especially beneficial for users with multi-core processors, as it leverages the available hardware to decode video faster and with fewer slowdowns. Adjusting this setting will not negatively affect your system but can significantly enhance VLC's performance when playing ultra-HD content.
- Open VLC Media Player, go to the Tools menu and select Preferences. In the Preferences window, click All at the bottom left to enable advanced settings, which will expand the available configuration options.
- Navigate to Input/Codecs, then Video Codecs, and select FFmpeg. In the right-hand panel, find the Threads setting and change the value from 0 (automatic) to a specific number based on your CPU's capabilities. For quad-core CPUs, set it to 4; for higher-end CPUs, you can set it to 8 or 16 for improved performance when decoding 4K video.
- Click Save to apply the changes, then close and reopen VLC. Test the playback of your 4K video to see if the performance has improved. If you are still experiencing issues, consider adjusting the thread count further to optimize playback.
Method 8. Increase File Cache Values in VLC
If VLC struggles to stream or read 4K video from a slower storage device, such as a USB drive or network source, increasing the file cache value can help. This tells VLC to preload more video into memory before playing it, reducing read errors and buffering interruptions. While this tweak doesn't increase video quality or frame rate, it can stabilize playback, especially for long 4K videos or files on external drives. This low-risk change can yield significant improvements in scenarios involving slower I/O performance or streaming from shared drives.
- Open VLC Media Player, go to the Tools menu and select Preferences. Click All at the bottom left of the Preferences window to reveal the advanced settings, which will give you access to more detailed configuration options
- Navigate to Input/Codecs in the left-hand tree view, select Access Modules, and click on File. In the right-hand panel, locate the File caching (ms) setting. By default, this value is set to 300ms, but you can increase it to 1000–2000ms for smoother playback. This setting determines how much of the video VLC buffers before it starts playing, so improving it can help with buffering issues, especially for 4K content.
- After adjusting the caching value, click Save to apply the changes. Close VLC completely and then reopen the program. Load your 4K video and check whether the playback is smoother, with fewer freezes or buffering delays. This adjustment is especially helpful for large videos stored on slower devices like external or network drives.

Frequently Asked Questions
Why is my 4K video choppy or lagging in VLC?
Several factors, including hardware limitations, outdated software, or improper settings, often cause choppy or lagging 4K playback in VLC. A common issue could be the lack of hardware acceleration, where VLC is not fully utilizing your GPU for decoding. Another reason might be the video output settings in VLC, which might not be optimized for your specific system, causing stuttering. Low file cache values can also lead to buffering, especially when trying to play 2160p on VLC, which demands more system resources than lower resolutions.

How can I improve 4K playback performance in VLC?
To enhance 4K playback in VLC, you'll need to adjust both the software and your hardware setup. First, enabling hardware acceleration in VLC can make a big difference. This can be done by going to Tools > Preferences > Input / Codecs and selecting "Automatic" or "Direct3D11 Video Acceleration" for Windows users. In addition, changing the video output settings in VLC, such as switching to OpenGL, may help with performance issues. If buffering or stuttering persists, increasing the file cache values in Tools > Preferences > Input / Codecs to around 1000 ms or higher can smooth out playback. Lastly, make sure both VLC and your graphics drivers are up to date, as newer versions often include performance fixes and optimizations.
Should I convert my 4K videos for better playback in VLC?
Converting 4K videos can be a practical solution if you're experiencing persistent playback issues. By reducing the resolution, such as converting 4K videos to 1080p, you can reduce the strain on your system, which may improve playback smoothness. Additionally, converting your video to a more VLC-friendly format like MP4 with H.264 encoding can help with compatibility and performance. While converting does impact the video's resolution, it can also ensure smoother playback without significant degradation in quality. A reliable conversion tool allows you to adjust the bitrate and resolution to balance quality and performance.
Conclusion
Playing 4K videos smoothly in VLC can sometimes feel frustrating, but with the right adjustments, it's entirely achievable—no need to abandon the player or settle for a choppy experience. You're not alone if you've ever run into a VLC 4K video choppy issue. Whether converting heavy video formats into lighter ones, updating your graphics drivers, or adjusting decoding and output settings within VLC, each method addresses a specific cause of playback disruption. Some fixes, like enabling multi-threaded decoding or increasing the cache buffer, focus on improving performance, while others help VLC interact more efficiently with your hardware. Since every system differs in configuration and capability, it's worth experimenting with these options one step at a time to determine which solution works best for your setup. VLC remains one of the most versatile media players out there, and with a few careful tweaks, it can easily handle even the most demanding 4K content.