
- On your Windows 10 computer, acquire the screen recorder, Aqua Demo.
- Select the specific region you want to record and start recording.
- When satisfied, stop the recording and save the video.
In the rapidly evolving digital communication landscape, screen recording has emerged as an indispensable tool, shaping how we convey information across diverse scenarios. From educational endeavors to troubleshooting sessions, the importance of capturing on-screen activities cannot be overstated. This transformative technology has become the anchor of effective content creation, enabling users to communicate complex processes and share insights with unparalleled precision. In that line, the significance of recording specific parts of the screen takes center stage. Focusing on the screen's precise elements becomes crucial for concisely conveying a message in a world saturated with digital information. Whether guiding an audience through intricate coding sequences or presenting a step-by-step tutorial, the need to direct attention to specific areas is paramount. While Windows 10 offers a built-in screen recorder, it might not be able to showcase your needs, so you will need another option for it. In this article, we will delve into the different solutions for how you can record a portion of your screen Windows 10.
Windows Built-in Recorder
Windows 10 has built-in screen recording options, providing users a convenient and accessible way to capture on-screen activities. One notable feature is the Xbox Game Bar, originally designed for gaming experiences. It seamlessly integrates screen recording capabilities, expanding its utility beyond the gaming community. While primarily recognized for gaming-related functionalities, it caters to a broader audience by offering audio capture and basic editing options. Users can record their on-screen actions and enhance their content by including system audio or adding rudimentary edits to refine their recordings. Nonetheless, this built-in screen recording cannot record specific part of screen Windows 10 since it only supports recording a full screen and specific window. Luckily, there are third-party tools that you can rely on; below are the top screen recorders you can utilize.
Top Screen Recorder for Windows 10
1. Aqua Demo
Aqua Demo takes the lead as a comprehensive solution, providing users with advanced features to precisely record section of screen Windows 10. The tool is designed with a customization recording area, which allows you to select to record an entire screen, select a window, or only a preferred section. In addition, the tools let users capture the webcam and around the mouse based on their needs, enabling users to highlight the details of their screen recording. To make your screen recording more informative, you can insert arrows, text, shapes, and more, which is ideal for tutorials and presentations. Besides, you can save your recorded video in numerous formats, such as MP4, MOV, WMA, AVI, and other video formats. Another good thing about this screen recorder is that it can record at a set time using its Task Scheduler features, making it convenient for recording live streaming videos.
Step 1 Get the Windows Recorder
First, get the Windows 10 screen recorder by clicking the Windows download button. Once the file installer is downloaded, you can follow the installation prompts to set it up on your Windows 10 system. Open Aqua Demo after installation. Familiarize yourself with the user-friendly interface.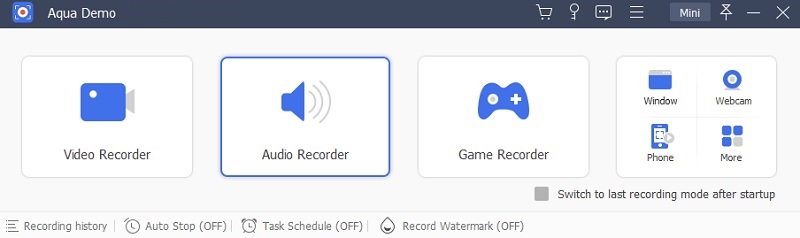
Step 2 Configure Recording Settings
You can do this by accessing the Settings of the tool. Click the "Hamburger" icon, then when the drop-down menu shows, click the "Preferences." Customize recording settings, such as resolution, output format, and frame rate, under the "Output" settings to align with your preferences. Click the "OK" button when you are pleased with your modification.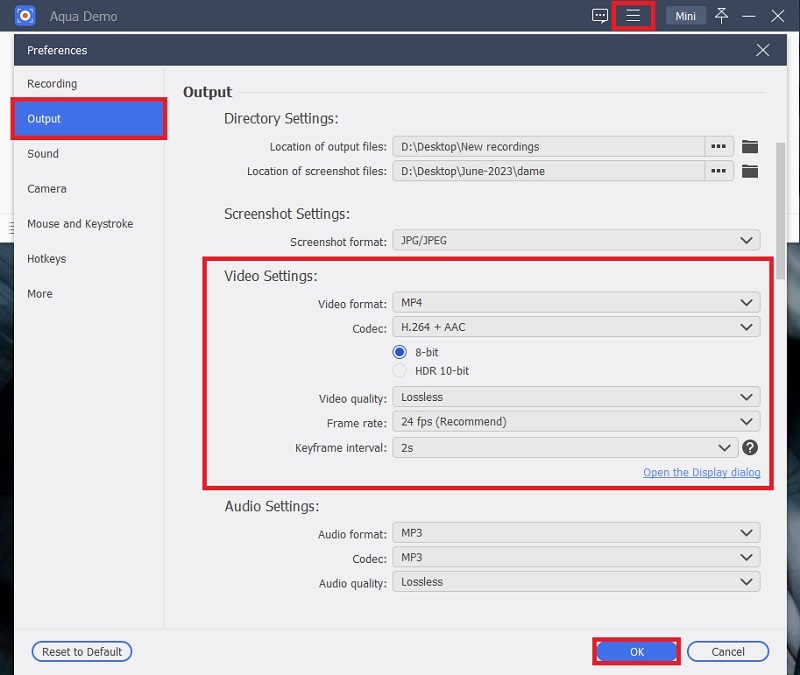
Step 3 Select a Specific Region and Start Recording
Click the "Video Recorder" on the tool's interface to take a screen recording. Then, you can select the "Custom" button to choose a specific part of your screen to record. After that, you can toggle the webcam button and system sound if it requires your preferences. Hit the red "REC" button to commence your recording.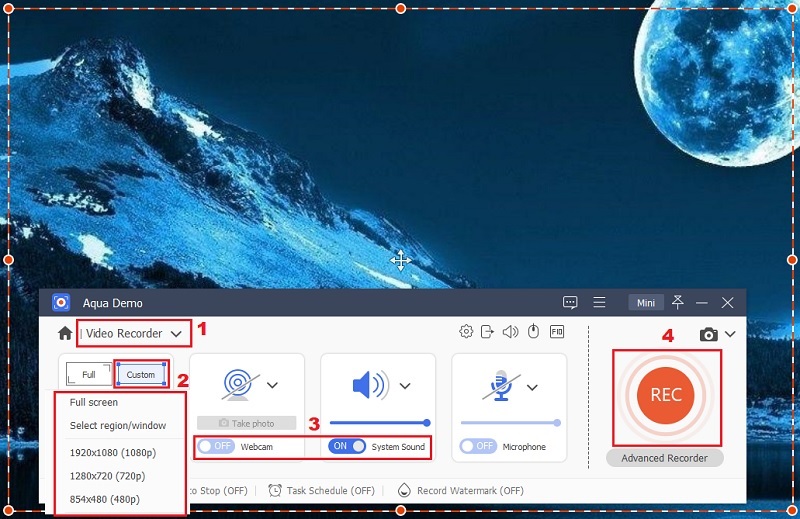
Step 4 Stop Recording on Windows
While recording, you can use the annotation feature of the Windows screen recorder by clicking the suitcase icon. You have the option to insert numbers, text, arrows, and shapes while recording. When your recording ends, hit the "Stop" icon represented by a small red square.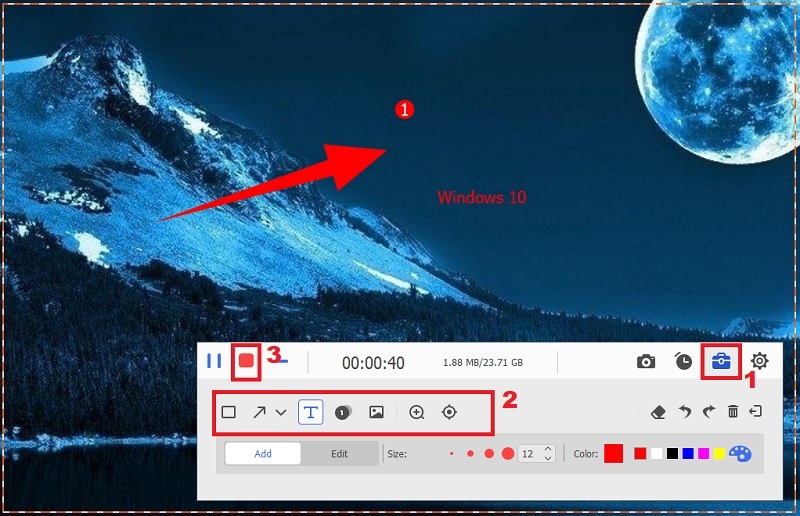
Step 5 Check the Video Playback on your Windows
Subsequently, a preview will emerge, allowing you to trim the video you have recorded. You can also access the "Advanced Trimmer" function to access the "Merge" and "Fast Split" functions of the tool. Hit "Done" to save the recording on your Windows computer. Then, you will be moved to the media library of the tool, double clicking the recorded video content will play on your Windows default media player.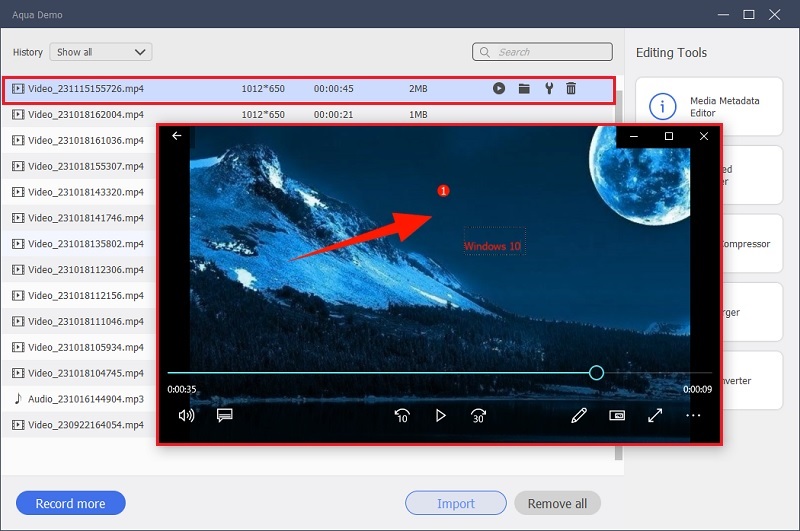
2. Icecream Screen Recorder
Icecream Screen Recorder arises as a straightforward and feature-rich screen recording tool compatible with Windows 10. It delivers a range of functionalities beyond the standard capture options. It can record video, audio, and webcam, making it a reliable screen recorder. The output format it supports ranges from WebM, MP4, AVI, and MOV, ensuring you can easily access the recording on various devices. It caters to different user preferences with options so you can record part of the screen Windows 10, full-screen recording, and even the convenience of area auto-detection. This is ideal for presentations, gameplay, or any scenario where capturing a specific screen part is essential. While Icecream Screen Recorder provides a robust set of features, it's important to note that the free version has a time constraint of five minutes for screen recordings.
- Begin by downloading the screen recording tool from the official website. Then, go through the installation prompts to fully install it on your device. Once installed, launch the screen recorder.
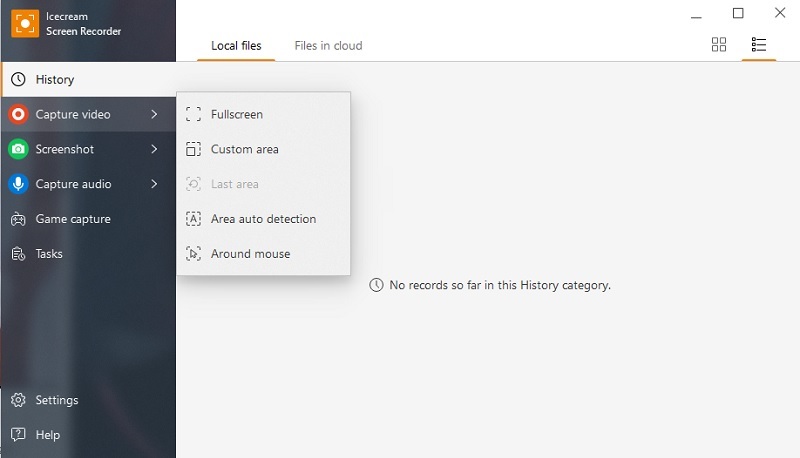
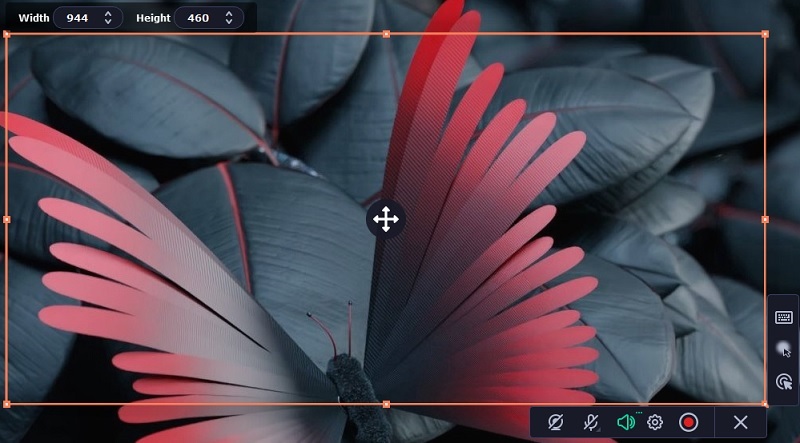
- Upon launching, the main screen presents options like "Capture video," "Game capture," "Screenshot," and "Capture audio." To record a specific part of your screen, click "Capture video" and select the "Custom area" option. Specify the area of your screen that you wish to record by dragging and adjusting the frame.
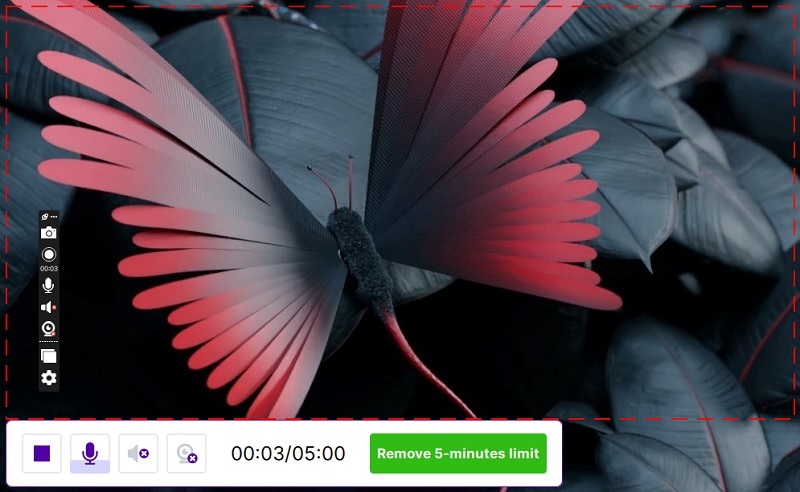
- Once you've chosen your desired recording area, click the "Rec" (Record) button to capture your screen. Perform the actions or tasks you want to record.
- When you're done recording, click the "Stop" button to halt the recording process. Icecream Screen Recorder will prompt you to save the recorded file on your computer. Choose the destination and file name as per your preferences.
3. Bandicam
Bandicam stands as a powerhouse in the realm of Windows screen recording, providing users with the capability to produce high-quality recorded videos. Tailored for those needing a reliable tool to create engaging and informative content, Bandicam presents many features that make it a top choice among content creators. It lets users record only part of screen Windows 10 or record in full screen. Furthermore, it empowers users to enhance their recording by incorporating voiceovers, annotations, and webcam overlays during the recording process. One standout feature of Bandicam is its customizable chroma key settings. This unique functionality enables users to create the chroma keys according to their preferences, providing control not always found in other screen recording tools.
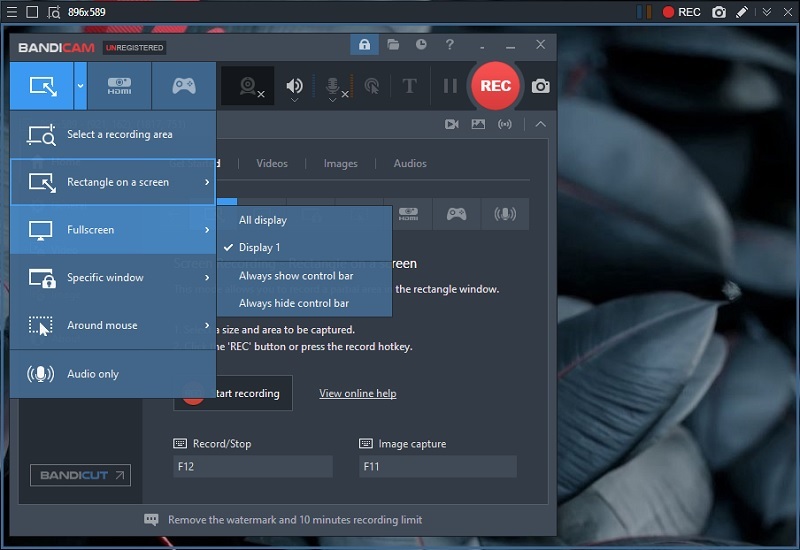
- Obtain the file installer of Bandicam by visiting the official website of this screen recorder. Then, go behind the installation instructions provided. Run the screen recorder on your Windows 10 computer.
- Navigate to the left side of the interface and click on the corresponding button. Choose "Select a recording area" or "Rectangle on a screen" from the drop-down menu. Pick the appropriate recording area and click the "REC" button to initiate the recording process. Perform the actions or deliver the content you want to capture.
- When ready to conclude the recording, click on the red button again. Access your recorded files by navigating to "Home" > "Video," where you can play, edit, and upload them to various platforms.
4. Movavi Screen Recorder
Another third-party screen recorder you can use to record partial screen Windows 10 is the Movavi Screen Recorder. It permits users to capture the whole screen or a specific portion of the screen. This tool enables users to set up the recording parameters before recording, resulting in more appealing recordings. Whether you are a seasoned user or a newcomer to the world of screen recording, its user-centric UI makes it an ideal choice for capturing in a precise manner what you need from your Windows 10 screen. To create a more informative video recording, it allows you to draw lines, shapes, and more while recording. This function lets users be more engaged in the recording as it gets the viewer's attention and conveys your message. Additionally, you can record streaming video Windows 10 in a high-resolution and clear audio. To use this screen recorder, you can see the guide below.
- Start by launching the Movavi Screen Recorder. If you still need to download it, go to its page and click the available download button. Then, install it on your Windows 10.
- Locate and click the "Record region" button on the main interface. When your cursor transforms into a crosshair, click and drag it diagonally to precisely choose the part of the screen you wish to record. Hit the red "REC" button to begin the recording process. A 3-second countdown precedes the recording, ensuring you capture what you intend.
- Once you have recorded all the content you need, hit the "Stop" button to conclude the recording. It provides editing options if necessary, allowing you to refine your recorded video. After editing, save the partial screen recording Windows 10 on your computer for future use or sharing.
5. ScreenRec
Last on the list you can utilize to record part of screen Windows 10 is ScreenRec. This screen recording tool is designed to facilitate instant video messages, and it proves indispensable in saving time. It simplifies communication by letting users swiftly demonstrate concepts and processes. With features like instant sharing and a drag-and-drop system, it is a powerful asset for businesses looking to enhance communication and collaboration. Moreover, users can capture the audio coming from the microphone or system sound. ScreenRec also lets users capture their webcam and choose their preferred recording quality. However, the free trial of the tool only allows users to record a 5-minute video, so if you need more time to record, you have to subscribe to its premium plan. Here are the steps you can take to use this screen recorder.
- Initiate by downloading and installing ScreenRec from the official website. Follow the installation prompts to set up the application on your system. Launch ScreenRec and adjust the settings according to your preferences.
- To record a specific part of your screen, use the drag-and-drop system to select the desired area for recording. Click the record button to trigger the screen recording.
- Once you've captured the necessary content, click the stop button. It facilitates instant sharing, so you can directly send the video to your colleagues or save it on your Windows computer.
Frequently Asked Questions
How can I reduce/lower background noise in my recordings?
To minimize background noise in your recordings, consider using a directional microphone, adjusting input levels, and leveraging audio editing software to apply noise reduction techniques. Additionally, recording in a quiet environment and strategically placing the microphone can significantly improve audio quality.

Can I record my screen without any additional software on Windows 10?
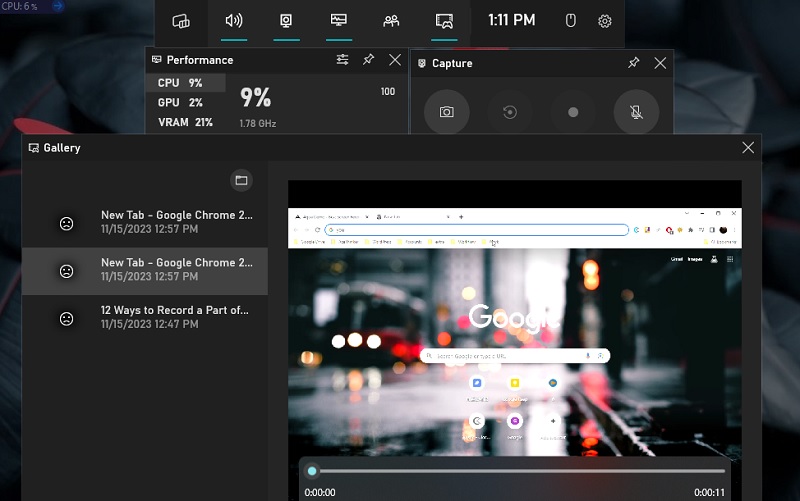
Yes, Windows 10 offers built-in screen recording options through the Xbox Game Bar, eliminating the need for additional software. Access the Game Bar by pressing Win + G, and you can initiate basic screen capture without installing third-party applications.
Which video formats ensure the highest video quality?
Commonly used high-quality formats include MP4 (H.264) and AVI for optimal video quality. The choice between these formats depends on specific needs and compatibility with editing or playback tools.
How can I record system audio along with the screen recording?
To capture system audio and screen recording, ensure that the selected screen recording software supports the recording of system sound. Adjust the software's audio settings to include system sound during recording, allowing for a comprehensive audio-visual capture.